Showing posts with label tutorial. Show all posts

Monday, February 12, 2018

"Jelly Fish" Mail Art | Sue Plumb


Hi VLVS friends!
Sue Plumb here today to share my project for Mail Art Monday. I was actually inspired by the current "Under the Sea" Monthly Challenge to design this sea themed piece. Although I have created mail art before, it has usually been on a bigger scale (pizza boxes); so creating on this envelope was a good push to do something outside what I am used to. 


When I started this piece, I realised I didn't have any larger sized white envelopes left at home, only some yellow ones. The answer? Gesso of course! And then lots of lovely layers over the top!
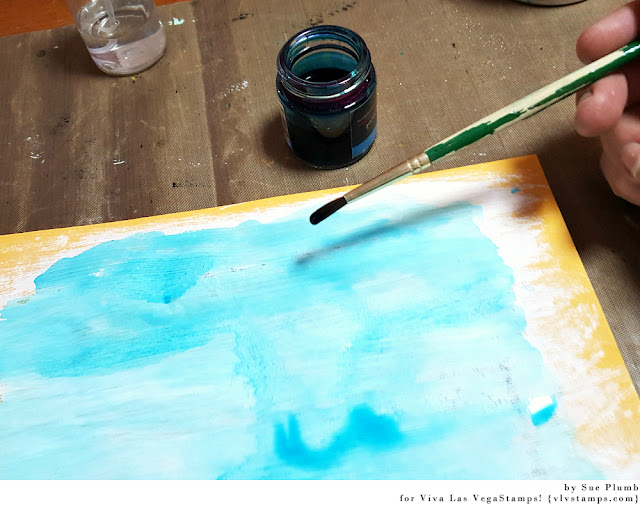
I started with some Colour Blast Colour Artist Ink, which I applied directly over the gesso, along with lots of water to help move it around before drying it off.


Next, I wanted to blend the edges of the envelope, so I used a Faber-Castell Gelato to scribble some colour around the edge before blending it with a baby wipe.


Then it was time to turn my attention to my focal images for my envelope. I had previously stamped some gorgeous jelly fish out onto tissue paper using the Jelly Fish stamp. Because the tissue paper is so thin, it means the image can been seen well from either side, which allows you to flip its orientation to face the other way. 

I added some subtle colour to the jelly fish bodies using another Gelato, then used a Faber-Castell watercolour pencil to add some colour along the tentacles before sticking them down onto my envelope.


Once I had the jellies in place; I then took a piece of scrap cardboard to mark out the address box, before I used the same blue Gelato to blend around the edges of it, and also around the edges of my jelly fish.

Next, it was time to add a little greenery to my under sea scene, so I used the Doodle Flower/Garden stamp to add some plants along the bottom edge.


I also added some "bubbles" to create a sense of movement using my favourite Doodle Dots stamp. (I told you, there is no project this stamp can't be used on!) I also added some more pink to the jellies with a darker pink Gelato, as I didn't think they were "popping" enough.


I used a green Gelato to roughly scribble some colour over the top of my stamped plants before blending with a wipe.


To finish off my envelope, I added some blue ink splatters before removing the cardboard to reveal the address box. To help further define the box, I used a watercolour pencil to quickly draw around the inside border.


I am really happy with how this piece turned out; although sadly, I don't think it will make the mail. As soon as my daughter saw it she said "can I have that?" (she loves the ocean and its creatures) and I didn't have the heart to deny her. 
If I was planning on posting this however, I would recommend a quick spray with a water based sealant to protect it from the mail handling process and prevent the colours being rubbed away.


Thanks for stopping by so I could share this - I hope I have inspired you to get inky today!


Stamps used: 

Other materials:
envelope
tissue paper
Colour Blast White Heavy Gesso
Colour Blast Colour Artist Inks (Calypso & Marine)
Faber-Castell Gelatos
Faber-Castell watercolour pencils
Staz-On ink

Tuesday, January 16, 2018

"Born to be Wild" scrapbook page | Sue Plumb


Hi everyone!
It's Sue Plumb here kicking off my first post as an official design team member for Viva Las VegaStamps. (I can't tell you how excited I am to be able to say that!)
So I thought I would start with what I do best - a mixed media scrapbook layout. I even used a fun SnapChat selfie, so you can see who you are putting up with for the next 6 months...hehe


To create this page, I started by laying down my background colour onto my cardstock using  Colour Blast Colour Artist Inks. I first spritzed the cardstock with water, then used a small brush to apply the inks and a little more water to move the colours around, before drying it with a heat gun.


Once dry, I decided I wanted more hard water lines; so I went back and applied more ink & water to my focal area; as well as some splatters with a small, stiff brush; before again drying with the heat gun. 


Next, it was time to add some depth to my background. I used Staz On ink along with a couple of my favourite mark making stamps to add structure to my focal area:
- Punchinella / Sequin Waste Border


I also stamped a few quotes randomly around my page:

Next, I turned my attention to the focal piece of my page. I fussy cut my photo away from the background; and I also cut out two rabbit images I had previously stamped onto tissue paper to use on either side:
Creepy Rabbit by Tera Callihan


I adhered them all to a piece of cardstock using a matte medium, before cutting around them, leaving a white border. (You will note the tissue paper simply disappears into the background using this technique.)


To add a bit of colour to my gorgeous creepy little rabbits, I used Faber-Castell watercolour pencils, which I applied roughly, before blending them out with a water pen. Once coloured, I mounted my photo up on some cardboard to raise it from the background and then moved on to putting the page together.


Underneath where my photo was going to be placed, I added a die cut glitter frame, that I had cut in half; along with some messy purple thread.


I then added a few torn pieces of washi tape to my background, and also tucked a piece of paper doily in behind my photo before sticking it down.
I used a chipboard title from Kinder Kreations, which I coloured simply with black ink.


I then stamped some scattered stars using purple ink:
Star Sliding 


To finish my page I added a wood veneer arrow (also inked black) to the left of my photo.


And to the right of my photo, I added a cute handmade rabbit embellishment from Charms Creations.


Thanks for stopping by so I could share this - I hope I have inspired you to get inky today!


Stamps used:
-  Star Sliding 

Other materials:
- Colour Blast Colour Artist Inks
- Staz On ink
- Studio Calico ink
- Kinder Kreations chipboard title
- Charms Creations rabbit embellishment
- Cocoa Vanilla Studio wood veneer arrow
- washi tape
- die cut glitter frame and arrow
- cotton thread

Friday, December 29, 2017

Whimsical Watercolor Tags- Video by Susanne


Hi my dear Viva Las VegaStamps! Friends!

I have two whimiscal watercolor tags for you today which are created with Brushos, the Leaf Lady and the Letter Man stamps.


I have a video tutorial for you today! Enjoy!


Here are some close-ups:


Thank you for stopping by today!
xx Susanne


Supplies:
Viva Las VegaStamps!
Wire Rings
Stars
Butterfly Specimens
Others:
Brushos: Turquoise, Ost. Blue, Orange, Vermillion
Liquid Watercolor: Purple, Black
Sizzix Embossing Folder
Crealies Banners

Monday, September 18, 2017

Mail Art Envelope by Susanne


Hi my dear crafty friends!

It's Mail Art Monday today and I have an envelope with the lovely "Girl With Wings" for you.


I picked on of my gelli printed papers and build an envelope with the Envelope Punch Board. Before I glue the envelope together I decorate it:
I stamp the main image onto the front with the Tim Holtz Stamp Platform. I make a second print onto white cardstock.


I cut this one directly on the outlines and colour it with Distress Inks.


I paint a white address field with gesso, add some more stamping and glue the envelope together. Finally I adhere the main image.
In case you don't send any mail art, you can use those envelopes perfectly in your art/ junk journals!


Thank you for stopping by today.
xx Susanne.


Supplies:
Viva Las VegaStamps!:
Others:
Gelli Plate
Gesso
Archival Ink


Tuesday, August 22, 2017

Finding My Way - Tag by Susanne

Hi everyone!

It's Susanne writing today and I want to share a mixed media tag with the lovely "Girl In Princess Costume" with you.
 
If you are gelli printing addicted, like me, you might have the same "problem": Tons of gelli printed backgrounds. This is one way you can use them:

Cut a tag from the background of your choice and stamp the main image:


Stamp the same image on white cardstock, too. Cut it out.


I did the same with all images that are on my tag. (Except from the sentiment and the tree on the background)


Colour the images with a medium of your choice (I used Distress Inks) and adhere them to the tag. I used a Nuvo Glitter Gloss pen to add some shimmer to the crown.


Here are some close ups:


Normally I use tags in my Art Journal, as a bookmark or to decorate gifts.
I hope you like this one. Thanks for stopping by today!
xx Susanne.


Supplies:
Viva Las VegaStamps!:
Girl in Princess Costume
Whimsical Worm
Compass
Finding my Way
Leaves Blowing from Tree
Others:
Gelli Print
Staz On ink
Distress Inks
Nuvo Glitter Gloss pen
Tim Holtz Stamping Platform

Wednesday, August 09, 2017

Art Journal Page Tutorial by Susanne

Hi there!

Susanne here today and I'm sharing a step by step art journal project. This one is made in my homemade traveler's journal. I used gelli printed papers as my base pages.


Use gel medium and adhere the mixed media die cuts to the page. Cover it with a layer of gesso. Stamp the main image and the sentiment on tissue paper, cut it out and adhere it to the page.


Now it's time to add colour with Brusho powders. I sprinkle the pigments onto my page and spread them arround with a wet brush. I am adding colour until I am happy with the result.
While I am drying the colours with a heat tool I am spritzing water droplets with the Distress Sprayer onto the page to create some more texture.


I make the Dancing Lady pop out more by adding a shadow around her. I'm using an Inktense pencil.


Finally I add some stamping:


Here are some close-ups:


Thank you for stopping by today!
xx Susanne.


Supplies:
Viva Las VegaStamps!
Tired of Trying to Cram 1
Dancing Lady
There is a Universe
You are Beautiful
Howling Coyote Silhouette
Straggly Pine Trees 
Others:
Brushos
Archival Ink
Sizzix Tim Holtz Mixed Media Dies
Distress Sprayer
Gel Medium
Gesso
Tissue Paper