Thursday, November 29, 2018

My dream ► Majo

Hello everyone,

and welcome to my second November post. I made another Christmas card, this time using some of the typical Christmas stamps .... and some others as well.


You might want to scroll down for a funky version of my card?

 I stamped the waybill in addition with the branches on a panel and added some distress ink. 

After stamping the tree on another panel, I traced this image, using a dummy I stamped before to trace the tree on the upper panel and cut it out accordingly.

I used pop dots to glue the two panels together.

I added some wooden stars with a bit of sparkle and the sentiment which is a part of the "This was not my dream" stamp. 

A closer look at the sparkle?


Wanna get a bit funky with your Christmas Cards? Here you go in VERY unusual colors ....


.... and here is the variety I created with the versatile stamps ....


These are the stamps I used:


Thanks so much for visiting!

Happy stamping ♥

Wednesday, November 28, 2018

Art Card || "Learning to Sail"

Hey everyone! I have a monochromatic art journal page to share today. Sometimes taking the color choices out of a piece makes it come together super fast. Of course, Banksy stamps help too!

If you want to see exactly how I made this piece, you can check out the video at the bottom of this post.


STAMPS USED:


Tuesday, November 27, 2018

Santa Claus is coming...

Hello crafty friends!


It's time for me to get to work on Christmas cards.  I wanted to create something simple and sort of grungy/vintage so it would be great for anyone. 

Stamps used:

Using archival ink in watering can grey.  I stamped Santa and my sentiment.  I used distress stains to "watercolor" everything.  The card is A2 sized with each matte being 1/4 in smaller than the layer below.


I hope you enjoy this fun and easy card!
Happy Holidays


Monday, November 26, 2018

Mail Art Monday with Elina

Hi!
Happy Mail Art Monday!
My latest mail art project is created on a craft envelope, using Banksy images and a limited black/brown color palette:


With a help of a stamping platform I first stamped my two main images on the craft envelope. I left the stamps on the platform, and re-stamped the images on a white paper:


Then I cut out the address label from the white paper, following the stamped lines on the left side. I glued the label on the envelope on top of the stamped images.


Then the only remaining thing was the decoration: I stamped some patterns on the top of the envelope, and here and there added a bit of color with color pencils. The background needed a hint of white, so I traced around the edges with a glue pen.
I think the envelope looks quite nice!


For this mail art project I used the following Viva Las VegaStamps! products:

Banksy Pulling Back The Curtain
Banksy Ladder Painter
Typeset Scallop
Staple X
Triangle Arrow Marker

Wishing you a wonderful day. Thanks for stopping by!


Friday, November 23, 2018

Love. Repeat.

Hello everyone,

and welcome to my second November post. I made a very small art journal page today. I had this piece of paper in my stash that I had gelli printed on and wanted to use it today. It is 10 x 15 cm which is aprox. 4 x 6 inches.


I did add some stencilling on the right side to repeat the pattern of the left side. I then added white paint in the middle and some splatters. I doodled the same words as from the stamp onto the whitish spot in the middle. Next I stamped this fab stamp by Tina Walker, went around with a white pen and filled in the heart with a pink paint pen. I then stamped the sentiment as a background stamp and also separately on a strip of white paper which I edged with a pink marker. I adhered the strip underneath the woman image. Lastly I added a line around the sentiment and around the page. 

I have used the following stamps:


Thank you for stopping by today ! 


Wednesday, November 21, 2018

More Incrediblerer

Can you believe tomorrow is Thanksgiving here in the US??  WOW, time is flying!!!
Next month will be jamb packed with holiday crafting so for a little break I am sharing a birthday card.


What I love most about this stamp is that it can be geared towards a girl or a boy, in this case it was for a boy.  I always have a little bit of trouble with boy birthday cards but I LOVE the playfulness of this one.

Viva Las VegaStamps! used: Girls Party, Whimsical Triangle Banner, A Whole Year.


I chose blue and red and focused my coloring with Prisma Colored Pencils on the boy in the group creating  my focal point.  I kept to the color theme and added washi tape and splatters (with Broken China and Festive Berry Distress Spray).


See you next month with some holiday cheer.
Until then...get inky!!

Tuesday, November 20, 2018

Awesome | Sue Plumb


Hi everyone!
It's Sue Plumb here to share my latest Viva Las VegaStamps design team project with you. Today I have a 12x12" mixed media scrapbook layout to share that features some new release library-themed stamps, as well as a few others from my stash.
I created this page to document some photos of my boys that I captured in a hospital waiting room one day, while they both practised their reading and writing skills.


I began my layout with a sheet of white cardstock, and a couple of pages torn from some old books. I collaged the pieces onto the cardstock, then applied acrylic paint over the top with a brayer to give the page more of an aged paper look. 


Once the paint had dried, I stamped the new Library Return Card stamp multiple times to define the focal area of my page where my photos were going to be placed.
I then used the This Book Belongs To: and the Library Return Dates stamps to add some extra interest and structure to my background. 
(These three stamps are all available together on plate #1508.)


With all that text in place, it was time to add a few images to my page. I used a series of dragon images (all with a book theme) designed by Brian Kesinger - Aagar the Emotional; Telkyn the Learned; and Vornii the Bookish. (These three stamps are all available together on plate #1499.)
I stamped the three dragons around my page to form a "visual triangle" around my photos. 


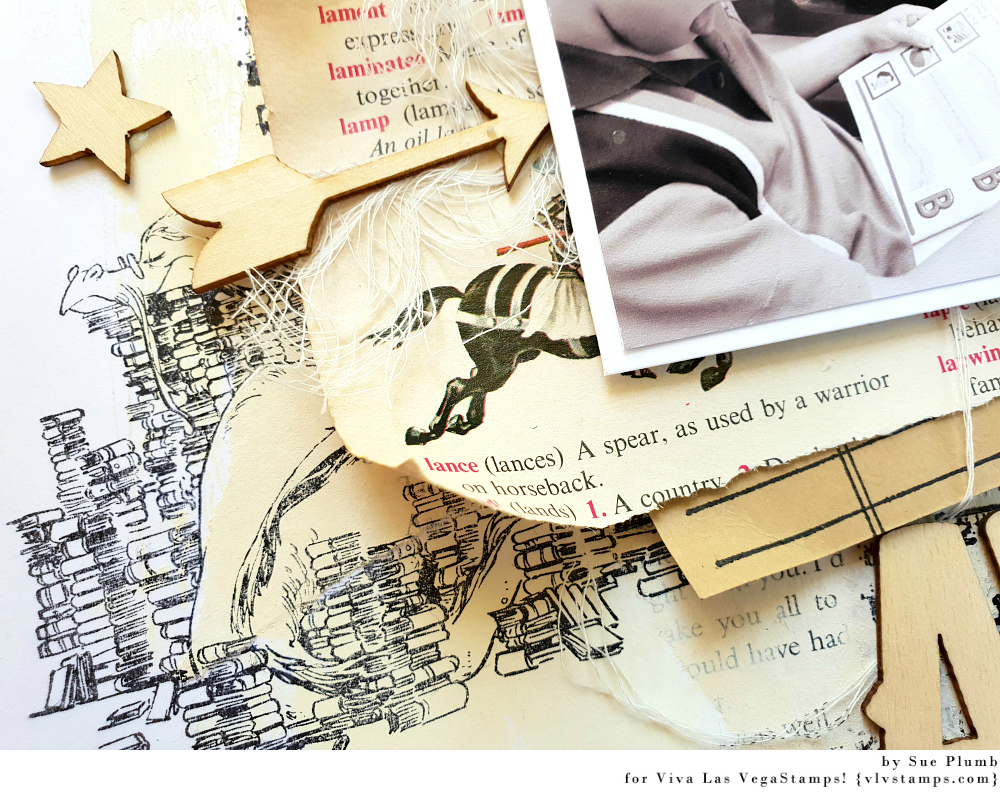
With all my background in place, it was time to add some papery layers to form a mat for my photos. Naturally, I turned again to book paper (a logical choice for this page, right?) 


I layered some torn pieces of paper, along with some brown paper, small white tags, and a large kraft tag that I had also stamped with the Library Return Card stamp. 


I stapled all the papers in place along with some frayed gauze, and then added my photos on top before turning my attention to adding some embellishments to finish off my page and tie it all together. 


In keeping with the reading theme of my page, I chose a handmade book paper star from Charms Creations, and tucked it under the right edge of my photo.


I added three wood veneer stars from Cocoa Vanilla Studio, layering one on top of the book paper star and using the other two to again form a "visual triangle". 


To the left of my photo I added a wood veneer arrow, and then below my photos the large awesome wood veneer piece for my page title (all from Cocoa Vanilla Studio). 


I added some simple handwritten journalling below my title using a felt pen, and my page was complete.

Thanks so much for stopping by today so I could share this with you. I hope I have inspired you to get inky too!


Stamps used:

Other materials:
- Bazzill cardstock
- Mont Marte acrylic paints
- Book paper, brown paper, gauze, tags
- Tsukineko Staz On ink
- Cocoa Vanilla Studio wood veneer pieces
- Charms Creations handmade book paper star
- Felt pen

Wednesday, November 14, 2018

Holiday Cheer ► Majo


Hi folks, with Christmas just around the corner, I decided to finally start my card making for this year.


Today I'd like to show you a technique I recently discovered and I just knew I would love to try this. 

It’s called "Watercolor Smooshing" and it allows you to play with so many colors on top of each other.


I used Watercolor Paper because it will hold up to lots of water, an acrylic stamp block, a Distress Sprayer and of course, many Distress Oxide inks. I tapped the first color (Cracked Pistachio) on to the acrylic block, spritzed with water, smooshed my panel around a little and left it there to allow the ink to be absorbed into the paper. I dried the panel with a heat tool. This is very important, or you will end up with a muddy mess.

I repeated these steps with the other colors (Worn Lipstick, Tumbled Glass and Fossilized Amber), making sure again to dry each layer of ink before using the next.

I diluted the colors even more and used a brush to create the splatters. Again it is very important to dry the splatters right away to prevent the colors absorbing into the background.


I stamped my panel with the “Holiday Cheers” stamp in different colors. The word my dream is from the Banksy sentiment “This was not my dream”, which I stamped on black cardstock and heat embossed with Stampendous Detail White embossing powder.


I cut the snowflake with a Sizzix Die, designed by Tim Holtz. It’s almost Christmas time, so I added some sparkle to my card with several rhinestones.


I used the following stamps:

8603
20066

Miracle Tape

I hope you enjoyed my tutorial and I hope to see you around next time!


Happy Crafting ♥


Tuesday, November 13, 2018

Queen of Hearts ❤ with Elina

Hi!
A new spread is now finished in my small Moleskine art journal:


I'm in love with my new VLVS! 'Alice in Wonderland' stamps! The amount of character and expression is amazing, and I know for sure that they will be in heavy use for various types of projects.

The cool images didn't require too many additional elements, so for the background I just simply built layers of gesso, acrylic paints, gold colour cracle medium, and stamped patterns. One layer I stamped on a piece of tissue paper and adhered it to the page with collage glue; it was an easy way to decorate the layer of stencilled texture paste.

I think the simple color palette was a right choice for this page, and I'm quite happy about it's bit grungy, weather-worn look.

Here are close-ups of the main images:


For this page I used the following VLVS! stamps:

Queen Of Hearts
Mad Hatter
Texture Background
Row of Scribble Circles/Eyes
Smear/Smudge
Rows of Numbers

Wishing you a wonderful week! Hope my art journal page inspires you to take out your favourite stamps :)