Showing posts with label sheri. Show all posts

Monday, June 17, 2013

Pure Imagination

I had 3 or 4 pages left in my small Staphmore Visual journal, so I took them out and did some backgrounds with the Melted Crayon technique. Just to have some backgrounds. This is one of the pages I did the background.


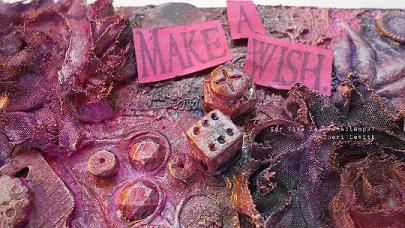
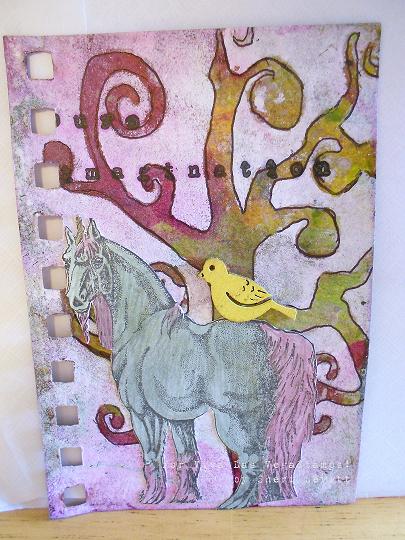
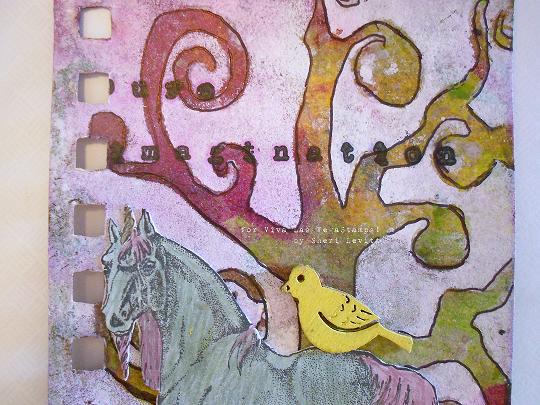
The crayons I used were magenta, a yellow and a green yellow. I took used some white craft paint over a tree mask. When it dried you can see some of the magenta crayon coming through the paint. Really cool! When it dried I took a black Bic pen and outlined the tree. I stamped the Unicorn on white cardstock with the black Menento ink pad. Colored him in with the metallic color pencils by Faber-Castell.  I attached him on the page with Miracle tape. The unicorn needed a friend so I took one of the wood embellishments pieces by Prima, colored both sides with yellow craft paint(I didn't know which way the birdie wanted to face). Glued him using Aileen's tacky. I used the "Pure imagination"stamp for the page. When I got this stamp I cut the words apart, it is easier for me to use it this way. Yes I know the 'P' in Pure is cut off. I was kinda ticked when I pulled the stamp up. But I'm going to let it go and say its part of the process of art journaling.


Stamps used

Items used
Staphmore visual journal Mixed media paper
Crayola crayons
Craft iron
White craft paint
Tree mask
Bic pen
Black Menento ink pad
Metallic color pencils
Prima wood embellishment

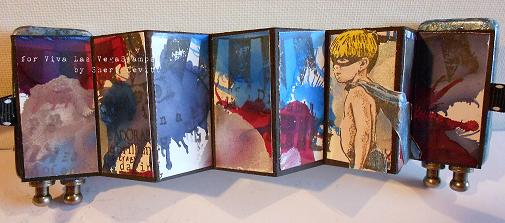
This is my last Viva Las VegaStamps Design Team project for this term. It's a blast working for this company, and working with some amazing talented artists on this team. Its been a dream come true. I tried out for this team three times before I made it on the 3rd try. That is how much I love this company. I want to thank DeeDee for all her hard work she does for us, and letting me be on this awesome team. I will be trying out again for the next term. :)

Monday, June 10, 2013

More melted crayon fun

Last year I showed an ATC I made using the Melted crayon technique that I learned how to do from Martha,Seeking for Art(Martha's ustream of this technique). Today I'm going to show you 2 more ATC's I did recently with the melted crayon technique, this time using Kromecote.

I wanted to see if the Melted crayon technique would work using Kromecote. So, I started playing around with it. I did 2 ATC's using both sides of the Kromecote. The glossy side (left side) and the matte side(right side). You can see the different results I got.


I'll start with the left one. The glossy side

I stamped on the Kromecote with the Brick background stamp with Black Versafine ink pad. Because I stamped on the glossy side The ink is still very wet, so I embossed with the Ultra High gloss embossing powder. Yes, more experimenting. After it was embossed I  took some crayons in blue hues and with my craft iron melted the crayons and wiped them on the Kromecote. When I was done I heated the back of the atc to get the way hot. I turned it back around to wipe off the wax. But I was starting to wipe off the color off as well(even some of the embossing). So I left it alone. i like dhow it looked anyway. I stamped the Boy in cape on white cardstock. and colored him in with my Prisma's. I used foam tape to put him on the ATC. I stamped the all my Heroes sentiment and cut the words apart and glued with glossy accents because there is wax where I was putting the words at I had to hold there a little bit to make sure it didn't pop off. 


Now to the Matte side


I stamped the Harlequin Diamond background with the black Versafine ink pad. I used magenta and purple crayons with my craft iron. I turned the paper over to heat the way. then I took a paper towel and wiped the wax off leaving the color.

On white cardstock I stamped with Black Achrival ink pad the Writing Arrow, coffee pot inn. I painted them with my Pearlesent water colors. The arrow smudged a little, but I was fine with that. I used Miracle tape to the coffee pot on the ATC. The arrow I made it like a tree and used foam tape to put it on the ATC. I stamped the A morning without coffee sentiment. and cut out the words. Glued them on with glossy accents. 


Stamps used
brick background
Boy in cape
all my heroes
Harlequin Diamond background
Coffee pot inn
A morning without coffee

Items used
Kromecote
Miracle tape
Black Archival ink pad
Black Versafine ink pad
crayola crayons
foam tape
glossy accents
pearlesent water colors
water brush

Saturday, May 04, 2013

It's a bird...its a plane...its another Domino book!

Today's project I made another Domino book. This one was so fun to make.


I used Sunshine Yellow and purple twilight Alcohol inks on the dominoes  I then stamped the brick background stamp with Black Memento ink pad. Yes,I know I should of used Stazon, but I don't have it. So, I used what I have. The edges I used my Heat and Stick embossing powder and some metallic flakes that I had in my stash for years. I stamped the superman standing image on white cardstock and black Memento ink pad. Colored him with Prisma color pencils. Glued him down on the domino and then glossy accented the domino (along with the second domino.) I also Glossy accent the sides of the domino. I took some May Arts trim that was white and colored it with some purple spray. I glued it to each domino. 


Now its time for the inside of the book. I took a piece of white cardstock cut it about 2 inches wide and 9 inches long and scored it at every 7/8ths. You should have 10 sections. But I never do, not a math wiz. lol


I took The Salted Ocean distress ink pad and sponged the color all over the paper to make it look like a sky. I stamped everything with black archival ink pad. I first stamped the Whimsical clouds. I then stamped the Whimsical trees and houses just for placement. On white cardstock I stamped the Whimsical trees and houses. I colored everything with color pencils. I also added some Glossy Accents to parts of the trees and houses. I cut them out and used foam squares to attach them to the pages. I then stamped Superman Flying and colored him in. I then stamped the Sentiment "all my Heroes where their underwear on the outside." and cut the words apart and glued them to the pages. Love how this turned out!

When everything was done. I used Miracle tape and glossy accents to attached the inside of the book to the domino covers. When dried I tied the trim in bows to close the book.

stamps used


Items used
Dominoes
Alcohol inks
Black Memento ink pad
Black archival ink pad
Glossy accents
heat and stick embossing powder
metallic flakes
Prisma color pencils
spray to color trim 


Thursday, March 28, 2013

Clearsnap & VLVS! Day FOUR!

Welcome back everyone!!! 


If you've been following along this week you'll know we've been swapping blogs with Clearnsap. They've got fabulous beautiful inks of all types to go with our amazing range of stamps and together we've got a match made in heaven! 


Today I'm sharing three projects with you! 

First up is Kersten with this lovely Goddess Tree Card:

Kersten says : "I made a Goddess Tree card using two stamps from VLVS:  Japanese Tree and Be Your Own Goddess.  I used ColorBox Archival Ink:  Glacier Lake and Wicked Black by Clearsnap to not only sponge pad directly to paper for a green-hued background, but Wicked Ink for the tree and expression.  I used Smooches Pearlized Top Coat to highlight the blossoms on the branches and Ocean Soul to highlight the black borders.  Fun combination of greens and blues!"

Second is Sheri with this whimsical journal page:
Sheri says : "I used : Smooch in Sassy pink, Silver fox, Gold Lame, moonlight, pool, taffy, grape soda, and snickerdoodle. Smooch spritz -galaxy gold. Ink pads: Mix'd Media inx-Jasmine; colorBox Archival Dye-Pinkolicious; and Colorbox Stephanie Barnard Premium Dye Licorice all by Clearsnap.
As well as : Kromecote, Straphmore Visual Journal in the Mix media papers, Miracle Tape, Black cardstock, Ultra high Gloss Embossing powder and stamps from the December Daily plate, and some of the stamps from plate 910.

I basically used everything I was given on this fun little journal page. Made a marble background, and colored with the smooches, Stamped with all three ink pads I was given either on Kromecote, black cardstock, or on the journal page itself. I even edged the page with the Smooch Spritz."

And last today but certainly never least is leslierahye:
From LR: "Create background on book paper with gesso and smooch spritz. Stencil with Mix'd Media Inx and punchnella. Stamp grid background with Mix'd Media Inx. On another piece of Book Paper, stamp March Hare in black archival and watercolor. Fussy cut and adhere to your background. Attach art piece to EcoArtBoard. Trim out board pieces. Sand edges. Ink with Truffle Mix'd Media Inx. Coat entire image with Mod Podge. Glue image back together with E6000. Adhere 3D pieces with E6000. 
VLVS! Stamps:
Mix'd Media Inx School House
Mix'd Media Inx Truffle
Smooch Spritz Vanilla Shimmer
Smooch Spirtz Navy Twinkle
Wicked Archival Ink
Others:
Book Paper, Watercolor, trinkets, Mod podge, Punchnella, E6000, gesso"
Get more details on LR's blog!


Now head over to the Clearsnap blog to see what they've cooked up :)

(P.S. don't forget to leave a comment for your chance to win the plate o' rubber of your choice!)

Wednesday, March 20, 2013

Don't dull your sparkle altered coaster

Hi again! Today I'm going to show you another piece I submitted to Rubber Stamp Madness for the Spring 2013 issue. And again it didn't make the cut.


I took a $1 coaster from Micheal's and glued some napkins to it to give some tooth for when I added layers to it. Once it was dried I added some gesso. Next I added some layers of different shades of green craft paints. I used a stencil with a lighter green. You can also see some punchenllia too. I also added some Star Bright paint. I put some on with a pallet knife, then with a paper town wiped it off. Leaving the sparkle and not the yellow color.

On tissue paper I stamped the Many Legged lady with Black Versafine ink pad. Glued it on with matte medium. When that was dried I took one of the lighter greens put some on my craft mat and spritz some water and with my finger put some of it over the tissue to try to blend it in more. I stamped the Don't let anyone ever dull your sparkle on white cardstock. I cut the words apart and glued them with glossy accents. I then took a water brushed and Crushed Olive distress ink pad and painted the words. I edged the coaster with black craft paint.

When I got the coaster back, I deiced to make a junk journal with it. I gathered some of my papers and make a little journal with it.

Stamps used 

Items used
Coaster
matte medium
tissue paper
white cardstock
Versafine black ink pad
Memento ink pad
Crushed olive distress ink pad
water brush
stencils
punchenllia
craft paints
Star bright paint
crop-a-dile
assorted papers for journal
2 binder rings
glossy accents


Wednesday, March 06, 2013

I hope no one sees me in this dress

Last year I submitted a couple of things to RSM for their Spring 2013 issue with the Green theme. But sadly neither item made the cut. Today I'm showing you the tag I submitted.


The tag is 8 inches tall and 4 inches wide. I did lots of layers of green and some yellow paints. I also used some punchenilla with some green paint. I then stamped with vintage photo distress ink pad the Specialita Orologi

Then on a separate piece of paper. I did almost the same thing but no stamping.. and used the Dress maker mask from Hampton Art Graphic 45. I stamped the lady with scallop hat. colored her with prisima pencils. Cut her out and glued her to the dress form. I then used Miracle tape to put her on to the tag. One white cardstock I stamped Gee I hope no one sees me and the A new Body for $1.87. With a water brush and Black soot distress ink pad I colored in the white. Cut them out and attached them with Miracle tape.

When I got the tag back from RSM I added the lace trim from May Arts with Miracle tape and then tied the black cording through the hole of the tag.


Items used
Manila tag
craft paints
punchinella
dress form mask
Black memeto ink pag
Black Soot Distress ink pad
Vintage photo distress ink pad
sharpie marker
Prisma Color pencils
water brush

Stamps used

Sunday, February 24, 2013

Is it summer yet?

I know we are only in the middle of winter. But its too cold out! I did this little art journal page of wishing it was a bit warmer (and sunny) outside in Chicago.

The background is from a calender that I got in the $1 spot in Target. I cut it and glued it on the page with modge podge. After it dried I took some yellow paint that was inside the cap and with a somewhat dry baby wipe just rubbed the pain on the page in spots. The orange circles you see are a stack of mini cup cake liners. I just took the group of them and dabbed them in orange paint and stamped them on the page in spots.

The swirl you see is a chipboard piece that was just laying on my desk. I painted it the same yellow I used earlier  I stamped the Harlequin stamp in clear embossing ink pad, and sprinkled some heat and stick embossing powder that I had for YEARS that I got a a local rubber stamp store that is now closed. It is very similar to the Ranger stuff. After embossing, it was very tacky, I sprinkled some yellow glitter from the Art Institute Glitter. Glued it on the page with Aileen's tacky.

The bottom of the page I used this sand type stuff that is made by MuddPuddles(I got it in a RAK a while back and thought this was a great page to use it on to try it out). The color I used is called Lemonade, it also has a little bit of glitter in it.

I stamped  the Beach lady on Kromecote with black Memento ink pad. Frst I tried coloring her with my Neo color II's but wasn't liking it. Luckily it came off with no problem, with maybe a little tint of the peach. I went back to coloring her with the Artist's Loft water colors. I glossy accented the sunglasses on her and on the little birdie. Glued her on with glossy accents. Finally I used little sticker alpha letters by Kaiser Kraft (love these little letter stickers) and spelled out "is it summer yet?"

Stamp used
Beach Lady

items used
Kromecote
Straphmore Visual Journal 3 1/2 by 5
calender page
craft paints
cupcake liners
modge podge
water colors
PuddlePuddle
chipboard piece
heat and stick embossing powder
glitter
alphabet stickers
Aileen's tack glue
glossy accents

Wednesday, February 06, 2013

Make a Wish Canvas

I been wanting to do a Finn inspired canvas with VLVS! since I did a little 4x4 with a coaster to get my feet wet. So that's what I did in December. I did it so far in advance because I wanted to give it to my parents to take with them to Las Vegas. They will be there for the whole month of February(So they are bond to go to the VLVS! store for me sometime in the month!).... leaving me in cold snowy Chicago! Sigh!

The canvas is a 5x7 flat board canvas by Artist Loft.I started of stamping on white cardstock Couture by Brian Kesinger in black memento ink and colored her in Prisma color pencils. I then glued her down the canvas.  I glued on white lace from my stash and the white rosette trim by May Arts with gel medium. I then put some molding paste on the canvas and took the Harlequin Diamond background stamp in the molding paste. The I went to the sink and washed the stamp off. After I let the molding paste dried. I then went to town and glued all kinds of things down to the canvas. I dud use molding paste as a glue for the stuff (do you spy a pink Flamingo. lol), because I was very low of gel medium.

When done this is what it looks like before the magic happens.


Now the after!


Before spraying I did put a few post it notes over the stamped image on the canvas to protect it.

I used Dylusion Pink Bubble gum spray, Lindy stamp gang Dark Chocolate Truffle, starbusrt spray, Phantom Fushia moon shadow mist, and Screaming Banchee Black Starburst spray. I then went over some parts with Luminere pearl Magenta paint. Some more spraying. and then i went over some parts with bronze, and silver craft paints. 

When I was done and took off the tape and post it notes that was on the image. ad i did get some of the pink spray on it. I tried to fix it, but it looked awful! So I covered it with the sprays and paints. I re stamped the image and colored her and fussy cut her out. I used foam tape to pop her up on the canvas. 

It needed something so I stamped Dream Big and Make a Wish on white card stock cut the words apart and then painted them with the Dylusion bubblegum pink and then Phantom Fushia with a brush. klet them dry and put them on the canvas with foam tape. Love how it turned out!


Stamped used

Items used
5x7 canvas
Gel Medium
Molding Paste
Lace
junk from my stash
Moon Shadow Mist and starburst sprays by Lindy's Stamp Gang
Luminare magenta paint
bronze and silver craft paint
white cardstock
prisma color pencils
black menento ink ad
foam tape


Sunday, January 20, 2013

It's another trap!

Back in November there was an altered mouse trap swap over at the VLVS! swap group on Facebook. The swap was inspired by my mouse traps I did for the Halloween blog hop. I was truly honored that my work was the inspiration for this swap. I didn't do the swap, because I knew I wouldn't be able to get another package of traps in time. I later talked with DeeDee and told her I will be doing one and sending it to the store. I had 1 trap left from the last package I got back in September.


The theme of the swap was powerful women. I had an idea of what I wanted to do, but after going one way I went another way. lol I started out with a base coat of black craft paint. Then I did a layer with crackle medium. after that dried I did 2 coats of magenta craft paint. Two coats because it was water down. After that dried this is where I made a right turn. lol

I wanted to use my Lady Silhouette so I thought hmmm it needs some sparkle. I had this heat and stick stuff that I got years ago, from a local rubber stamp store that is no longer in business  This is just like the Heat and Stick that is now out from Ranger. I had never tried it so I thought why not try it now. So I did. I used the clear embossing pad on the back of the trap and the sprinkled some of the heat and stick on it. heat set it and it was sticky. then used a white glitter from Art Institute  and it stuck nicely to the back of the trap. I then did the other side, but with a hot pink glitter.

I stamped the lady on the Kromecote and colored her with watercolor from Artist Loft. Cut her out and glued her on the trap with hot glue. I added a flower from Jolie's next to her. The quote is from the same plate as the lady. I stamped that quote on the matte side of the Kromecote. I trimmed it and edge it with the picked raspberry distress ink pad. I lightly did the inside with the same pad too what was left on the sponge. I attached that on the metal parts of the trap with glossy accents.


stamps used
Lady Silhouette
"if I'd observed all the rules, I'd never got anywhere"

Items used
Kromecote
Mouse trap
black craft paint
crackle medium
magenta craft paint
Clear embossing pod
Heat and stick embossing pwder
Art institute glitters
Glossy accents
hot glue
flower


Sunday, January 06, 2013

Altered Domino book


I was inspired making this altered domino book after I saw it on the Artfully Musing blog. It is very easy to make. Even for me the measuring challenge. And it was fun to make too.


I took 2 domino and alcohol inked them up. Colors I used were sail boat blue, denim  and the silver mixative. There was a little bit o raisin alcohol ink in there too. I stamped the small Banner stamp on Kromecote, I used a blue Crayola maker. Because the crayola marker is water base, it is easy to clean the stamp. I cut out the banner and used glossy accents to glue it to the domino. I then covered both Dominoes with glossy accents. I noticed that the alcohol ink was coming off the domino after a while and this will prevent that to happen. I did 2 coats of Glossy Accents on the front. While that was drying I stamped the jump roping girl on white cardstock and colored her with Bic Mark-it markers. I cut her out and used pop dots and a little bit of glossy accents to attach her to the front domino. The bottom of the dominoes I added 2 hitch posts on both dominoes.

I then glued some trim from May Arts. I took the piece of the black trim folded it half so I know where to cut. I took each half and glued them to a domino. This is how the book closes, you tie both ends of the trim together.

The book part itself is 1 piece of 1 7/8 by 9 piece of cardstock and I scored it at about 7/8 increments. The back of the book I took a scrap of scrapbook paper and trimmed it down to the sizes of the book and then used Miracle tape to attach them tot he back cardstock.

The front of the pages I took  a strip of the Kromecote that I cut to about the same size of the black card stock. I took the 4 colors of alcohol ink that I used on the domino and used it on the kromoecote. A drop of alcohol ink and a spritz of can air. I then took the bigger banner and a couple of the sentiments from plate 918 and stamped on the Kromecote. After that I cut the Kromecote to size and attached them to the black cardstock with Miracle tape. I stamped the little boy on cardstock and colored him with Prismas color pencils. Cut him out and attached him on the the Kromoecote. I used Miracle tape and Glossy accents(to make sure the paper stays put to the Domino) to attach each side of the book to a domino.


Stamps used
Plate 918
jump rope girl

Items used
Kromecote
Miracle tape
glossy accents
Black Memento ink pad
Bic Markers
crayola marker
white card stock
black cardstock
Dominos
Tim Holtz hitch posts
prisma color pencils
Alcohol inks
can of air
score board

Sunday, December 23, 2012

Have yourself a merry little Christmas

Its the the Holiday Season! This year I deiced to make some Christmas cards using Viva Las VegaStamps! of course!

 This first card is a quick fun card I made using Kromecote and Ultra High Gloss clear embossing powder for a fun emboss resist technique.

I stamped the Harlequin Diamond background stamp in clear embossing ink on the Kromecote. I poured the Ultra High Gloss embossing powder over it. After I melted the embossing powder with my heat gun, and it cooled, I took Barn Door distress ink pad and one of the foam pieces and went over the embossed image with the ink. I then took Fire Brick distress ink pad and did it again. I then took a paper towel to wipe off the ink from where it is embossed. it looks like this.


 I trimmed the Kromcote a pit so it can fit on the Kraft card base. I used Miracle tape to attached the Kromecote to the card base.

On white cardstock I stamped the Snow woman in flower hat with black Memento ink pad. I colored her hat and purse with markers. I stamped the head part of the stamp and painted the nose orange. I cut it out and glued it on her. I glossy accented the band of the hat and her eyes. I added some rock candy stickles to her body. I used foam tape to attache her to the card.

On a piece of scrap cardstock I stamped the sentiment, "have yourself a merry little Christmas" and edged it with Crushed Olive distress ink pad.


Stamps I used:
Harlequin Diamond Background
Have yourself a Merry Little Christmas
Snow woman with flower hat

items used:
Kromecote
Ultra High Gloss Embossing powder
Miracle tape
bard door distress ink pad
fire brick distress ink pad
kraft cardstock
white cardstock
black memento ink pad
orange craft paint
markers
rock candy stickles
foam tape
crushed olive distress ink pad

This card is another fun card to make. Its a triple stamping card technique  I saw a friend make one, then saw a youtube video on where she got the idea from. While watching her make the card I got an idea to use a VLVS! stamp with it. Turned out really cute! This is what it looks like uncolored.


I took the 3 white cardstock layers and stack them on top of each other. I then stamped the Santa hits plane with Black Versafine ink pad and then embossed in Ultra High Gloss clear embossing powder. After I embossed the powder I mounted the three white layers onto the green cardstock using Miracle tape. I then colored the image Artist Loft watercolors. I also used pearlesnt watercolors. I should of done that first before mounting them on the green. but live and learn! :P 

Taking a cue from George of the Jungle I stamped out "Watch out for that plane George" with the small alpha's from the plate 1430 on scrap of white cardsock with black soot distress ink pad. cut the words and mounted that on the bottom white layer. 


stamps used

items used
white cardstock
green cardstock
black Versafine ink pad
Black soot distress ink pad
artist loft water color
pearlesent water color


Saturday, December 08, 2012

Put on your Yamaka it's time for Hanukkah!

Today is the first day of Hanukkah. This is what I celebrate  But lets face it, there is not very much fun Hanukkah stamps out there. There are lots of traditional looking stamps out there. I kinda over look those stamps, mostly because i'm not traditional type of girl. LOL I like the fun and different type stamps. When I was looking at the Viva Las Vegastamps! online store I saw this stamp, I had to get it.


A few years ago, me and a friend went to a Micheal's and they had a big white bags filled for previous $1 bin items for sale as grab bags for $2 each. Of course we got one. I have a bunch of coasters. One set I deiced to use and try to make Christmas mini's I had the coasters all cut and cover with paper, and that's all that I did with them....Til now.


Paper I used was Secret Santa by K & Co. They were already cut and glued onto the coasters last year. I stamped on white cardstock the Holiday cats in black memento ink pad. I colored them with Prisma color pencils. I added rock candy stickes to the white of the Santa hat. With the extra pieces of cardstock I stamped Oy to the world and Have yourself a merry little Christmas. Cut those out and went over the edges with black marker. I attached everything to the coaster with Miracle tape.   then went around the edges of the coaster with bronze craft paint.


Yes I know I need to fix this one. This is the first one I did. Didn't realized I colored part of the white trim of the hat. :/


Stamps used

Items used
White cardstock
prisma color pencils
rock candy stickles
black marker
bronze craft paint
paint brush
decorative paper
coaters


Thursday, November 22, 2012

DD Inspiration Day #4

Hello!! Welcome to our week full of inspiration using Plate1430! Stay tuned all week for some amazing works in which the Viva Las VegaStamps! Design Team has utilized our "December Daily" plate.


First today is LYNEEN! She's created this wonderful Christmas Calendar and says "
Each day during the month of December I will feature each ornament along with an idea to do with the family each day... my count down to Christmas Day be sure to stop by my blog http://dreamingofcastles.blogspot.com/ "

 Along with Plate1430 Lyneen used : 
Swirl stamps
 Viva Las VegaStamps! Ultra High Gloss Embossing Powder

Other Supplies:
 Ink VersaFine Black, Tim Holtz Distress, VersaMark, Green Glitter, Sakura Crystal Lacquer, Sand paper and Nail file, Pattern Paper, Tissue Paper Paint (old sewing pattern), Bakers Twine, Paint brush, Scissors, Display - Vintage Window and decorative Snowflakes.


1- Paint one side of the chip board ornaments with an off white color - let dry. Figure 1
2- Adhere pattern paper to the back side of the chip board ornaments. With sand paper & file sand them to get crisp clean edges.
3- Stamp December Daily Numbers on tissue paper that has been sprayed with hairspray to keep the ink from bleeding. Heat emboss numbers with VLVS! Ultra High Gloss Embossing Powder. Figure 2
4- Stamp images directly on the back (paper) side of the chip board ornaments. Heat emboss numbers with VLVS! Ultra High Gloss Embossing Powder.
5- Distress with Tim Holtz ink direct from pad to chip board ornaments.
6- Add green glitter to the edge of each ornament. Use Sakura Crystal lacquer as the glue.
7- On the painted side of the chip board ornaments randomly stamp swirls with Tim Holtz Distress ink. Heat emboss numbers with VLVS! Ultra High Gloss Embossing Powder.
8- User VersaMark Pad, directly apply to the swirl side of chip board ornaments, add the tissue paper number and apply VersaMark to the number. Cover with Ultra High Gloss Embossing Powder and heat. The ornament almost looks like glass.
9- Tie bakers twine to each chip board ornaments at varying lengths, attach to display. My display is an old window I picked up at a thrift store!


 And 2nd today we have SHERI! This may not be your traidtional book, but Sher loves appreciating the little things and has this beautiful, bright Daily album for December:


Other VLVS! Used: Chevrons and Harlequin BG
Other Supplies: The covers are from a recycled book, the papers are Create collection by Recollections and The Snap Shot stack by DWCV. ATG tape, Miracle tape, 3 trims from May Arts, Pink trim s from Recollections, Black flower on cover is from Jolee's, 2 tags made from a manila folder, Bubble gum pink dylusion spray, neon green S.E.I. tumble dye spray, sky blue S.E.I. tumble dye spray, hot pink S.E.I. tumble dye spray, alphabet stencil, butterfly mask, black Memento ink pad, pink vivid ink pad, Salty ocean and Picked Raspberry distress ink pads, crop-a-dile to punch the holes, 3 binder rings
 
Let these gals know what you think of their FABULOUS projects and be entered to win Plate1430 all to yourself! :)