Showing posts with label VLVS Images. Show all posts

Wednesday, June 27, 2018

Artist Trading Coins: Three Amigos

Hi!
A short while back I participated in an international swap of artist trading coins. ATCoins have become really popular lately; ATCoins are just like artist trading cards but circular, with diameter of 2.5 inches.

These were my very first ATCoins, and I ended up creating two identical sets of three coins; three of them I sent to my swapee, and three I kept to myself.

Here's how my 'Three Amigos' ATCoins looked like:

They were really fun and easy to make:

I started with die-cutting the circles from white cardstock (one of the nesting Sizzix circle dies has a diameter of 2.5 inches!). For coloring the coin backgrounds I used a purple Distress Ink, then splashed the inked surface with water, and dried with my heat gun. For the finishing touch I used a VLVS! pattern stamp ('Doodle Dots', my favorite!).

I stamped the main images on white cardstock, colored with Promarkers, and cut out. Lady Grey and the cute fox (which I colored like it was a raccoon, lol!) had some fine details that could not be fuzzy cut, so instead of trying to cut out the fox whiskers or Lady Grey's hair I stamped the complete images on the purple background, and glued the simplified fuzzy cut images on top. Worked well!


I love the shape and size of the ATCoins. They were so fun to create, and I'm sure I'll make many more!
Have you created ATCoins already?


For my ATCoins I used the following VLVS! stamps:


Wishing you a wonderful day! Thanks for stopping by!


Wednesday, May 04, 2016

So cute

Hi Hermine here, I find this stamp so cute, love working with it. Hope you enjoy.


step 1: stamp Sitting Voodoo doll 19739 with Stazon Black, make a mask and put the mask on.
step 2: Stamp Bell Jar 19660, remove mask and colour the imgaes with ZIG Clean Colour Real Brush markers.
step 3: then mask off the top of the jar and stamp Blood dripping 18961 by colouring directly onto the stamp with the markers. I used the same colour as I use to colour the jar.
step 4: glue this card onto a double rectanlge card.


Warmly Hermine
Used materials:
Sitting Voodoo Doll 19739
Bell Jar 19660
Blood dripping 18961
Stazon
ZIG Clean Colour Real Brush markers


Wednesday, April 20, 2016

Tutorial pretty in pink

Hi Hermine here. I made a photo step by step tutorial in tun-sur-ton colours.


step 1: Stamp with Stazon black  Roller-skating teens 19749 and make a mask of it.

step 2: Put mask on and stencil with different colours Memento Luxe.

step 3: keep mask still on and stamp with the different colours Memento Luxe the Clock face 19468, Lines of Chevrons 18965, Sawtooth Stitching lines 19643 and the alphabet of the December Daily plate 1430 and with Stazon Black the Striped border Arrow 19202

step 4: Remove mask and colour the focal image with the same colours Memento Luxe and a water brush. Glue with magical tape onto a doble square card.

Hope you like this little tutorial.

Warmly Hermine

Used materials:
Memento Luxe


Monday, April 04, 2016

mail art monday

Hi Hermine here on mail art monday. This time I used a bubble wrap envelope to alter.


step 1: Take different colours Memento Luxe, put them directly on a craftsheet, spray a little water and put your envelope in it. If you press a little harder you'll end up with an imprint of the bubble warp inside, which gives it some extra depth (don't press to hard or else the bubbles will pop)
step 2: Stamp with Stazon Black the images: start with the windmill 19791 and mask it, then Winter Woods Scene 19793, Stars 19291. Then hand draw the rectanlge for the address and mask of. Then stamp  Fallen Tree 19722 and Leafless Trees in field 19719. Colour the images slightly with some colouring pencils.
step 3: Stamp with blue the Harlequin Diamond background 18920 on the flap, do the same with pink and the Spotty Background 1461. Then stamp with Stazon Black the staples 19578, 19576 and 19577.
And now you are ready and set to send out you artwork in a fancy way.


Warmly Hermine


Used materials:
staples 19578, 19576 and 19577


Monday, February 29, 2016

Forest Critter and give away

Hi Hermine here, my turn to post today and I made a card with this awesome little forest critter. But not only that I made a little pocket as well to pu in my give-away. Read about this further on in this post.

But first the how to on this card:
step 1: Stamp the forest critter 19820 on your piece of paper and mask it. Then stamp the winter wood scene 19793.
step 2: take a outer circle mask and put on your work. Start colouring the images and its surroundings with colouring pencils.
step 3: remove mask and draw some faux stitches around the circle. 
step 4: mat on black paper and glue onto a double rectangle card.


And here is my give-away.  As you can see on the photo its not an ATC but a little pocket. I had this stamp double so I want to give it away to one of you loveluy people. The only thing you have to do it to leave a comment at this post. Its runs untill march 20th, after that I put all the names in a hat and draw the winner/ The winner will be announced in my second post for march and that is march 23.

Here a close-up of the little pocket. Stamped the same way as the card, but using the inner mask to mask off the center and sponged around to create the background.

Hope you like it and good luck. One of you will be the winner of this awesome stamp designed by Mary Vogel Lozinak and is called Whimsical collage 19166.

Used materials:


Friday, February 05, 2016

mainly men

Hi Hermine here, this time I tried to make a card for men, always a struggle for me,


step 1: colour the backgorund with 3 colours fluid ink.
step 2: stencil the dots onto the background with Memento Luxe Weddingdress (white).
step 3: stamp with distress purple the Victorian Flourish 19417 and partial  Waybill/invoice background 19416 
step 4: stamp with Stazon Black the Business man silhouette 19418 and  Wright brothers walking 19730
step 5: take a stencil and purple Memento Luxe and sponge the dots. Make with a white sharpie some accents.
step 6: die cut the dragonfly and glue onto the left hand upper corner
step 7: Glue one a white card.


Warmly Hermine

Used materials:


Wednesday, January 20, 2016

TIME - tutorial

Hi Hermine here, with a little tutorial this time. Time to play!


step 1 : take a stencil, add gesso with a palet knife. Leave to dry, best is to leave to dry overnight.


step 2 : take liquid ink and colour the background.


step 3 : stamp with Stazon different trees at the bottom, all the trees are on plate 1460


step 4:  stamp on a seperate piece of paper the Clockface 19468 , Whimsical Lettered man19679 and Writing triangles 19571 with Stazon. Glue the clockface onto the background. Colour the face and the with Memento Luxe and a sponge. Finish the fac with some white accents. Glue the triangles behind the face and glue onto the clock. Make some black lines with a fine liner that acts like a border.


Hope you like the tutorial.


Warmly Hermine

Used materials:
plate 1460
clockface 19468
Whimsical Lettered man 19679
writing triangles 19571
Stazon
Miracle tape

Tuesday, November 17, 2015

Together

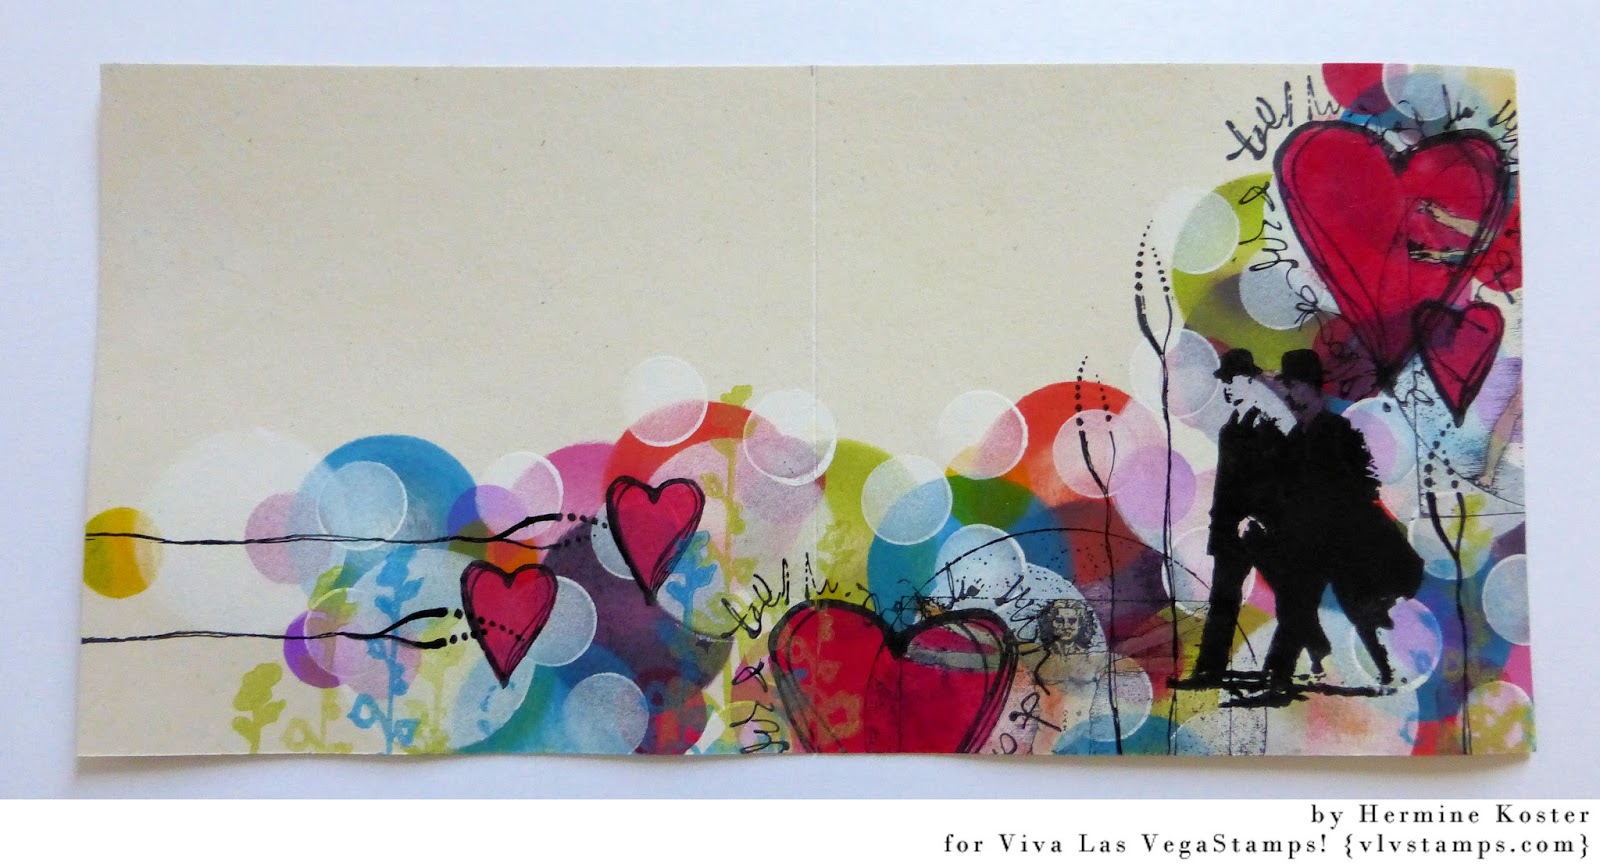
Hi Hermine, this time I made a step by step photo tutorial again. I am totally in love with this heart stamp, it colours my world.


step 1: take several colours Memento Luxe and several rounds sponges and finger sponges and stamp circles all over you card, one colour at a time. On the front as well as on the back of your card. Leave to dry.

step 2: Take Memento Luxe Weddingdress (white) and work in the same way you did in step 1. Leave to dry.

step 3: Stamp Wright Brothers walking 19730 with Stazon Black. And the Vitruvian Man Large 19763 partial on the right hand site and partial on the left hand bottom side.

step 4: Stamp the Squiggle Heart 19644 next to the Vitruvian Man   Then stamp the  Scribble Heart 19645 once on the front and twice on the back. Make some outside masks and sponge the inner space with Memento Luxe red.

step 5:  Stamp the Stitching Lines 19642 3 times on the front vertically and twice on the back horizontally. Draw some dots at the ends of the stitching lines. Take green en blue Memento Luxe and stamp the Wild flowers Silhouette 19646 aal the way along the bottom of the card.

step 6: fold the card in half. I Always love when the design runs over the back of the card as well.


Hope you like my tutorial. 

Warmly Hermine 

Used stamps:


Monday, November 02, 2015

Challenge inspiration november

Hi Hermine here. Every year I make myself a promisse to start making Christmas cards in january, do one a week and at th end of the year you have a great stack, but as always, in november I think WHY didn't I keep my promisse to myself when I realise I didn;t start yet. So here I started up with one idea and ended with 3 cards, now we are talking :o)


step 1: I cut a snowflake out of a doble card on the right hand side.
step 2: take a seperate piece of paper colour with a turquoise spray ink, leave to dry. Then take a template with the circles and spray again, leave to dry. Sponge with Distress ink the ouside circle so the tips of the snowflake turn out darker.
step 3: take Memento Luxe Wedding dress and stamp Xmas Silhouette collage 19713 and stars19291.
step 4: glue the coloured card behind the snowflake and splatter some ink on the front of the double card. 


step 1: Because I still had the die-cut of the snowflake I deciced to use that as a mask, so put the snowflake on a double card on the right hand side and spray with turquoise spray in an dleave to dry.
step 2: put back on the snowflake and sponge with a few colours Distress ink.
step 3: Stamp with Memento Luxe Weddingdress Redwood Tress 19718 and a few times Fir Trees Silhouette 19723
step 4: Take Versamakr and stamp the Xmas silhouette Collage and the stars (on the right as well as on the left of the Xmas silhouette) and emboss with white embmossing powder.
step 5: splatter some water on the card and remove the water with a paper towel.


step 1: What was left was this awesome coloured snowflake and couldn't resist to make another card with so I stamped the Xmas Silhouette collage and the stars with Stazon Black.
step 2: spray some turqouise spray ink at the bottom of the card.
step 3: stamp with Versamark the Fir trees Silhouette twice and emboss with white embossingpowder.
step 4: Glue the snowflake in place.


Look HERE for all information about the November challenge and here is the inspiration board.


Hope you like it. And don't forget to enter the challenge, its so much fun to do.


Warmly Hermine


Used materials:


Monday, October 19, 2015

mail art monday

Hi Hermine, this time I made an envelope for mail art monday, love making them, love sending them out. Always fun to see the reaction at the post office when they discover they are handmade.


step 1: I prefer to make my envelopes from sratch so I used The Enveloper Pro from Crafters Companion, the paper cut to measure 19 x 19 and used B and C to score the sides.

step 2: Cut out the little corners but not folding it yet. Then I put a rectangle piece of masking tape on the spot where the address goes.

step 3: Sprayed the whole paper with water and sprinkels 5 colours blue Brusho in it.

step 4: remove the masking paper because the stamp will end up in this rectanlge for a bit.

step 5: Stamp the Whimsical Man-face fish 19678 and Pier or Dock Silhouette 19716 with Stazon Black. Then discolour the fish with some bleech.

step 6: Mask the fish and stamp Whimsical border 19675 with Stazon Black. Leave the mask on the fish and use a stencil with bubles and sponge with Memento Luxe Weddingdress.

step 7: Colouer the fish and border with Lyra water colour crayons and a waterbrush. Then I decided it needed a few more stamps. So I stamped grunge circles 19563 above the mouth of the fish on the right hand side and the Sawtooth stitching lines 19643 on the right hand side the top of this stamp and on the left hand side the bottom part of this stamp. Colour a bit between the lines.

step 8: fold the score lines and put some miracle tape on the bottom flap and glue to the right and left hand flaps.


Hope you like the tutorial on how I make a mail art envelope.


Warmly Hermine


Used materials:


Tuesday, October 13, 2015

Gorgeous greens

Hi Hermine here, my favorite colour is green as you maybe can tell :o) so I made this clean and simple card with lots of green.


step 1: take the Big and Juicy Herb garden and stamp several different trees by inking on a different spot on the ink pad. I have used: Redwood Trees 19718, Fir trees Silhouette 19723 and  Leafless trees in field 19719
step 2: Take the Tree with tire swing 19717 and stamp it with Stazon Black. Then take the Stitching Lines 19642 and stamp on the card as shown on photo 3, making little squares. Colour in 4 of the squares with the big and juicy.
step 3: fasten some brads in 2 of them and die cut a leaf and put behind one brad.
step 4: glue the card on a double square card.


Warmly Hermine

Used materials:
Redwood Trees 19718
Fir trees silhouette 19723
Leafless Trees in field 19719
Stitching Lines 19642
Tree with tire swing 19717
Stazon