Showing posts with label achival ink. Show all posts

Wednesday, February 18, 2015

Dream Big

Hello everybody,

Corrie here. I am sharing a card with you today and I had so much fun making this. I hope you get inspired and dust of your rubber stamps and get creating !


Here's how I made this card :


Start with a piece of Gelli Print or some patterned paper cut into a panel that can go on the front of your card. I used a piece of Gelli Print.


Use a die or punch to cut some scalloped strips of pattern paper (I used Authentique - Be(you)tiful), ink the edges and adhere to your base panel. Ink the edges of the card panel.


Stamp the background with grey, black and orange Archival Inks and add some washi tape at three edges. (A list of stamps I used is at the bottom of this post).


Stamp the main image twice; once on your card panel and once on white card stock. I used Archival Jet Black to stamp on the panel and Memento to stamp on the white card stock as I was going to used Copic Markers to colour the image. 
I stamped the image on the panel because it is very difficult to cut out small details like the antennae on their heads. By doing it this way you can just cut them off when cutting out the main image. 
I used a silver gel pen to colour the antennae on the card panel. 


Once the image is coloured and cut out you can just adhere it on top of the one on your card base. I also stamped a sentiment on the same pattern paper as I used at the edges of the card. I inked the edges of this piece and then adhered it together with the main image on the card panel. Lastly I added some shadows around the image and sentiment with a Big Brush Marker.

Next I put some washi tape on the left side of my card base.


And here is the finished result, all put together. 

I used the following stamps :


Thank you so much for stopping by today ! 

Hope to see you next time...

Corrie x


Friday, January 30, 2015

Seek Paradise

Hiya folks!!
Michele here today and if you are anything like me you struggle with Clean and Simple (CAS).  I always want to keep going...and going...and going.
I have been practicing and today I am sharing a CAS card combining stamping and chipboard!


I love the bold stamped image, feather silhouette (Item 19126 Plate 923), and the delicate shape of the chipboard feather from Um Wow Studio.  


I stamped in archival ink.


And popped up the sentiment, seek paradise (Item 19546 Plate 1449).

The card base is Carta Bella and watercolor paper.  I also used Distress Spray (crushed pistashio), Distress Ink (walnut stain), May Arts burlap string and sequins.

So glad you stopped by!!!  See you back again SOON!!

Thursday, January 15, 2015

Live Like There's No Midnight

Happy 2015!!  I am so happy to be sharing with you as a Viva Las VegaStamps! design team member for the first time today!!
Since we were all just ringing in the new year I selected some stamps for just such an occasion.
But first I would like to show you a super awesome bokeh technique using watercolor paint and gesso.

You will need watercolor paper, watercolor paint, a paint brush, gesso, washi tape, circle stencil, water, your stamp and archival ink to get started.


I used my heat gun to speed up the drying!  I am NOT a very patient person...  :)


This is the clockface stamp (item 19468 plate 1444).


I used a Prima stencil and clear Wink of Stella pen.


I framed the bokeh image with black cardstock from my stash, tied some pretty May Arts ribbon around and stamped the Live like there's no Midnight (Item 18966 Plate 880) image directly on the ribbon.  The card base is Bazzill and the finishing touch was a couple of sequins.


Thanks for spending a bit of your day with us here and joining me for my very first design team post!!


Oh and let me mention...I took some inspiration from this month's challenge, color combination and circles. 
This inspiration board is a great start to ANY project.  I hope to see what you create linked up for your chance to win some GORGEOUS pink rubbah!

Thursday, January 30, 2014

The End Is Near

Hello again! It's me Tera here with another fun project. This time I am sharing a Small keep sake box I made for youngest brother. We just helped him move into his dorm a few weeks ago. 
For this box I've created a distressed Apocalypse style box! 
Fitting for a boys Dorm room Don't you think!?!


To start I painted all of the edges of the box black with the ranger acrylic paint dabber.
 
Next I cut out some vintage book pages, for all of the edges I cut parts of pages without words. All of the  pieces were cut so that there would be a 1/8 inch boarder. Next I added some text. 
  To start I stamped  Man In Gas Mask 2 1/2 x 3, next I stamped Apocalypse 3/4 x 2 1/2  on a scrap then layered it. 


Next I stamped Radioactive 2 x 2 and Crime Scene Tape 1 x 4  on two of the sides 
 

 On the 3rd side I stamped Biohazard 2 x 2, I also stamped The End is Near 1 1/2 x 1 1/4 and layered it on the top.  

  For the finishing touches I added one of the UM Wow Studio Gear Mash  gears. I added some gold and silver mica pieces to symbolize his hunt for money in life!  I also added a grunge board #4 and splatted black dylusions spray ink. 

(all images were stamped with Ranger Archival Pad #0 Jet Black)
Thank you all so much for stopping by! I hope you are all inspired! 
Stay warm It's a snowy mess here!! 

Friday, January 17, 2014

THE APOCALYPSE IS HERE!

Hello, Tera here. I'm so excited to be sharing my very first Design team project with you. My first DT project was actually inspired by Amy's piece HERE I love the idea of a piece that makes you think and creates a sense of mystery and wonder. I decided to use some of my favorite Viva Las VegaStamps! to create a post apocalyptic feel to my new altered book/Journal cover.

To make this I started by covering the book I wanted to alter with a vintage book page to create a fun background to work with (this was after I placed the Eyelets and wire wrapping). Next I stamped the Man In Gas Mask 2 1/2 x 3  on a separate book page and fussy cut it out so i could play with were to position it. I decided I wanted to add a little grunge to the book so I partial stamped Nautical Collage 3 x 6 1/4 on the bottom left then took a paper towel and immediately smudged the image out a bit. (I also stamped It on a piece of shrink plastic which I later added to the upper right to bring in symmetry to the piece.) The next layer was the fabulous Coffee Ring Stain 2 3/4 x 2 1/4. After the base stamps were placed I added a clock sticker, a lace Doily, a set of Tim Holtz wings and a fragment doll. I added some chain around the angel with a fabulous UMWOW Studio Gear Mash Gear with a tiny heart and golden chips inside. I also added gears above the clock the decide to add a clock key as well. Now that I had the cover built up I decided to add some detail to the spine, I made a fun label with some inked grunge board scraps I had, placed some Eyelets and used a word from the book pages (I adhered this with Miracle Tape, as well as the shrink plastic piece since this fabulous tape is super strong and clear). I decided the Apocalypse 3/4 x 2 1/2 stamp was the perfect word for the side and also stamped it on some scraps from the book page. The Finishing touches were the knob, chain and keys. As well as one of my favorite stamps the Pen Tips 2 3/4 x 2! I decided to only use one of them and stamped it on a piece of cardboard which I had colored with silver Inka Gold, I fussy cut the piece and bent the edges down to look like a real pen nib tip! :D I Hope you love this piece as much as I do. I love the feel of vintage meets apocalypse, the good vs evil, and the pieces of lost history like the keys and pen tips. 


All stamping was done with Ranger Archival Pad #0 Jet Black except the stamping on the shrink plastic which was done with StazOn Jet Black Ink Pad. 

Happy Stamping Everyone, I hope you enjoy the mystery and sense of curiosity that this piece invokes!
-Tera


Sunday, October 28, 2012

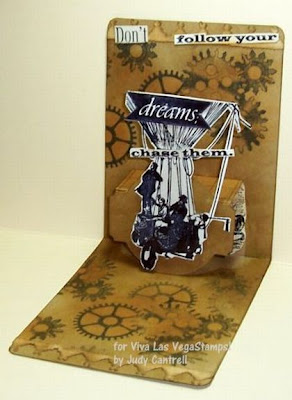
Don't Follow your Dreams; Chase Them!

 Hello Everyone, Judy here! This is my second tutorial as design team member.
I'm so excited to be here to share this tutorial with you using these stamps from VLVS! 


Stamps:


Supplies:
Sizzix pop 'n cut die
Sizzix strip die; vintage lace
Kraft resist paper
Ranger distress inks
Ranger archival black
Scissors
Foam dots
Vagabond die cutter


The fabulous stamps from plate #893 and nesting gears stamp were used on a kraft resist pop-up card. A strip from vintage lace die was applied to each end on inside card. 
Distress inks were used to color the card.

The men in balloon basket stamp was inked on Kromecote and cutout. A little bit of blue distress ink was applied to the white area of balloon. I used foam dots to adhere the balloon to the pop-up portion of card.


The quote, don’t follow your dreams, chase them; was inked on Kromecote with black ink and cut up. Miracle Tape was used to apply the words.
You might not be able to tell from the photo but camera collage was inked and placed behind the pop-up cut out.


The outside of the card was inked with distress inks and then inked and stamped with Time Flies and the clock collage.

Thank you for stopping by and have a nice day!
Judy Cantrell