Sunday, February 10, 2013

Steamy Valentine with Chamomile Tea and May Arts


Hi everyone! I'm sharing with you a fun ATC that I've made with the charming steampunk stamp Chamomile Tea. I love Brian Kensinger's drawings as they lend themselves to several coloring options...today I chose to watercolor her on a piece of antique book paper. 
For this project you will need : 
corrugated cardboard ATC Blank--painted and inked and embossed.
Punchinella from Guache Alchemy
Handmade Washi Tape using VLVS!, Miracle Tape and tissue paper
May Arts Ribbon
Distress Stain, Paris Trunk Ink
Book Paper, foil metal trinkets, feather and bling


I stamped Chamomile Tea onto the book paper with the Paris Trunk Ink in Black and embossed her with the Ultra High Gloss Emboss Enamel. This helps to keep most of the watercolor where it needs to be. I layered her onto of a prepared ATC base with some additional layers of homemade Washi tape and punchinella. I finished her off with a hand stamped ribbon from May Arts, trinkets, bling and a feather. Thank you for looking!
The May Arts Ribbon used in this project was originally white. I colored it quickly with Distress Stain and dried it lightly. Take care with the heat tool because this man-made fiber will crinkle--a process that I used once it was stamped. I then used my Black Paris Trunk Ink to stamp gears onto the ribbon. I set it aside to dry but if you are in a rush, again heat set gently. Once the ribbon was tied onto the ATC, I zapped it closer with the heat tool to get the ribbon to crinkle as seen in the final ATC.
I hope you enjoy my ATC! ~leslierahye

Saturday, February 09, 2013

Stamping can BEE so Much FUN!!

It's finally the weekend!!!! Welcome to Viva Las Vegastamps!!! Susan here today bringing you some inky inspiration ... straight from the beehive.


With my last order from VLVS!, I completed my collection of bee stamps so I am ready to play. You might notice that my paper is stamped with the "Six Hexagon Background #19076" and also looks embossed. Well, it is. I made my own embossing template using the stamp. If you attend my weekly demos at the Saturday Crafts Fair on Linqto, I recently shared how I make custom embossing template for my stamps {CLICK HERE to view demo}.


I started by using several Ranger Distress Inks to add color to my Kromecote cardstock base with the faux airbrush technique. After heat setting ink, I ran the paper and handmade embossing template through my Cuttlebug. I rubbed some more ink over the high points gently to accentuate the embossing, then stamped the "Six Hexagon Background #19076" randomly in places. Now my honeycomb background is complete.


I stamped the bees into the background using Jet Black Staz-On Ink and also stamped each bee onto clear acetate. I also stamped each bee's wings onto a Miracle Sheet. What is a MIRACLE SHEET??? It's a full 8 1/2" x 11" page of MIRACLE TAPE - perfect for making all sorts of projects, die cut shapes and making DIY Washi Tape, too. On the backside of the acetate, I colored the body and head of each bee using a Sharpie Gold Paint Pen. I trimmed out the wings out of Miracle Sheet, then gently peeled off backing and applied to backside of acetate to corresponding stamped wing sections.


After burnishing down my miracle tape wings, I remove backing and dust adhesive with Perfect Pearls in pearl to give wings a glittery iridescence. I fussy cut each bee out of the acetate and slightly bent each wing. I adhered each bee to the background using Diamond Glaze - only putting adhesive behind the bodies and legs. I left the wings free to have depth and dimension.


To finish this off I'm placing this in a black wood frame from the Dollar Tree. It's a bit rough and rustic looking and will be the perfect home for my "Hive of Bees".

Supplies used: STAMPS - Six Hexagon Background #19076, Bee Facing Left #1708, Bee Facing Right #1820, and Bee Wings Open #1926; Also used Kromecote cardstock; Miracle Sheet; Jet Black Staz-On Ink; Clear Acetate; Sharpie Gold Paint Pen; Sakura Gelli Stardust Pen; Diamond Glaze; Ranger Distress Markers, Several colors of Ranger Distress Inks {Old Paper, Antique Linen & Frayed Burlap}; Ranger Embossing Ink, and Ranger Perfect Pearls {Pearl}.

Thanks so much for dropping by. If you have a little time... check out what the rest of the Viva Las Vegastamps! Design Team has created. There's a few more days left of the SUPERBOWL SALE at the Viva Las Vegastamps! store - CLICK HERE for the details.

If you would like to see more of my creations please visit my blog, sbartist : painting in the dark HERE. I'll be back with another stamping adventure real soon! Hope you have an inky day! Sb

Friday, February 08, 2013

Guest Designer Pauline!

Good morning stampers :)

Today I'm introducing our February Guest Designer.. PAULINE!


Here's a little introduction by Pauline herself.. Hi, I'm Pauline Butcher, I live in historical Warwick, England, with my partner Robin, and have three grown up sons, one of which is still home with us. I have my own craft room (my haven), where I can often be found getting quite messy, lolI have been crafting, in one way or another for most of my life, (dressmaking, drawing, sewing, sugar craft and cake making) but discovered a passion for sticking bits of coloured card and paper together, twelve years ago. My addiction to stamps, stamping, and everything inky, became apparent 3 years ago, there is nothing more rewarding than making something beautiful, out of a few scraps of inked paper and card, for people to enjoy.

And now I have two awesome pieces to share of hers!


6"x 6" white card. Rose background stamped twice in 'Momento ink' in 'London Fog'.
One image left plain, one image coloured using  'Promarkers',   Rose Pink, Pastel Pink and Blossom. Girl In Polka Dot Dress, stamped in 'Momento ink' in 'Tuxedo Black'. and coloured using 'Promarkers', Rose Pink, Blossom, Pastel Pink, Satin, Putty, Sunkissed Pink, Ice Grey 1, Ice Grey 2. Chevron Banner and Be Adorable, stamped using 'Tim Holtz Distress Ink' in Pickled Raspberry. I also used a 'Tonic Border punch' for the lace, and added a few gems.


Garland Heart stamped using Momento ink Tuxedo Black and coloured using 'Promarkers' in Berry Red, Cocktail Pink, Antique Pink, Arctic Blue, Pastel Blue, Soft Green, Bright Green, Buttercup, Canary, Caramel, Cinnamon, Cocoa. Retired Couple stamped and aged using 'Tim Holtz Distress ink in Vintage Photo'. Large heart was cut using an 'X-cut' die, and coloured using 'Tim Holtz Distress ink' in .Squeezed Lemonade', spritzed with 'Perfect Pearl mist' in Forever Blue. Also used, 'Bazzill Basics Paper - Antique script, American Seam Binding, 'Tim holtz, Chit chat stickers' and a gem.

Thanks so much for sharing your work Pauline!
Check back in two weeks to see more beautiful work by her :)

Thursday, February 07, 2013

Girl Feeding Cat


Today I’ll share a card using these adorable images

And

With an alcohol ink Tutorial!

1.  Use a straight edge ruler and craft knife to cut clear packaging 4 ¼” x 5 ½.”
{This is the clear packaging that embossing folders and dies come in. You can also use acetate or transparency.}
2.  Cut one piece of card stock and a piece of aluminum kitchen foil 4 ¼” x 5 ½.”
Run card stock through Xyron with permanent adhesive. Peel of adhesive and apply aluminum foil to card stock.
3.   Use felt applicator to apply alcohol inks to aluminum foil.  The colors used should coordinate the finished stamped piece. I used purple, green and gold.
When the alcohol ink is is dry, run the alcohol piece through the Xyron. Peel off adhesive and apply the clear packaging over the alcohol piece.
4.  Place your alcohol inked piece in an embossing folder and run through an embossing tool.
5.   Set this aside.


6.   Ink a brayer with archival black to ink “Girl Feeding Cat” stamp on Kromecote paper from VLVS.  Set image aside to dry overnight or heat set to dry. I prefer to let dry overnight. 
7.   This is my favorite part of the card, using a portable waterbrush or paint brush with watercolor crayons to color image. I like to make the image look as real as possible, something I’ve done since 1998. When the image is dry, take a soft cloth and polish the image. Trim leaving a narrow white border around the image similar to a real photo. 
8.   Adhere gold trimmed paper and then watercolor piece to alcohol piece using Miracle Tape.
9.  Stamp sentiment “I can’t imagine” on Kromecote paper, trim and then use distress ink with foam applicator to coordinate the main stamped image.
10. Apply Miracle Tape to sentiment and alcohol embossed piece to pre-fold card.  

VLVS:


Supplies:
Pre-folded card
Ranger alcohol inks
Ranger felt applicator
Ranger foam applicator
Brayer
Music embossing folder
Ranger archival black ink
Niji portable waterbrush
Ranger distress ink
Xyron adhesive
Gold paper
Aluminum foil
Watercolor crayons
Embossing and die cutting tool
Clear packaging
Straight edge ruler
Kraft knife

Thanks for viewing my tutorial
Viva Las VegaStamps! Design Team ~ Judy Cantrell


Wednesday, February 06, 2013

Make a Wish Canvas

I been wanting to do a Finn inspired canvas with VLVS! since I did a little 4x4 with a coaster to get my feet wet. So that's what I did in December. I did it so far in advance because I wanted to give it to my parents to take with them to Las Vegas. They will be there for the whole month of February(So they are bond to go to the VLVS! store for me sometime in the month!).... leaving me in cold snowy Chicago! Sigh!

The canvas is a 5x7 flat board canvas by Artist Loft.I started of stamping on white cardstock Couture by Brian Kesinger in black memento ink and colored her in Prisma color pencils. I then glued her down the canvas.  I glued on white lace from my stash and the white rosette trim by May Arts with gel medium. I then put some molding paste on the canvas and took the Harlequin Diamond background stamp in the molding paste. The I went to the sink and washed the stamp off. After I let the molding paste dried. I then went to town and glued all kinds of things down to the canvas. I dud use molding paste as a glue for the stuff (do you spy a pink Flamingo. lol), because I was very low of gel medium.

When done this is what it looks like before the magic happens.


Now the after!


Before spraying I did put a few post it notes over the stamped image on the canvas to protect it.

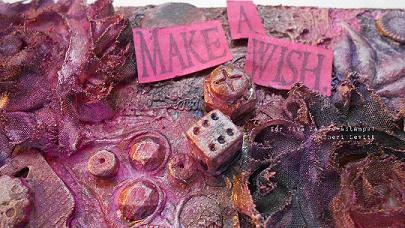
I used Dylusion Pink Bubble gum spray, Lindy stamp gang Dark Chocolate Truffle, starbusrt spray, Phantom Fushia moon shadow mist, and Screaming Banchee Black Starburst spray. I then went over some parts with Luminere pearl Magenta paint. Some more spraying. and then i went over some parts with bronze, and silver craft paints. 

When I was done and took off the tape and post it notes that was on the image. ad i did get some of the pink spray on it. I tried to fix it, but it looked awful! So I covered it with the sprays and paints. I re stamped the image and colored her and fussy cut her out. I used foam tape to pop her up on the canvas. 

It needed something so I stamped Dream Big and Make a Wish on white card stock cut the words apart and then painted them with the Dylusion bubblegum pink and then Phantom Fushia with a brush. klet them dry and put them on the canvas with foam tape. Love how it turned out!


Stamped used

Items used
5x7 canvas
Gel Medium
Molding Paste
Lace
junk from my stash
Moon Shadow Mist and starburst sprays by Lindy's Stamp Gang
Luminare magenta paint
bronze and silver craft paint
white cardstock
prisma color pencils
black menento ink ad
foam tape


Tuesday, February 05, 2013

200 Networked Blog Followers = WINNER!!!

Thanks so much everyone for following us via Networked Blogs :)

Because we reached a new milestone (200!!!) I get to give away a LB O' Rubber!!!

And it goes to....

Mark Gould!!!


YAY!

Monday, February 04, 2013

Create Peace

Art by ANg coming to you from her new lazy boy recliner!

I love the color combination of pinks and browns. So when I found this AWESOME stamp, patterned heart  and this CREATE PEACE at my favorite stamping store VLVS I just knew I could create something very pretty.


 I am just tickled pink! I love how they turned out!

1. Select the colors you want. I used a bronze/brown cardstock, pink cardstock, and some sticky back fabric. (From  DCWV - Die Cuts With A View)
2. I selected the papers I wanted as my focus, rubberstamped the Patterned heart Stamp with Timber Brown Stazon.
3. If you notice it created a very subtle look. I wanted it like that. So that I could accent the parts of the stamps by using Prisma colored pencils .
4. "Create Peace " was stamped on each card.
5. Layering - Your Base card, a layer of pink cardstock, patterend paper, base color again, switch it up, use those little pieces of paper that are left over.
6. Attach some pretty brads, to accent.
7. Embellish - I used some pretty pink flowers to embellish the cards. I bought some Mica Flakes by Stampendous. OMGosh! These are super pretty. Use any glossy varnish/medium/glue and put a small amount on your card and then sprinkle the Mica Flakes in the glue. Let it dry. I even used pretty ribbon.
Cards are perfect for those embellishments that you only have a few of.

I used MIRACLE TAPE to attach the layers.

I used the following stamps :
Patterned Heart

Here  is the link for the Patterned Heart.
Here is the link for the Create Peace.
Here is the link for the Ribbon.

Art on my friends.
L.
ANg


Don't Be Afraid To Stamp A Scrapbook!

Good morning VLVS friends!

Pinky here today with a fun stamped project....a LAYOUT!
The number one thing I hear from my friends about stamping is 
"Oh I don't make cards so I don't stamp" but I am here to tell you that
it is amazing to stamp on a layout!

I LOVE LOVE LOVE being able to create my own images/die cuts 
and really personalize my scrapbook pages! 
Here I simply used this amazing (and new) "Be Adorable" stamp- I stamped it
in bright cherry red ink onto a textures cardstock, and created my own pennant. 
This is just one of 1000 ways to create you own stamped images for a layout. 
 It really adds something to the layout that I would have a hard time creating
with just an alphabet sticker set or journaling. 
I encourage you to go give it a try today!
Come one all you scrapbookers! Let's play with stamps and get our fingers messy!

Happy Monday my friends, until next time!

American Crafts Ink
Scraptastic Kit Club Feb 2013 Kit

Sunday, February 03, 2013

Love is in the air!

Since February is the month for lovers with Valentine's Day and all I decided to make a canvas for my art room showcasing our wedding day! I had alot of fun making this and took a few pictures outlining the process but got a little too into it and forgot to take more along the way! Here's a few pictures of the start of the canvas:

1. I took a 12 x 12 blank canvas and Gesso'd it and then layered some of the items onto it that I wanted to use just to play around with the placement of things before I permanently adhered them.


2. I glued a wedding picture of us on and as well as various papers. The pink floral lace paper was originally white but I used pink glimmer mist on it.

3. I didn't care for the yellow stenciled numbers so I painted them white and then glued them onto the canvas. I also used Light Molding Paste for added texture.

4.  As you can see things were starting to come together and I added the fabulous Kissing Couple stamp
as well as the 6 Hexagon background stamp


and the Writing Arrow stamp


and then I must have gotten totally sucked into making this because the next picture I have is the finished canvas!
and here is a close up of the fabulous stamp

Supplies used:

12 x 12 canvas
Paints
Glimmermists
Versafine ink
Watercolor pencils
Light Molding Paste
Gaffer Tape
Glitter, pom pom trim
Number stencils
stickers, various papers
Transparancies
Chipboard embellies

Here is my new addition on my art room wall:


I hope you enjoyed seeing the canvas I made for my art room and until next time,

Marvelous Marilyn!

Hi there, Glenda here to let you know that we have a new art journal prompt up over at the A Year in the Life of an Art Journal and I would love to see you come on over and play with us!!

For my take on this prompt I used this fabulous Umbrella Pinup Lady , whom I like to call "Marilyn with an umbrella"!  I have a few different Marilyn stamps but this is one of my favorites.
and I also used the awesome Line of Chevrons stamp

to make this art journal page

I hope you enjoyed seeing my art journal page and if you enjoy art journaling please stop on by and play along, I would love to see your take on the prompt!