Showing posts with label cardstock. Show all posts

Sunday, March 13, 2022

Art is anything - by Arwen

 Hi Lovelies 


Today, I'm on the Blog with a new card.

I loved to create it - it was lots of fun :)

That's the result:

That's how it looks from the inside (just a sheet of white paper):


And here are some close-up pics:


all stamps I used:

- Row of distressed lines

- Screaming head

- Mason jar

- Whimsical face with horns

- Art is anything - Andy Warhol

- Scribble circle


other materials:

- Watercolor paper

- black cardstock

- Staz on

- Distress Oxide

- Diamond glaze

- Distress reinker


That's it for today :)

See ya soon


Friday, August 20, 2021

Diorama card by Arwen

 Hi Lovelies 💜

Today, I'm back here with a new project, named "Diorama card".

 From the outside:

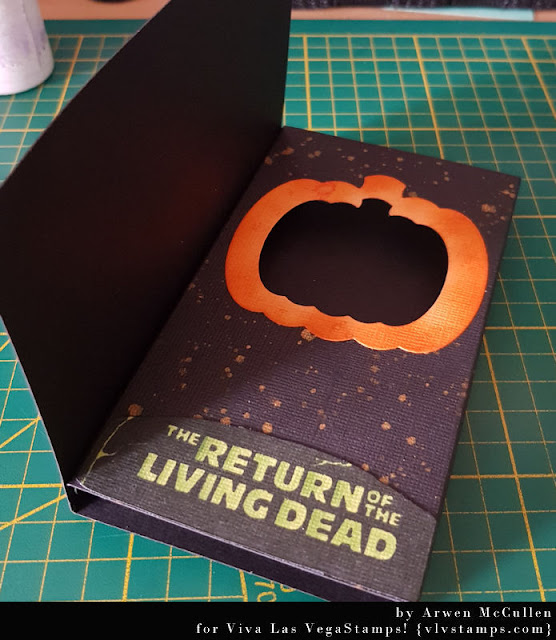
From the inside:


And that's the way, I created it:

1.) I cut my cardstock into a 30cm x 14,8cm piece.

2.) Score it at 10cm, 18,5cm, 20cm and 28,5cm.


3.) For the cutout at the inside, I choose a pumpkin die.

I also used the next size for a pumpkin border.


4.) After wiping the edges with some darker orange color, I glued my border exactly over the cutout. I also used some shimmer spray.


5.) Next step - choosing decoration for my card on the inside.

First, I stamp a text on my green cardstock.


6.) I used some darker green, to create a little shadow on the letters.

7.) As the next step, I choose this raven stamp. Wiping the edges with white color.


8.) Now it's time for the inlay. I used the pumpkin inlay from my border pumkin. Also wiping it with a darker orange and stamped a text on it.


9.) I glued this pumpkin on the inside of the card on exactly the opposite of this position, where I made the cutout before.


10.) Now we can decorate the front side.

For this, I choose my images, I wanna use to.


11.) After coloring, I glued it onto another piece of purple cardstock and stick it together with the front of my card.


12. Now the last step is to finish the diorama card. For this , I glued the small side with my front side.


All stamps, I used:

- Skeleton Punkess

- The moon

- Bat

- Stay creepy

- Faded crow/raven

- The return of the living dead

- Happy Birthday

- Skull and crossbones


other materials:

- Canson cardstock

- Bazzill cardstock

- Pumpkin dies

- Staz on

- Stampin' up stamping pad

- Acrylic paint

- Dylusions shimmer spray

- Distress Reinker

- Stencil

- ColorBox


See ya soon :)

Much love


Saturday, June 19, 2021

Endless card by Arwen

 Hi peeps ❤

I'm back at the Blog with some new stuff.

Today, I wanna show you my endless card.

I made this video - so you can have a look, how it works:

And here are some pics with each side of this card.

First side:


Second side:


Third side:


And the last side (before you can start at the beginning)


For this project, I used lots of stamps.

Here's the list:

- Hanging bats silhouette

- Brain

- Frankenstein's bolts

- Stay creepy

- What would you do with a

- Six staples

- Dracula

- Roses are red

- Bat

- Devil's trap

- The end is near

- RIP

- Nosferatu

- Bird skull

- Bone

- Cross gravestone

- Why get married

- Bride of Frankenstein


other materials:

- Canson paper

- Cardstock black

- Distress Ink

- Distress Oxide

- Stencil

- ScorPal


Hope you like my little project.

See ya soon


Saturday, March 20, 2021

Jewlery Box by Arwen

 Hi Lovelies

Today, it's my turn to share my project with you.

This time, I created a jewlery box to store all my earrings.


And this is how I made it:

First, I built this box from chipboard, cardstock and acrylic paint:


After finished this , I chose the stamps, I wanna use:


Next step is, to cut the paper pieces, which I need to decorate my box. I need 4 pieces with same size and one for the top of the box:


Of course, only white is just boring - so I used Distress Reinker to color the paperpieces:


Last step before finishing - stamp,stamp,stamp :)


All stamps, I used:

- Raven looking up

- Bat

- Devils Trap


other materials:

- chipboard

- cardstock

- Canson Mixed Media Imagine paper 

- Distress Reinker

- Waterbrush pen

- Acrylic paint

- Diamond Glaze

- Glitter

- Ribbon


See ya soon


Monday, February 04, 2013

Create Peace

Art by ANg coming to you from her new lazy boy recliner!

I love the color combination of pinks and browns. So when I found this AWESOME stamp, patterned heart  and this CREATE PEACE at my favorite stamping store VLVS I just knew I could create something very pretty.


 I am just tickled pink! I love how they turned out!

1. Select the colors you want. I used a bronze/brown cardstock, pink cardstock, and some sticky back fabric. (From  DCWV - Die Cuts With A View)
2. I selected the papers I wanted as my focus, rubberstamped the Patterned heart Stamp with Timber Brown Stazon.
3. If you notice it created a very subtle look. I wanted it like that. So that I could accent the parts of the stamps by using Prisma colored pencils .
4. "Create Peace " was stamped on each card.
5. Layering - Your Base card, a layer of pink cardstock, patterend paper, base color again, switch it up, use those little pieces of paper that are left over.
6. Attach some pretty brads, to accent.
7. Embellish - I used some pretty pink flowers to embellish the cards. I bought some Mica Flakes by Stampendous. OMGosh! These are super pretty. Use any glossy varnish/medium/glue and put a small amount on your card and then sprinkle the Mica Flakes in the glue. Let it dry. I even used pretty ribbon.
Cards are perfect for those embellishments that you only have a few of.

I used MIRACLE TAPE to attach the layers.

I used the following stamps :
Patterned Heart

Here  is the link for the Patterned Heart.
Here is the link for the Create Peace.
Here is the link for the Ribbon.

Art on my friends.
L.
ANg


Don't Be Afraid To Stamp A Scrapbook!

Good morning VLVS friends!

Pinky here today with a fun stamped project....a LAYOUT!
The number one thing I hear from my friends about stamping is 
"Oh I don't make cards so I don't stamp" but I am here to tell you that
it is amazing to stamp on a layout!

I LOVE LOVE LOVE being able to create my own images/die cuts 
and really personalize my scrapbook pages! 
Here I simply used this amazing (and new) "Be Adorable" stamp- I stamped it
in bright cherry red ink onto a textures cardstock, and created my own pennant. 
This is just one of 1000 ways to create you own stamped images for a layout. 
 It really adds something to the layout that I would have a hard time creating
with just an alphabet sticker set or journaling. 
I encourage you to go give it a try today!
Come one all you scrapbookers! Let's play with stamps and get our fingers messy!

Happy Monday my friends, until next time!

American Crafts Ink
Scraptastic Kit Club Feb 2013 Kit