Tuesday, June 11, 2013

Stamping With VLVS On Glassine by Pinky

Hey there VLVS fans!

Pinky here today with a fun project tutorial- 
A how to make this acrylic card and stamp on Glassine paper by Tim Holtz. 
I used the amazing Plate 1350 and several images to create this vintage style card
of encouragement and love. I stamped right on the Glassine paper and love it!
 Using Plate 1350 and Colorbox Mixed Media ink- stamp images onto
Glassine paper. Drying with heat gun in between each image. 
I found that a blow dryer did not work you will need a heat 
gun for this ink/paper combo but it dries beautifully. 
 After all images have dried- crinkle paper thoroughly and smooth out after. 
 Stamp an extra Violet Nosegay Flower Plate 1350: Item 17819 onto Glassine
dry, then cut out. Crinkle just like before. 
 Adhere stamped paper to base of card.
Take single flower and pop up over stamped image using foam pop dots. 
 Add embellishments pearls and gemstone.
Using Acrylic Expression- coat wit Alcohol Ink and light dusting of glitter. 
 Adhere vintage lace to front flap wrapping around flap. 
Add Gemstones. 
 Adhere Courage Expression to from flap on outside. 
 Assemble card as per instructions being careful not to touch clear stickers. 
Take Glassine paper scrap and insert "Sending You" alphabet sticker. 
Place into Momenta Metal Frame. 
Adhere to front of card.

 As you can see because the card is clear I adhered gemstones to both sides
of the scallop and you can clearly see the lifted flower for dimension.
Vintage style, beautiful and full of heart- ready for the recipient. 

Until next time- Keep on creating!


Products Used:
Viva Las VegaStamps-
Mock Orange Branches Plate 1350: Item 17813
Violet Nosegay Flower Plate 1350: Item 17819
Flowering Quince Plate 1350: Item 17822
Glassine paper
Clear Scraps Send It Clear Half Scallop Card
Queen & Co Pearls
Colorbox Mixed Media Ink- Truffle
Ranger Alcohol inks
PK Glitz Glitter
Accent Creative Gemstones
Vintage Lace
Momenta Metals Frame

Monday, June 10, 2013

More melted crayon fun

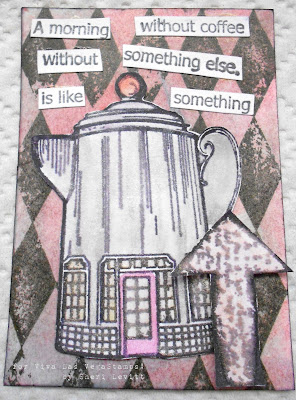
Last year I showed an ATC I made using the Melted crayon technique that I learned how to do from Martha,Seeking for Art(Martha's ustream of this technique). Today I'm going to show you 2 more ATC's I did recently with the melted crayon technique, this time using Kromecote.

I wanted to see if the Melted crayon technique would work using Kromecote. So, I started playing around with it. I did 2 ATC's using both sides of the Kromecote. The glossy side (left side) and the matte side(right side). You can see the different results I got.


I'll start with the left one. The glossy side

I stamped on the Kromecote with the Brick background stamp with Black Versafine ink pad. Because I stamped on the glossy side The ink is still very wet, so I embossed with the Ultra High gloss embossing powder. Yes, more experimenting. After it was embossed I  took some crayons in blue hues and with my craft iron melted the crayons and wiped them on the Kromecote. When I was done I heated the back of the atc to get the way hot. I turned it back around to wipe off the wax. But I was starting to wipe off the color off as well(even some of the embossing). So I left it alone. i like dhow it looked anyway. I stamped the Boy in cape on white cardstock. and colored him in with my Prisma's. I used foam tape to put him on the ATC. I stamped the all my Heroes sentiment and cut the words apart and glued with glossy accents because there is wax where I was putting the words at I had to hold there a little bit to make sure it didn't pop off. 


Now to the Matte side


I stamped the Harlequin Diamond background with the black Versafine ink pad. I used magenta and purple crayons with my craft iron. I turned the paper over to heat the way. then I took a paper towel and wiped the wax off leaving the color.

On white cardstock I stamped with Black Achrival ink pad the Writing Arrow, coffee pot inn. I painted them with my Pearlesent water colors. The arrow smudged a little, but I was fine with that. I used Miracle tape to the coffee pot on the ATC. The arrow I made it like a tree and used foam tape to put it on the ATC. I stamped the A morning without coffee sentiment. and cut out the words. Glued them on with glossy accents. 


Stamps used
brick background
Boy in cape
all my heroes
Harlequin Diamond background
Coffee pot inn
A morning without coffee

Items used
Kromecote
Miracle tape
Black Archival ink pad
Black Versafine ink pad
crayola crayons
foam tape
glossy accents
pearlesent water colors
water brush

Sunday, June 09, 2013

Never Too Early to Start Christmas Cards

It's never to early to start creating Christmas Cards!!!  This is a design I created last December, but never was able to post to the blog. 

This round on the DT is coming to an end and a new one to start soon!!!  I have so loved my time on the team, the other DT member artists were so great to work with and be on the team with.  Such talents inspired me to the max with my own art.  I want to thank VLVS for picking me for this round, and hope to be on the next round!!!

Christmas cards do not have to be complicated or overly busy!  In fact, this is a card you can make up a lot of, working here and there, creating each step. 

VLVS Image - 10783 Poinsettia, Large

This image is so pretty and perfect for Christmas cards.  This image comes in both small and large.

The image is stamped with permanent ink on Kromecote cardstock.  Copics are used to color in the leaves, and glitter pen for the center.  Little lines and dots decorate around the poinsettia, and glitter pen used as well on the dots.

Card mounted on cranberry cardstock with metal "Noel" embellishment and Season Greetings word sticker.

I have one more post for the end of this round designing!  The last piece is going to be a Wayne Gartley piece, you will NOT want to miss!!!!

Cre8tiveLea Yours - Lea

Saturday, June 08, 2013

Imagination

Hi, Hermine here. Love to work with canvases but with this canvas I like to work on the back because this has such a beautiful finish that it is more interesting to use the back instead of the front.


Some of the materials I collected to use in my project.

 
Front, at least this time it is.

Back

detail using a star made out of the PVA glue (tutorial in my previous project)
 
 
Step 1: Take a canvas and work on the backside. Paint a square with white acryllic paint and outline with a black marker. Take some tacky glue and make a smaller sqaure in the middle, when the glue gets transparant it gets sticky so you can use the metall leafing. Stamp with Stazon Black Dream Big 19047
 
Step 2: Take 3 of the wooden parts that come with the canvas (they where meant to use to stretch the canvas to pull it tight after working on it) and give them a white wash with white acryllic paint. Then stamp the Small Wasp 19011 with Stazon Black. Nail them on the bottom part of the wood of the canvas.
 
Step 3: Stamp the Grandville Chicken 18894 (twice) , The Grandville bug 18896  and the Grandville Hawk 18895 with Stazon Black on Kromecote. Make some red accents with a marker. Cut out and glue them on the Cloth pins and slide thecloth pins over the wooden parts. Take a piece of twine and glue this with PVA glue in the slot of the canvas to cover up the staples.
 
step 4: Make a star out of PVA Glue and adding some metall leafing and gold Pearls into the wet glue, let this dry for at least 2 or 3 days. Glue this on top. Take a little clock embellishment and glue on the right side of the star.
 
step 5: On the back you take a vellum quote and fasten it with different kinds of washi tape. Glue the Grandville Chicken 18894 on the right hand side. Put this aside and work on the "wheels".
 
step 6: take some vintage wooden spools and use some washi tape to enhance them. Take smaller wooden wheels, give them a white wash with white acryllic paint and stamp the Spotty Background 1461 on it with Colorbox Chalkink Charcoal. Glue them on on both sides of the wooden spools. Glue the spools at the bottom of canvas.


Stamps used:
Dream Big 19047
Small Wasp 19011
Grandville Chicken 18894
Grandville Bug 18896
Grandville Hawk 18895
Spotty Background 1461

Stazon Black
Kromecote

Friday, June 07, 2013

Feed Your Soul Postcard

Mail art rules!  I put this together as a postcard for a friend across the sea.  


The background is simply an acrylic painted, postcard-shaped piece of cardboard.  I used orange and pink paints for this.  Once dry, I tore and layered matching patterned paper.  Each stamped piece was trimmed, layered and adhered to card.  The leaves were added as the final touch.  Add sealant, address, and mail.


Thursday, June 06, 2013

Celebrate America!


Summer unofficially has started where I am...school is out, the temperature is getting H O T and it is the season of flags. From Memorial Day to Labor Day these next 3 months are full or red-white-blue flag-waving opportunities for my family and I love it! This is probably the time of the year that I am most emotional about the freedoms that have been afforded us by the lives and duties of others.
Viva Las VegaStamps has a plethora of stamps that could be used to celebrate America. I think my favorite are the photo stamps that look like vintage posters. They are simply gorgeous. For my tag today  I selected a stamp that has a collage of fireworks, the American flag, the statue of liberty and the rotunda of classic American architecture.
I've paired this beautiful stamp--which happens to be the perfect size for an ATC also--with upholstery remnants, May Arts ribbons and trim and some metal  embellishments. Miracle Tape adhered the paper to the fabric snuggly and Distress Ink colored the stamp to give that vintage feel! I hope you enjoy my tag! Thank you for stopping by!
If you love Viva Las VegaStamps and want to have over 19,000 images at your fingertips to express you passion, remember that the Design Team Call has been extended to Friday!! You can't make the team if you don't try out! Good Luck!


Wednesday, June 05, 2013

Altered Tile


Hi Everyone Judy here, today I'll share how a small white gloss ceramic tile
can be turned into a drink coaster.
Making a set of these would make a nice gift.

VLVS stamps and supplies used on this project:


Clean and dry tile. In ventilated area or outdoors spray tile with Krylon matte finish, leave in ventilated area until dry. This process preps the surface for the alcohol inks to stick to.
Apply one drop of two alcohol inks on felt applicator with one drop of blending solution in center of both and then apply on tile. The object is not to cover, but add a little color for a nice background. See photo below. 


Stamp all the VLVS images listed above on trimmed tissue paper to fit top of tile with StazOn black ink, it's important to use a solvent ink for this technique. 

With sharp scissors trim away most of tissue from images if you are layering some of the images over tile. 
For best results let ink dry 30 minutes. 
Set tile on wax paper, apply a thin film of Decoupage and Craft Paste on tile, gently place stamped writing background tissue over tile, smooth out wrinkles with fingers, let set about 10 minutes, stamp swirl image with StazOn black ink tile to fill in blank space and then gently add Decoupage and Craft Paste to trimmed stamped tissue images and adhere to tile.
Before setting aside, wipe excess Decoupage off edges, then set tile aside to dry at least 30 minutes before proceeding with next step. 
Trim tissue away from edge with sharp scissors. 

(A substitute for Decoupage; try matte gel medium.)


(trimmed stamped images with writing background and swirl on tile)


close-up

Sealing Tile:
Keep tile on wax paper, spray several coats of matte or glossy finish or
 brush on clear polyurethane. 
Let each layer dry following directions on container.
( it's best to do the spraying in a well vented area or outdoors.)

Apply Inka-gold around edge of tile. 
Finished Tile

Trim to fit cork and Miracle Sheets to fit, peel off adhesive and then apply to base of tile to finish. 
(Note: Miracle Sheets is a perfect product adhering any art projects together.)

Other supplies:
Small Ceramic tile 3 3/4"
Helmar Decoupage and Craft Paste
Krylon Matte finish
Ranger Alcohol inks; Pesto, Ginger
Ranger felt applicator
StazOn jet black
Viva Inka-gold
Cork
Tacky glue
Tissue paper

And
This is a close-up of the second tile I made using a variety of VLVS images.


As an extra special blog post, this is a page I made using some of my favorite stamps you have seen me use the past 8 months during my term as DT Member. 


Man on bicycle #16284
Ship Collage #16091
World Circle Collage #16096
Steampunk #16022
Don't follow your dreams #19003
Nesting Gears #18077
Man on Balloon Basket #19002
Writing Background #16207
Clock Face #19007

Other supplies:
Distress inks, Archival black ink, Gears die-cuts, Helmar acid free glue.
This mini book was made with my Bind it All.  

Thank you so much for stopping by to view this tutorial. 

Viva Las VegaStamps Design Team - Judy Cantrell

Tuesday, June 04, 2013

---paperHaus {Blog Hop}

Hello Everyone! Welcome to our stop on the hop today - we're super excited to be a part of paperHaus this quarter.

Click here to read this quarter's Magazine. It's all about mixed media and we LOVE mixed media!!

You should be here via miss Izzy Anderson.

If you don't know who we are, we are Viva Las VegaStamps!, the world's largest rubber stamp manufacturer with over 19,000 deeply etched pink rubber stamps in our line. They're PERFECT for mixed media, the thick rubber stands up beautifully to thick paints, mists, inks and anything else you can throw at them. We have stamps in categories like Vintage, Steampunk, Mixed Media, Water world, Animals, South Western and more.

We're offering up a giveaway in celebration for the Mixed Media issue of paperHaus and invite you to like us on Facebook, follow our blog, and leave a comment to be entered to win this set of 12 rubber stamps :)


Pin the image for an extra entry into the giveaway! Don't forget to leave a comment with a link to your pin!

For a little inspiration today we're sharing this Travel Journal by Hermine Koster! Perfect for all your summer jaunts across the world!

For the front cover of her journal she has used the SwirlWashi Grid BGBe AdorableBlowing Dandelion and Wheeled Jester from Viva Las VegaStamps!. She has taken the time to stamp on all the inside pages as well, for a full reveal and a tutorial on the front please head over to Hermine's Blog

P.S. -- we're in the middle of a DESIGN TEAM CALL -- we've extended the deadline specifically for paperHaus fans :). Be on a team with over 19,000 stamps at your fingertips!!

Now head on over to paperHaus's facebook and finish today's portion of the hop!!

Monday, June 03, 2013

Red Velvet Cake


Sharing a quick project today! 


The lady holding the cake reminds me of years ago when I made this cake before central air. 
The apartment was hot, it started sliding off, toothpicks were added to hold the layers on. 

Have a nice day! 

Sunday, June 02, 2013

A day late but not a dollar short!

I am all aflutter because today yesterday is was National Butterfly Awareness Day! The main purpose of National Butterfly Awareness Day is to raise peoples’ awareness of Butterflies and their importance as pollinators in nature.

There is however one group of people who already know the importance of Butterflies – CRAFTERS! I can say with 100% certainty that each and every one of you has at least one Butterfly in your stash! Who am I kidding? You all have dozens, if not hundreds of Butterflies flying around your craft room.

Butterfly paper, embellishments, punches, dies, stickers and stamps. But, if you feel you might be lacking in the stamp department check out the selection at VLVStamps. They have 79 Butterfly Stamps for you to chose from, plus 4 Caterpillar Stamps.

THIS is one of my favorite butterfly quotes. I may be known as the EllenBee, but Butterflies are a close second to being my favorite insect.


I used a piece of leftover corrugated cardboard, a scrap of Prima Paper, leftover lace and a bit of ribbon to make this very simple wall hanging. I rubbed white paint onto the corrugated cardboard then added two layers of distressed pretty paper and a handful of paper butterflies. In the center is a journaling spot that I carefully stamped and then EMBOSSED.

The Metamorphosis of butterflies is one of the mysteries of Nature. The ability of these insects to change from the crawling caterpillar to the flying adult is magical. I believe it Butterflies, do you?