Wednesday, September 24, 2014

It's all about me

Hi everyone, Glenda here with a pocket page layout all about me.  I thought it would be fun to do a layout on myself and I had alot of fun using 4 different VLVS stamps to make this page.  Forgive the glare on some of the pockets as it's a bugger trying to photograph these things!!! *(#&)$#&
Alot of the stamps are just the right size for either ATC's or for the pocket cards. 
 I love this Lady hair blowing stamp so I stamped her onto white cardstock and then cut her out
and I used black marker to make her darker as well as Sakura Gelly rolls to color in the little hearts on the camera.  Here are few more close ups


and here are the fabulous stamps I used:

The Lady hair blowing
the Distraught lady
and last but not least the Line of chevrons 
I hope you enjoyed seeing how I used these stamps and until next time!


Tuesday, September 23, 2014

Creating texture with stamps and stencils

Hello and Happy Tuesday!

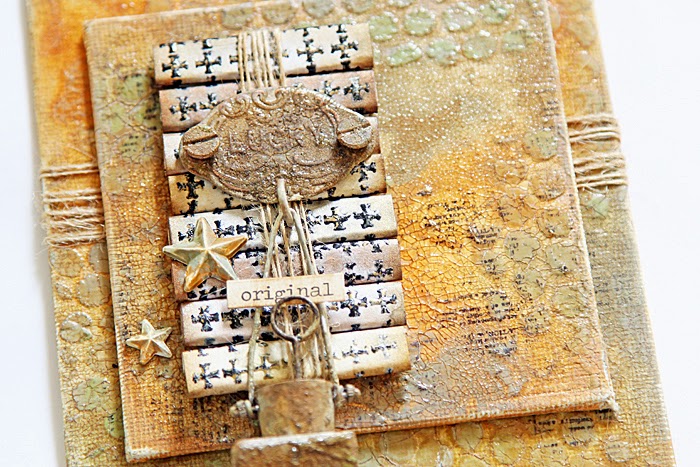
Tina here today with a dimensional Mini Canvas project that is FULL of texture created by using Stamps and Stencils - two of my favorite tools!


If you only had a couple of favorite stamps and a stencil or two, you could create an unlimited number of unique canvases!  The possibilities are endless.

To create my background texture, I applied Shimmerz Dazzelerz through a Crafters Workshop stencil and let dry completely.  I then applied several shades of Distress Paint (over the stenciled pattern) and let the colors mix and blend.


For more texture, I covered both canvases with a layer of Crackle Paint.  Once dry, I applied Distress Ink (watered down) and allowed the ink to seep into the cracks.


I added a bit of stamping, using the Dictionary Page stamp.  This added more texture and interest.

To create my focal point, I heat embossed a sheet of heavy cardstock, using the Design Crosses 2x2 stamp.  I then painted each square with Shimmerz Inklingz, cut each stamped image out, then rolled each square into a flat piece.


I glued each rolled square to a scrap piece of cardboard, and wrapped twine around the entire piece.

To finish my canvas, I added several metal embellishments, painted and enhanced to match the colors of the canvas.


Done!

How do you create texture on canvases?  Please share your tips and ideas!  I am always looking for new ways to create!

Thanks for stopping by!  Have a wonderful day!


Monday, September 22, 2014

money box - piggy bank

Hi Hermine here. Saw this can with glues but it wasn't just a can but if emptied it serves as a money box. Couldn't resist it, and immedialtely thought of altering it. And it comes in very handy because in The Netherlands there is an awesome stamping event in april 2015 and start save up some money already is a very smart thing to do :o)

front

close-up

back

before photo

after photo of front and back

step 1: measure the can and cut a piece of cardstock at size. Spray some bistre on the cardstock and delute with water. Take a stencil and sponge with gesso. Beause bistre delutes in water it also reacts with the wet gesso, which gives these gorgeous muted grungy colours. Distress it with a paper kitchen towel so it looks even more grunge.
step 2: glue the cardstock around the can with miracle tape and finish it off with some washi tape. Put aside for a little.
step 3: stamp with Stazon Black the letters "savings" from the steampunk alphabet 5888 on a piece of cardstock and spray with some bistre mixed with water in a spray bottle. Punch out with an inchie punch. Give them some highlights with a Sharpie white.
step 4: stamp with Stazon black the pigs in basket large 9686 on a piece of cardstock, colour in with Lyra crayons and a waterbrush, using the same colours as used in the background and cut out.
step 5: Glue the letters on the back where the ends meet from top to bottom. Glue the pigs in basket at the front and make some shading around it with Lyra crayons and a waterbrush.
step 6: finish it off with a piece of string.


used materials
bistre
Lyra crayons
sharpie white
string
washi tape

Saturday, September 20, 2014

Guest Designer >> AMBER

 Hello everyone! It's Amber here again today! Yeah! I'm super excited to be able to share another two projects with you VLVS fans. Today I have not one but two fun little tags to share.


To create my first tag, I started by stamping TweedleDum & TweedleDee onto some white and yellow cardstock. I colored them with some colorful markers, cut them out, and then paper pieced their pants with the yellow cardstock. For the base of my tag I started with some blue patterned paper and then stitched some colorful strips of striped paper horizontally across the blue tag base. To finish, I attached a wood veneer sentiment and a few chevron confetti pieces that I colored in black to the upper half of my tag. Check out the close up below!


To created my second tag, I started by stamping Humpty Dumpty and the "Sometimes I Get So Weird I Eben Freak Myself Out" sentiment onto some kraft cardstock. After I had the cut out I set them aside and started working on the tag base. I started by cutting my tag out of some lightly polka dotted paper and then I randomly stamped the "I'm Weird And I Enjoy" sentiment all across the tag base. After I had my background stamped I cut and stitched a few vellum sun rays all around my tag base. To finish, I added my humpty dumpty image,sentiment, and twine.You can check out a close up below!


Before I go I want to say a special Thank You to DeeDee for inviting me to be a guest designer for Viva Las VegaStamps. I had lots of fun creating and sharing my projects here on the blog and Thanks to each and everyone of you that have let me a kind comment!

TweedleDum & TweedleDee Tag
Viva Las VegaStamps Supplies- TweedleDum & TweedleDee
Other Supplies-White, Black, & Yellow Cardstock Patterned Paper CTMH / Staz-On Ink Pad- Jet Black / CTMH Markers / Chevron Confetti- UmWowStudios / You + Me Wood Veneer- Elles Studio / Sulky Thread Black / Sewing Machine


Humpty Dumpty Tag
Viva La VegaStamps Supplies- Humpty Dumpty & Sometimes I Get So Weird & I'm Weird
Other Supplies- Kraft Cardstock / Patterned Paper- Crate Paper / CTMH- Ink Pad- Black / Vellum / Twine / Sulky Thread- Cream / Sewing Machine

Friday, September 19, 2014

GDT : Marilyn Hughes

Hello everyone!  Marilyn back with you today with a journal page I created.  I fell in love with one of the recent plate releases (Plate 1444) and just had to use the stamps.


Stamps Used:

Other Supplies:
Art Anthology Lemon Tart, Fiji, Kona & Basil Velvet
UmWow Studios Clouds & Star Confetti
Prima Stencil Crackle 12x12
Distress Paint Picket Fence & Brushed Pewter
Distress Ink Broken China
Distress Stickles Dry Glitter Clear Rock Candy
Micron Pen


To start off my journal page, I stamped the Clockface and Flock of Geese with black Archival ink directly onto the white page.  I then masked them off and since I was going for a cloudy, moonlit night-type of background, stenciled over them using a Crackle stencil with Broken China Distress Ink. Next I painted the Clockface with Lemon Tart Velvet (I wanted a glowing effect) and then traced each Roman numeral, the clock hands, and the geese with a Micron pen to make them darker and to help them stand out.  I then painted the clouds with Picket Fence Distress Paint and the starts with Brushed Pewter Distress Paint and adhered them to the page.  It's hard to see in the picture put while the paint on the clouds was still wet, I sprinkled on dry glitter (okay, I'm a glitter fiend & most of my projects have glitter on them).


At the bottom of the page I stamped the Weathered Tree in dark brown ink and then using a brown marker, added some scribbles to "ground it" to the page (it looked like it was floating in space). I then painted on Kona and Basil Velvets to give the impression of dirt and to add a horizon line. The quote is one I found in a book of quotes that really resonated with the stamps I had chosen. I used the small Scrabble ​Alphabet letters to stamp the saying onto white cardstock which I colored with the a Fiji Velvet and then outlined using my Micron pen followed by a yellow marker. Finally I added a line around the entire page in black and brown marker to give it a frame.


I've had a blast being a Guest Designer for VLVS! and want to thank DeeDee for giving me such an awesome opportunity!

Thursday, September 18, 2014

Family Love Vintage Style Collage


Greetings stampers! It's Amy blogging today, to share a vintage style collaged canvas. I have 7 different Viva Las VegaStamps! on this canvas, and I think they all work so well together.

  I started by prepping a 12x12 canvas board with...of all things, a sample of Benjamin Moore blue paint I picked up at the hardware store for $1. I then layered on vintage style papers, layering them on with Mod Podge. When this had dried, I added layers of mists in light browns, and spread them on with a brayer. A layer of white acrylic paint was the final of the canvas layers. 
The fourth layer on this canvas is the background stamping, where I used the checkerboard and cursive writing stamps randomly all over. I kept the harlequin diamond stamping just over the area where my photo cluster would be. 
 After layering on vintage papers and elements, I stamped the Bee Cards, Paintbrushes in Jar, and Pen Tips onto untextured cardstock, and fussy cut them out. Adding them throughout the clustered area of the collage, gave the perfect unique vintage touch.


 The Directional Wheel stamp added a perfect bit of movement on the bottom and top corners of my layered cluster. I love the look and how it blends seamlessly with the style of the piece.

I'm really excited with how this canvas turned out, and I hope you enjoyed seeing it too! I hope you have a creative rest of the week! <3

Supply List:
Viva Las VegaStamps!:
Backgrounds: checkerboard, cursive writing, Harlequin Diamond.
Other: Bee Cards, Paint Brushes in Jar, Pen Tips, Directional Wheel.

Canvas board
Ink: IMAGINE Crafts, Ranger
Paint: Benjamin Moore,Plaid Crafts
Mist: 13 Arts, Tattered Angels
Paper: Tim Holtz, 7 Dots Studio, Vintage
Metals: Prima, Bead Landing, Vintage
Photograph: The Sparkling Gnome

Wednesday, September 17, 2014

Live in the moment

Hi!! Karen here with you again today!
 Hope you are having a wonderful week!
 
I absolutely adore this stamp, and have been waiting patiently for it to arrive.


Finally this week I found it in my letter box.. so I knew exactly what I was going to be creating my tag with for this post :)


I started with a distress inked base for my tag... added in some background stamping using
 
 
Victorian Flourish 2 1/4 x 5
 
 
Line of Grass 3/4 x 3 3/4
 
 and my favourite -
 
 
Waybill/Invoice Background 4 1/4 x 5 1/4
 
I added in some stitching and a crinkle ribbon bow a few  idea-ology few trinkets


I then stamped the Girl in Princess costume onto some blank pages of an old book, and cut her out.. isn't she just adorable. I also added in some fussy cut butterfly wings.. turning her into a fairy princess!!
 
Next up I layered  her onto my tag, 
 added in a Tim Holtz ornate plate and word band, and some more baubles
 
and my tag was finished!


Thanks so much for stopping by, I hope I've inspired you a little,
until next time..
Happy Stamping!
Karen xx


Tuesday, September 16, 2014

The road not taken card by Maria Potapovich (mellpellmell)

Hi)

Do you  know...?

Every day goes and never comes back...

Every minute disappears at a speed a second per second...

Years run inexorably...

We grow older every minute and it does not change...

But this is not a reason to say goodbye to happiness?!

It is an opportunity to understand that you can start once again at any moment!
Life goes on! 
There is a chance and... a lot of them! Really!


If you want to know I'll tell you about the stamps I've used:


Always remember that the Road Not Taken! 

Remember this every moment !

Saturday, September 13, 2014

Guest Designer >> AMBER

We have guest designer Amber Rasmussen joining us today :)


Hello everyone! My name is Amber Rasmussen and I live in Florence, Arizona with my high school sweetheart and our two fur little babies. I am an avid cardmaker and scrapbooker and like to explore different styles but if I had to describe my crafting style I would say its Clean & Simple but Fun & Cute. There isn't a material or technique I won't try at least once!


Hello Viva Las VegaStamp fans! I'm super exciting to be joining you here as a guest on the VLVS Blog for the entire month of September. Today I would love to share this fun and funky little tag, using Wheeley Frog, Photographs Do Not Bend, and Lets Roll.


To create my little tag, I started by taking an old recycled sticker sheet and placed it over my tag base. Then I took my sponge dauber and added some color. I used a light green and a light orange color for this background. You could of course use a stencil or stamps to create your background but I like to recycle and reuse whatever let over supplies I have on hand, like the sticker sheet. After I had my colorful background circles applied I went a head and stamped the two Photograph images and the Wheeley Frog image to the tag base. I also went a head and distressed the front of my tag as well as the edges.


After I had my tag base all ready to go I stamped my "Lets Roll" sentiment onto a little white banner I created and then stamped and colored my Wheeley Frog. I also added some clear Rangers Stickles to my cute little frog and cut all around him. 


Here is a close up of my finished tag. I add my cut and colored Wheeley frog over the first image I had stamped onto my tag base, added my "Lets Roll" banner to the top left side, and then added some orange stitching all around my tag.
VLVS Supplies:  
Wheeley FrogPhotographs Do Not Bend, and Lets Roll.
Other Supplies: Patterned Paper- Fancy Pants / Staz-On Ink Pad- Jet Black / CTMH Markers / CMTH Edge Distresser / Ranger Stickles- Clear / Sulky Thread- Orange / Sewing Machine