Showing posts with label Mini Canvas. Show all posts

Tuesday, May 18, 2021

She was a dreamer ► Majo

Good morning, Peeps ♥

Today I show you another addition to my canvas triple.


I started it last year and two are already hanging on the wall of my studio.

Again I started with distress ink in warm red and yellow and left out a part in the middle. I stamped the vintage lady and the sentiment on tissue paper and used Mod Podge Matte to adhere it to my canvas.

I used the same colours distress ink to colour her dress and hair.

 For more interest I spritzed some ink on top, added the wooden charms, the metal ring and string and ready is my little canvas.


I tend to give my creations to friends, those three I’m sure I will keep.

Remember the last two I made?
 

I used the following stamps:

Fed-up Vintage Lady
She was a dreamer
 Both from plate 1459
 Thanks so mch for stopping by, have a great day, find time to craft and take good care of yourselves.
 Luv ya ♥


Friday, August 12, 2016

Display purposes only

Hello everyone,

and welcome to my blog where today I have a mini canvas to share which I made for my DT post. I've also took lots of photos along the way and will tell you how I made this so sit down with a nice cuppa and enjoy !

As always I'll start with the finished project :


And here's how:


I started with a 4"x4" (10 cm x 10 cm) canvas. 


I took a stencil and some model paste and applied it to the canvas with a palet knife. 


This is how it looked, I dried it with a heat tool. 


Next I painted it with white gesso to get a base for the paint. 


These are the colours I used; I also added some white. 


This is the painted version.. but I thought it was a bit flat so....


I decided to use some glazing liquid and a darker turquoise to add som shadows... 


I used about half paint and half glazing liquid...


I painted it over the model pasted area. What happens is that because of the glazing liquid the paint stays wet for much longer. So you put it on, leave it a little while (how long depends on the temperature, the moisture in the air etc... just try and see) and then wipe off with a baby wipe.. It sort of settles on the recesses... 


It is very subtle but gives a little bit of interes. You can keep doing this until your are happy with the result... 


Next I took a Pitt pen and went along the edge of the canvas. The idea is to paint the sides black but it is not easy to get a straight-ish line with a brush. So I do this with a marker... 


Like this... 


The rest then gets painted.... 


Like so... 


Now for some background stamping, not to much as there is not much room... A list of all the stamps I used is at the bottom of this post... 


The canvas with stamping... 


No for the main image and the sentiment.. 


At this point I wasn't sure about which sentiment to use... So I stamped both..


This is how she looks coloured... 


I still thought the canvas was lacking something so I added white splatters. I just shake this paint pen at it and drops fly out... Be careful as they tend to go everywhere... 


This looked better...


I chose this sentiment which is part of a sentiment really... 


After adhering everything with gel medium and adding some shading around her I declared it finished. 

I used the following stamps:


Thank you so much for stopping by today !! 


Tuesday, September 23, 2014

Creating texture with stamps and stencils

Hello and Happy Tuesday!
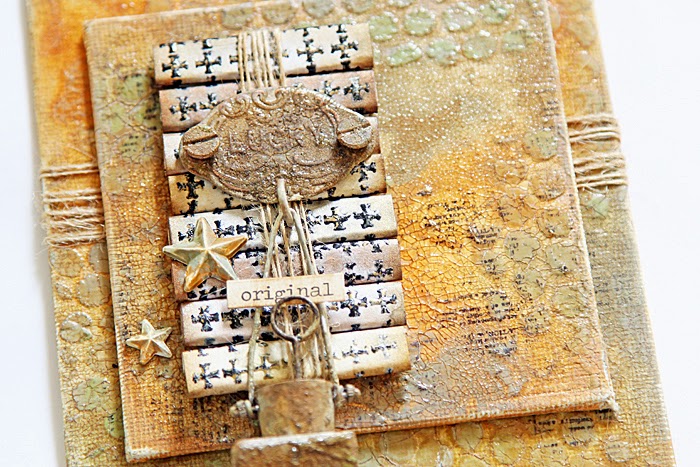
Tina here today with a dimensional Mini Canvas project that is FULL of texture created by using Stamps and Stencils - two of my favorite tools!


If you only had a couple of favorite stamps and a stencil or two, you could create an unlimited number of unique canvases!  The possibilities are endless.

To create my background texture, I applied Shimmerz Dazzelerz through a Crafters Workshop stencil and let dry completely.  I then applied several shades of Distress Paint (over the stenciled pattern) and let the colors mix and blend.


For more texture, I covered both canvases with a layer of Crackle Paint.  Once dry, I applied Distress Ink (watered down) and allowed the ink to seep into the cracks.


I added a bit of stamping, using the Dictionary Page stamp.  This added more texture and interest.

To create my focal point, I heat embossed a sheet of heavy cardstock, using the Design Crosses 2x2 stamp.  I then painted each square with Shimmerz Inklingz, cut each stamped image out, then rolled each square into a flat piece.


I glued each rolled square to a scrap piece of cardboard, and wrapped twine around the entire piece.

To finish my canvas, I added several metal embellishments, painted and enhanced to match the colors of the canvas.


Done!

How do you create texture on canvases?  Please share your tips and ideas!  I am always looking for new ways to create!

Thanks for stopping by!  Have a wonderful day!