Showing posts with label Alphabet. Show all posts

Thursday, June 10, 2021

Index card - Into the abyss

Hi everyone,

It's June and that means for me it's ICAD time! If you are not familiar with this, it stands for "index card a day" and is about doing something creative on an index card every day for two months. This is the third year I'm participating in the challenge and I decided to follow the weekly prompts. This week is about typography, text and poetry and so today's card contains a few text and letter elements.

When I started, I knew I wanted to do something a little "steampunky" and had a rough idea for my focal point. With an eye towards the weekly theme, I started with this fantastic steampunk alphabet stamp set. I got out my quite dry Archival Ink and stamped the words "brave hearts dive deep", not caring too much about a perfect stamp impression.


I wanted to add some color and therefore chose two Moonshadow Mists. I sprayed them on top and also dipped the card into the puddles on my working surface to get some additional texture. When building layers with these sprays (or any other water soluable colors) it can be helpful to dry the piece in between as it adds some interesting textures.

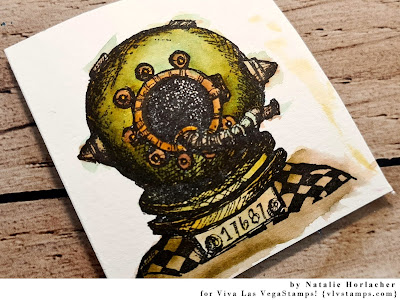
Next, I stamped my focal image - the whimsical diver - with Versafine Claire Ink and used watercolor brush pens to color it in. I used some brown and orange/gold tones first and went over parts of the image with a very light blue wash then. Doing this wash is easy: Instead of adding the color directly to the page, I scribbled some on my glass mat and picked it up with a water tank brush. The blue wash created this pretty greenish metal look.


I cut my image and inked up the edges with a black marker. Then I decided where to place it on my index card. For more interest in the background I added some messy stamping with the "into the abyss" text stamp. As I wanted a stonger impression as I had with my first layer, I used my juicy Versafine Claire ink pad again and made multiple stamp impressions without reinking the stamp very often. With this technique I did two areas around the diving helmet and one in the right top corner.


To finish my card, I did two more steps. First, I glues the image down together with some washi tape to avoid a weirdly floating focal point. Of course I could have simply glued the image to the bottom, but I just liked it to be a little higher.
Also, I collected some text fragments from books. I have a few old/used books (novels and poetry) that I just keep for this purpose. I went through them quickly (just a quick skimming) and through the snippets I already cut from some of the books and chose some fragments to form a new text. I love when you can see that the fragments are taken from different books, and to be honest, I love that it turned out a little oppressive.

So heres my finished index card again, as well as a few detail images:

Stamps used:
Steampunk Alphabet Unmounted (5888)
Whimsical Diver (19354)
Into The Abyss (19352)

Other material:

- index card
- Archival Ink (jet black)
- Versafine Claire Ink (nocturne)
- Lindy's Moonshadow Mist (buccaneer bay blue, moonlit mulberry)
- ZIG watercolor brush pens
- washi tape
- old books / text fragments


See you soon!


Monday, September 22, 2014

money box - piggy bank

Hi Hermine here. Saw this can with glues but it wasn't just a can but if emptied it serves as a money box. Couldn't resist it, and immedialtely thought of altering it. And it comes in very handy because in The Netherlands there is an awesome stamping event in april 2015 and start save up some money already is a very smart thing to do :o)

front

close-up

back

before photo

after photo of front and back

step 1: measure the can and cut a piece of cardstock at size. Spray some bistre on the cardstock and delute with water. Take a stencil and sponge with gesso. Beause bistre delutes in water it also reacts with the wet gesso, which gives these gorgeous muted grungy colours. Distress it with a paper kitchen towel so it looks even more grunge.
step 2: glue the cardstock around the can with miracle tape and finish it off with some washi tape. Put aside for a little.
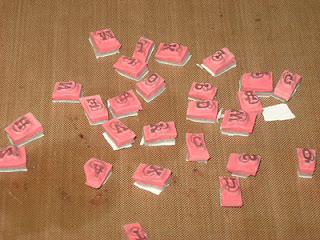
step 3: stamp with Stazon Black the letters "savings" from the steampunk alphabet 5888 on a piece of cardstock and spray with some bistre mixed with water in a spray bottle. Punch out with an inchie punch. Give them some highlights with a Sharpie white.
step 4: stamp with Stazon black the pigs in basket large 9686 on a piece of cardstock, colour in with Lyra crayons and a waterbrush, using the same colours as used in the background and cut out.
step 5: Glue the letters on the back where the ends meet from top to bottom. Glue the pigs in basket at the front and make some shading around it with Lyra crayons and a waterbrush.
step 6: finish it off with a piece of string.


used materials
bistre
Lyra crayons
sharpie white
string
washi tape

Friday, June 08, 2012

Motion and Time | Steampunk Tags

I find I can't stop playing with this steampunk alphabet. I made some quick, tags that can be used as bookmarks or as accents or journal spaces in my scrapbooks. I stamped the images first with a walnut colored ink. I then stamped with Archival the main images for the tags. For the letters I stamped the squares with the letters and then over-stamped in Walnut the steampunk dials and then edged the letters with the walnut ink. I hope you enjoy my quick and easy tags!
 For these tags:
 Item 16058 Plate 1269Item 10032 Plate 962 Page 608
Item 17484 Plate 1334 Item 5888 Plate 602  Matching set of Numbers also available as 8475. Page 347
Thank you for looking! ~leslierahye

Tuesday, June 05, 2012

Father's Day Steampunk Style

Today I wanted to share with you some of the first stamps I purchased with Viva Las Vegastamps! When I saw this Steam Engine and the Steampunk Alphabet, I immediately knew this would be a Father's Day card for my Dad who is a model train hobbyist. He and my son share a deep passion for trains--this is perfect for many applications in my crafting!

For this project:

Steampunk Alphabet/Unmounted

Steam Engine 3 x 2

Rangers Archival Ink
Steampunk Paper
Watercolors & Water Pen
Twinkling H20--Egyptian Gold
Adhesive & Foam Squares

These easy cards were created by stamping images on white card stock with Jet Black Archival Ink. The Archival Ink is perfect for water coloring as it does not run with this wet application of color. I went around the edges of the papers with sepia and colored a wash on the Steam Engine. I loaded the brush more heavily for coloring the letters. The letters perfectly fit on a 1" square. The shiny gold is the twinkling H20 and is perfect for Steampunk! 


Thank you for looking at my cards! I hope you enjoy them!
~leslierahye

Sunday, January 15, 2012

Senior Ladies, Best Friends - A Card For Your BFF

Old Friends Card by Joe Rotella using Viva Las Vegastamps! stamps

Senior Ladies (#8671) from Viva Las Vegastamps!Until this project, I don't think I've ever used a "photo stamp." You know the kind - stamps made from photographs rather than drawings. I've seen many that have interested me, but just didn't know what to do with them or how to use them. That brings me to the pound of rubber I received from Viva Las Vegastamps! For only $25, you can buy one pound of unmounted, deeply etched red rubber stamps. Viva Las Vegastamps! will select, at random, a pound of images and sayings from their collection of over 16,000, mostly "non-cute" stamps. I got a pound and when I sat and went through them I found Senior Ladies 3 1/2" x 4 3/4" (#8671).

Every time I looked at this stamp, a story went through my head. These two woman knew each other for years. They often went to the park together. They fed the birds. They played BINGO. They were best friends.

Given how many times I stopped and looked at this stamp (yes, I go through the pound of rubber over and over again), I knew I had to use it on a project.

I started by covering some glossy photo paper with distress ink. Then I stamped Senior Ladies 3 1/2" x 4 3/4" (#8671) using black dye ink. Once trimmed, the result looked like an old photo!
Bingo Card (#8431) from Viva Las Vegastamps!I picked up some vintage BINGO cards at a flea market this summer and decided to use one as a background for this photo. If you don't have a real BINGO card, you can create your own using Bingo Card 4 3/4 x 5 3/4 (#8431).

Scrabble Alphabet (#1948) from Viva Las Vegastamps!For the sentiment, I stamped letters using Scrabble Alphabet Unmounted Regular Size (#1948) on white paper. I applied distress ink, used a Copic marker to color the edges of each tile and then embossed the letters with Ultra High Gloss Embossing Powder. Once cut out, they look like real Scrabble tiles.

The card base is made from Designer Paper (DP) that fits the vintage look I was going for.

Now that I've finally used a photo stamp, I know they will become a standard part of my stamping portfolio. I hope you'll give them a try too. In fact, why not challenge yourself? Get a pound of rubber and see how creative you can be with stamps you didn't select. I bet you'll find it as fun as I did!

Check out my blog on Create & Craft for more project ideas.
Happy crafting!
Joe

Wednesday, October 26, 2011

Using Static Cling Mount Foam!! + Robins Nest goodies!

Hey VLVS! Fans!! DeeDee here again...

Now, I know I Promised a video in my last post.. but my card reader is not working correctly and I can only upload photos at this time... so here is a PHOTO tutorial on using the Cling Mount foam from VLVS! --- This foam has an adhesive side.. and a smooth side.. and once adhered to your rubber stamps allows them to cling to acrylic blocks like photopolymer clear stamps!!! No more heavy bulky wood hanging around.. just easy peasy cling mounted rubber!! 

Onto the tutorial:
Step one: gather supplies.:
Cling Mount Foam (1/8 inch thick) and (1/16 inch thick)
A nice pair of scissors (Click here for some via VLVS!)

Step two: cut foam to size of stamp

Step three: peel backing from ADHESIVE side and stick to underside of stamp

Step four: Cut and trim individual stamps

Step five: remove 2nd backing to reveal cling... press to acrylic block.. ink up.. and STAMP AWAY!


And here's what I ended up with! Small party favors at a local Halloween party! Paper and Dew Drops courtesy of The Robins Nest!!
The small bottles can be found HERE @ VLVS!


Hope this helps!! -DeeDee