Showing posts with label Crystal Lacquer. Show all posts

Saturday, August 04, 2012

Lady With Scarf on Moon Altered Ledger

I found this old unused old ledger on one of my treasure hunts one weekend going to estate sale after estate sale. Usually I tear pages out of books and use them in other projects this time I decided to keep this ledger.  My project today is to alter this old ledger! 


Here is a close up of the finished embellishment on the cover to the altered old ledger using the Rubber Stamp Lady with Scarf on Moon from VLVS!!

Supplies:
Tanzanite Pearl
Citrine Pearl
Gold
Pink Saphire Pearl
Garnet Pearl
Purple Pearl
Old Ledger Book
Lace
Ribbon


Roll out the Creative Paperclay® very thin. There are two pieces of core board on each side of the rolling pin to keep the thickness even.  Place VLVS! Lady with Scarf on Moon face down on clay and roll over gently.
With a craft knife cut around the stamped image of the VLVS! Lady with Scarf on MoonSet clay aside to dry. 
Once the clay is dry gently sand edges; use fine grade sand paper or an emery board. 

While the clay is drying adhere lace to the old ledger book with Sakura 3D Crystal Lacquer and Terri Sproul Mixers - Gold and sprinkle Glitz Effects Gold while the lacquer is still wet.
Paint the VLVS! Lady with Scarf on Moon with Terri Sproul Mixers (Tanzanite Pearl, Citrine Pearl, Pink Sapphire Pearl, Garnet Pearl and Purple Pearl) and Sakura 3D Crystal Lacquer. 
Add ribbons to the binding and 
now you have a "new" old ledger!


Friday, July 13, 2012

EYE ON FASHION of the PAST

This past week the Viva Las Vegastamps! design team  partnered with Gauche Alchemy. We have a wonderful collection of projects using products from both companies!
My project was a book titled EYE ON FASHION of the PAST. 

Only the front cover was used to in the daily post.  I am here today sharing the rest of the book. 

The base is a 5 Ring Kaiser Craft Scrapbook that was first painted brown.  After the paint dried, all pages were covered with vintage papers then inked using   Color Box Fluid Chalk Ink Pad - Rouge and Punchinello as a stencil.  Papers were trimmed then all edges were sanded.  On the cover VLVS! Fifties Eye Cat Glasses and Lady with Flowered Top

Note: All stamped images in this project are from VLVS!  They were stamped on sewing tissue, heat embossed with VLVS! High Gloss Embossing Powder and tinted with Tim Holtz Distress Markers.

Gauche Alchemy Supplies include: Vintage Papers including sheet music, yellow game piece as an eye glass on front , sequins, fabric cut into strips used with ribbons, Punchinello as a stencil with ink, lace black and purple, tag, Button, Bottle Cap and Gold Beads. Other supplies acrylic paint, Sakura Crystal Lacquer, Color Box Chalk Rouge, ribbon, 

Collage papers, inked using punchinella as a stencil for coverage of the background. Added pieces of doilies, colored some of the images on the collage papers with Tim Holtz Distress Markers.

Game piece over the eye on the cover... "EYE" on fashion of the past! 


Page 2 & 3 - VLVS! stamps Lady In Slacks, Lady Showing Slip and  Lady With Muff  Embellished flower cut from GA black lace. Pieces of doilies have been incorporated through out the book.  
  
Page 4 - VLVS! Lady with Pleated Skirt Another GA black lace flower with button and decorative straight pin. Tag between pages 4 & 5 purple lace, sheet music and VLVS! image of Lady Holding Up Dress


Page 5 - VLVS! Two Ladies Fancy Dress  another flower from the black lace.

Page 6-has this beautiful framed image. The frame is a GA bottle cap filled with Sakura Crystal Lacquer over the image, add the beads around the perimeter set aside to dry.

Pages 7 & 8 - VLVS! images Art Doll Set Large (head only) and Lady in Scarf Dress

The back of the book has been stamped with VLVS! Beautiful Women. Embellished with flower from the black lace, trim cut from the purple lace.  

To finish the project add a lot of ribbon/fabric to the rings.  On this book there is combination of both. 

Hope you enjoyed viewing my book and you are inspired to collage!

Tuesday, May 15, 2012

Prepping for the VLVS! Link Up BLog Hop!!!

This is just a little tease... I have something big planned for the LINK UP BLOG HOP!
The Viva Las Vegastamps! "Link Up Blog Hop" is May 26th & 27th, featuring Mary Vogel Lozniak's awesome VLVS! images.  There is still time to think about LINKING UP! See details HERE!


Today I am using Mary Vogel Lozniak's Headless Unicycle Juggler. With the Viva Las Vegastamps! sentiment "Anything I can imagine I can do." 
Supplies: 
Stewart Superiors Memories Black Ink
Mary Vogel Lozniak VLVS! Headless Unicycle Juggler 
White Card Stock
Black Card Stock
Yellow Card Base
Robins Nest Dew Drops

Stamp the Headless Unicycle Juggler on white cardstock, color dress with Tim Holtz Distress Marker - Rusty Hinge and fussy cut. 
Stamp the Headless Unicycle Juggler directly on the card, with Tim Holtz Distress Markers color the arms Tattered Rose and Pumice Stone on the unicycle. Note: The border was made ahead of time... instructions later in the post!  
Adhere the fussy cut dress to the stamped image on the card. Stamp the sentiment "Anything I can imagine I can do" on white card stock and layer on black, adhere to the card. Adhere three Robins Nest's Dew Drops as juggling balls with Sakura Crystal Lacquer!


A LITTLE BONUS POST!!!! 
Creating Textured Borders on Cards 
and what ever trinkets you want!  

Attach Viva Las Vegastamps! Miracle Tape to the card.  Remove the protective covering, add trinkets (locking washers) and fill with seed beads. Cover with Sakura Crystal Lacquer, set aside to dry 24 hours. 

Using the same technique here are two variations. On the left, are locking washers with Robins Nest Dew Drops. The trim on the right is the one used on the Headless Unicycle Juggler card above. It is made with Robins Nest Dew Drops and Terri Sproul's Gold Glitter Glitz! Covered with Sakura Crystal Lacquer and set aside to dry 24 hours.

Be sure to join the design team 
and "Link Up" on May 26th & 27th!

We plan to have tons of fun with 
Mary Vogel Lozniak's VLVS!


MONTHLY CHALLENGE 
Don't forget the VLVS! Monthly Challenge!
The theme is May Flowers.
One random winner has a chance to win $25 Gift Certificate the the Viva Las Vegastamps! online store.

Visit my blog Dreaming of Castles

I'll meet you at the "LINK UP BLOG HOP"
~Lyneen

Tuesday, April 10, 2012

Once, Twice, Three Times a Skipping Lady

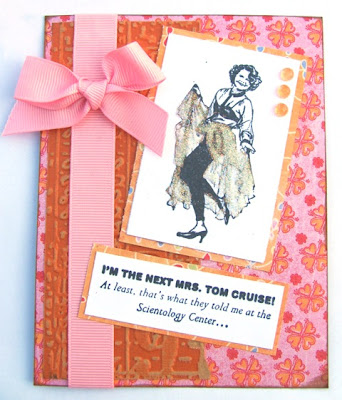
Hi Viva Las Vegastamps! fans! My name is leslierahye and I am proud to be a new design team member for this amazing stamp company! I love the diversity of the designs and sentiments offered [by far the largest selection of sentiments that I've ever seen in one place!]. 
For my project today, I wanted to share with you how versatile your stamps from Viva Las Vegastamps! can be!  I recently received a POUND OF RUBBER for $25! In this pound of rubber I received both images and sentiments that I could use for all sorts of crafting--a TON of them! With this my first project I wanted to share how you could take one image--in this case the Skipping Lady-- and create cards for different occasions by merely changing the sentiment--I stopped at 3 examples but the sky is the limit here with so many sentiments to choose from!
For this project you will need from Viva Las Vegastamps!:


Additional Supplies include:
card stock of your choice 
[I used Coredinations papers, Bazzil Basics and Basic Grey]
assorted ribbons, flowers and gems
assorted embossing folders
India Ink by Stewart Superior

Method:
All three cards began the same--I stamped the image on a 2"×3" piece of white card stock with Black India Ink. I then applied Sakura 3D Crystal Lacquer to the dress skirt "overlay". While the crystal lacquer was still wet, I applied a generous sprinkling of Terri Sproul's Mixers Ultra Fine Glitter. The images were put aside to allow the lacquer to dry. 
The sentiments were then stamped with Black India Ink onto white card stock and then trimmed to fit the sentiment. All images and sentiments were mounted on a piece of Basic Grey patterned paper using Miracle Tape to adhere the stamped items to their backings.
The Coredinations card stock was embossed using various folders to match the "intent"--clock for age, swirls for "crazy", reading material-like for Scientology sentiment. In some cases the card base was inked with a brown ink, but that is not necessary.
All embellishments were adhered with Miracle Tape--it is simply amazing for all applications but I LOVE how it holds ribbon! You don't even notice the tape even with the organza ribbons!! The little gems were adhered with crystal lacquer.
Thank you for looking! I hope you enjoyed my cards!

Tuesday, March 27, 2012

A sad farewell.. but a bright beginning!


You've probably noticed a setting trend on the VLVS! Blog the last couple of weeks -- it is with a heavy heart that most of the team is retiring and new kids are here to show you their goods. So it's a sad farewell... AND a bright beginning :) 

It's also quite the bright beginning for me as I've just (last week) Started as an EMPLOYEE of VLVS! -- I'll be working behind the scenes setting up the fabulous stamps that you all purchase :) I'll also be dabbling in pressing the rubber! 

Its' quite fun and I can't wait to show you how things work behind the magical curtain :) 

But here is my last post as a Design Team member.. I will forever be a VLVS! stamp addict -- I enjoy the plethora of images as well as the amazing quality of rubber. Today I've brought you a piece that I have not shown on the VLVS! blog..  a "Brave the storm" style tag --


Using my absolute favorite stamp by VLVS! 


2 1/4 x 3

(don't forget you can get just cushioned or unmounted rubber, too!)

I stamped my trusty umbrella man on white cardstock with Memento Ink. 

The back of the tag is embossed with a TH die and distressed with distress stain. The clouds are hand drawn, and the raindrops and puddle are made with 3D Crystal Lacquer .. after the lacquer was dry I dabbed it with alcohol ink. 

So Brave the storm new kids comin' in! This is a wonderful company to work for, both DT wise and as an employee supplying you with your wildest stampy dreams! Also.. Brave the storm outgoing folks.. the ride was amazing and now we can relax and think fondly of our VLVS! DT days. Take on new adventures! Try new things! BRANCH OUT! I will miss you all!  ♥♥♥
-DeeDee

Tuesday, March 06, 2012

March is Birthday Month at Viva Las Vegastamps!!!

MARCH is BIRTHDAY MONTH
and this month holds a very special birthday
Terri Sproul (the Design Team Lead) is 29 again!!!
Be sure to stop by
 and wish her Happy Birthday 
with a card in the MONTHLY CHALLENGE!!!

For this card gather supplies listed at the end of this post.  All stamps used are from Viva Las Vegastamps! the Basset Hound Dog Rocketeer, "May the Steam be with you!", Happy Birthday, Nesting Gears, Fancy Key-Vintage and a Swirl from Swirls Plate 1333. All images were embossed with Viva Las Vegastamps! Ultra High Gloss Embossing Powder.
First stamp Happy Birthday on a strip of paper and adhered with VLVS! Miracle Tape to the bottom of the panel. Next stamp the Basset Hound Dog Rocketeer, masking the dog stamp the Fancy Key-VIntage to make it look like the Basset was a wind up.  Stamp the Swirl from plate 1333, and "May the Steam be with you!"  Mask all stamped images and the flags on the pattern paper and stamp the Nesting Gears with Versafine Olympia Green ink. Once all images are stamped and embossed. Using COPICs add a little color to the rocket with gray and brown to the Basset.
Mix Sakura Crystal Lacquer with Terri Sproul Mixers Gold.  Paint thickly on the rocket and lightly on the Basset.  Set aside to dry 
After the panel has dried attach it to the card base with Viva Las Vegastamps! Miracle Tape. Add locking washers! 
HAPPY BIRTHDAY TERRI!!!
Supplies
Stewart Superior Memories Madonna Blue Ink
Stewart Superior Memories Black Ink
Versafine Olympia Green Ink
Pattern Paper - My Minds Eye
Locking Washers


Remember to enter the Monthly Challenge 
The theme this month is Birthday!
You could win $25 to the VLVS! on-line store 
To read more about the challenge click HERE!

Sunday, February 19, 2012

GOT MILK? MOOOOO... COW SWAP

Lyneen here with a surprise post! A few months back I participated in a swap... it was a special one.  We had to make 8 sets of ATCs, Moos and Inchies.


ATC = 3 1/2" x 2 1/2"
Moo = 3 1/2" x 1"
Inchie = 1" x 1" 

I had fun with these, all stamps are from Viva Las VegastampsI stayed with red, black and white! For a bit of whimsy added copies of a couple of vintage things from my collection of ephemera.  The tag is from an old local creamery. HOW OLD? The phone number listed is Main 360!!!  Then the milk cap has a 5 digit phone number!!!  How long ago did they use 5 digit phone numbers.

I used Crystal Lacquer to give the bottle the look of glass and VLVS! High Gloss Embossing Powder on all the images... if you haven't noticed I LOVE!!! VLVS! Ultra High Gloss Embossing Powder!


Sunday, December 04, 2011

Season's Greetings Side Step Card

Seasons Greetings Side Step Card

I participate in a card swap at Red Letter Journals. On the first Sunday of every month, about two dozen card makers get together to learn a new technique and trade cards using the technique they learned the previous month. It’s a great way to learn new things, have fun and get some great cards!

Today at the card swap our friend Nancy shared a “side step card” that really impressed me. As soon as I got home, I put the project I had ready to post on the back burner and created this card using two stamps from Viva Las Vegastamps! ; Waving Santa 2 ¾ x 2 ¾ #4820 and Seasons Greetings Square 1 ¾ x 2 ¼ #10110.

Waiving Santa Stamp #4820 from Viva Las Vegastamps!Seasons Greetings #10110 stamp from Viva Las Vegastamps!

The stamps were stamped on white cardstock using black dye ink and then colored using Copic markers. To highlight the images, glitter was applied using Sakura 3D Crystal Lacquer as an adhesive. The fine tip made it easy to get in to the tiniest parts of the stamped image. Since the Crystal Lacquer dries completely clear, you can still see the stamped image under the glitter.

I created the “HO! HO! HO!” banner on the computer, punched out a gift box using the Martha Stewart present punch and cut out a Christmas tree using Sure Cuts A Lot (SCAL).

I cut out the card base using a side step card pattern I found at Carson’s Creations.

Check out the 12 Tags of Christmas Blog Hop that's going on at Viva Las Vegastamps! The tags look fantastic!

You can see my other projects on my blog on Create & Craft.

Happy Crafting!

Joe Rotella