
Wow it's the end of March already!!! Susan here with my last post for my term on the Viva Las Vegastamps! Design Team and I have pulled a rabbit out of my hat for my last project!

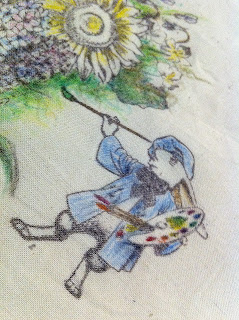
Did you know you can paint with stamps??? You can build up beautiful scenery with many individual stamps. I know it sounds daunting but it's pretty easy and I'm going to show you how! I recently received the new Easter Plate #1372 of stamps and there is this adorable Bunny Artist #18115 in a painter's smock and I knew exactly what I wanted to create...a painting using stamped images.
I recently treated myself a set of Derwent Inktense Pencils that I have been pining for since I saw a project made using these pencils by Lisa Fulmer. Now I can finally paint on fabric and get a watercolor effect -AND- it's permanent.
I needed to go through my stash of VLVS stamps to grab some of my floral stamps.


I am building up a large floral scape by masking with paper masks and multiple stamping using Bouquet #9680, Hyacinth and Leaves #10301, and Sunflowers #9918 - and the Bunny Artiste will be painting them.
For this project I am stamping onto a cotton muslin. I first begin by stamping my florals multiple times on plain paper and trimming them out to make individual masks. I would have used post-it notes, but I didn't have any within reach. Start by stamping an image, then place mask over and then stamp again, slightly overlapping. I repeated stamping florals multiple times to build up a large floral scape. This required several masks {one mask for each stamped image in layering process} so the additional prep time of fussy cutting is well worth the reward of a beautiful piece in the end.

Please see accompanying image number to go along with written instruction/description.
Photo #1: Bunny Artiste stamped on muslin in brown Staz-On ink off to the right side of my fabric. Photo #2. Next I stamped one Hyancinth, placed a mask over and stamped another to the left. Then placed a mask over the second Hyacinth also. Photo #3: I repeated by adding Sunflower image stamped three times; applying a handcut mask after each stamping. Photo #4: Detail stamped images covered by my paper masks. Photo #5: After completing Sunflowers and masking, I stamped the Bouquet three times slightly angling around the other flowers. I started in the center, then reinked and rotated to stamp left and right sides. Photo #6: Remove the masks to see the full layered image as one scene. Now the completed image is complete and ready for coloring.
Now I begin painting my scene with the Inktense pencils
and build up layers of color.
and build up layers of color.

Then to get a softer, watercolor look, I used a waterbrush to blend out some of the color. This really brightened and intensifed the colors. I continued building up and blending the color with the water brush until I reached a point I was happy with. For a finishing touch - I added some white gel pen to add back in some highlight areas. Some of these were lost from bleed out when blending out the colors. Not a problem. The really nice thing about these Inktense pencils - after the first time you wet the colors, when dry - they are permanent. If you re-wet - they do not blend out any further. These will be fun to play with more on other projects.
HERE IS THE FINISHED MASTERPIECE!

I showed this to my pals at my local monthly Altered Book Club meeting and they thought I had painted this from scratch. They were shocked to hear that it was all stamped images. So this project is a definitely a winner! Off to create some more : )

I hope you have enjoyed my projects as much as I have enjoyed creating for the Viva Las Vegastamps! Design Team over the past six months...it's amazing how fast the time has flown by. Beginning in just two days there is a brand new design team starting and I am just as excited as you are to see what the new team will create. I won't be far away. You can keep up with me by visiting my blog, sbartist : painting in the dark HERE.
One day left to enter the VLVS Theme Challenge for March! We are doing this just a little different this month. Trying something new. CLICK HERE for info on submissions. inLinkz your "BIRTHDAY" wishes for Terri Sproul creations using Viva Las Vegastamps! for a chance to win a $25 gift certificate at the VLVS online store. Don't forget to check out the Viva Las Vegastamps! store.
Stick around a while and see what our talented Design Team has been up to...thanks so much for visiting.
Have a crafty day! Sb
7 comments:
Impressive, Susan... hope we'll continue to see great artwork with our stamps.
Love love love this! The tutorial was great super tips! And the project is just amazing
Susan, what a great project and tutorial. Your work is beautiful, and it really does look like you painted it from scratch. Thanks so much for sharing this information. Love it!
An amazing piece! It doesn look like you painted it. Totally floored you can get that look with stamps, pencils, and a water brush.
Thank you for sharing your technique.
Smiles~
Marilyn
That is great Susan! I realy love. I would have never guess how you made it!
Very Nice!
so cool! I love the different images you pulled together.
Post a Comment