Tuesday, January 31, 2012

Viva Las Vegastamps! I Love Paris in the Springtime!

This month the Viva Las Vegastamps! Design Team was challenged with the theme of  LOVE... and I think Paris is one of the most romantic cities in the world.  So my first post this month combines my LOVE of Steampunk with my LOVE Paris!
Supplies
Rhinestones
Tissue Paper
Card stock - red (Base), black and pattern paper (From  my Stash)
Ink Stewart Superiors - Memories Dye Black
Ink Versafine Crimson Red
Locking washer from the hardware store
Stickles 
Foam Tape

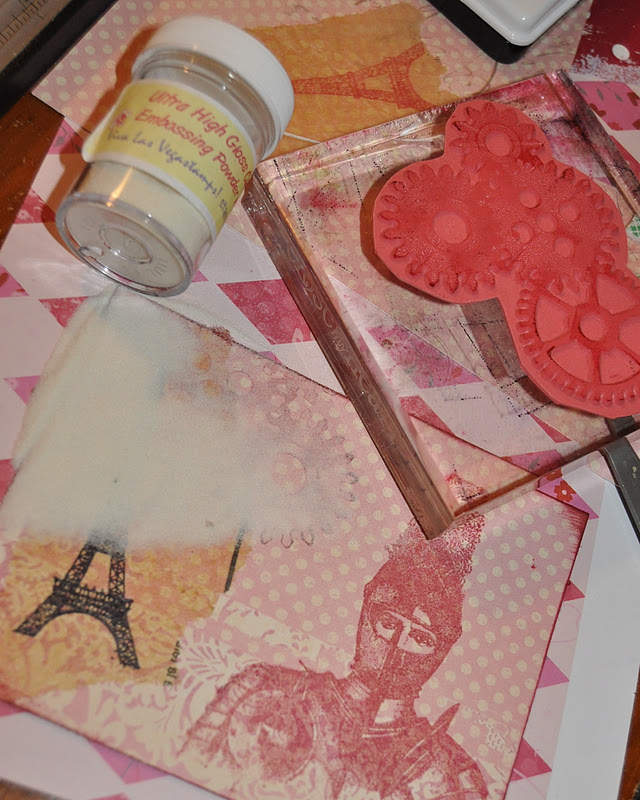
Stamp VLVS!Eiffel Tower on tissue paperlet the ink set, use heat tool if necessary) and adhere to the background, mask  VLVS! Eiffel Tower.  Edge pattern paper panel Versafine Crimson Red ink. Then stamp the VLVS! Nesting Gears and VLVS! Steampunk Warrior on the background with Versafine Crimson Red ink.  Heat emboss the VLVS! Nesting Gears with Ultra High Gloss Embossing Powered.  Stamp the VLVS! Steampunk Couple ( on a light colored card stock, fussy cut, color with COPICs and attach with foam tape to add dimension. With VLVS! Miracle Tape attach the pattern paper panel to black card stock then adhere to red card base.  
Stamp sentiment "I love Paris in  the Springtime" with black ink on scrap of paper, edge with Versafine Crimson red, layer on black cardstock adhere to card with foam tape.  Last touches add Stickles to the wings on man's hat, adhere locking wash on man and embellish lady with rhinestones. 


Join us for our February Theme 
"LOVE"

Check HERE for details!
You must play to have a chance to win!

See More of my work at DreamingofCastles!


Monthy Challenge

January  was Just full of :"Celebration" between our Design team having a wonderful blog hop to  all the entry for January Theme.  Thanks so much for play along..  We love to see what you create.  

Here is January  Winner
Theme was Celebration:

This was made by
Sandra Strait

please contact 
Terri Sproul at Terri@ultimatescrapbookretreat.com
to claim your prize...

Now on to February Theme.  

'LOVE"

How to enter our monthly challenge
1)  post a project using the theme on our Facebook page:  http://www.facebook.com/vlvstamps
2)  Must be a follower of our blog
3) entry must use Viva Las Vegastamps!  here is the link to our on line store.  Click HERE  
4)  Prize is a feature on our blog and $25 to our on-line store. 

We hope your play and WIN... 

Terri Sproul

Monday, January 30, 2012

Queen Bee in the Hive!!

Hi everybody! It's Susan and I'm at CHA and sending in this post from IHOP since the hotel internet is down...many crafters are M.I.A. because of this {Terri included}. But I did find Terri!!!


Here is my project today...This Queen Bee who is a little self conscious of the size of her stinger. I used three Viva Las Vegastamps!: Queen Bee #5373; Does this stinger... #5327; and Texture/Sharp Angles #9752. I started off with a scrap of hand-painted paper that really wasn't pretty enough for anything. So I cut hexagonal shapes mimicking the queen bee stamp and then with grey Staz-on stamped the texture on each piece. Then I glued them onto an olive green cardstock in a honeycomb pattern. I stamped the Queen Bee on the same painted paper twice and then colored in and layered the image. The wing is a piece of Mica colored with silver Krylon pen on the back and stamped on the front. Then I gave it detail with Sakura Terri Sproul Mixers on the wings, staff and eye {OK - I just got a mini sample at the trade show today}. The tip of the staff is perfect pearls. Then I stamped quote on yellow cardstock and matted on same background paper. A lot of fussy cutting....but so worth it.

Detail of gussied up Queen Bee!

Two days left submit your creations for the VLVS Theme Challenge for January! Submit your "CELEBRATION" theme creations using Viva Las Vegastamps! for a chance to win a $25 gift certificate at the VLVS online store. CLICK HERE for info on submissions. Don't forget to check out the Viva Las Vegastamps! store - there is something for every occasion and everything from bees to aliens! Don't forget to hang out a little while to see what our talented Design Team has been up to.

Thanks so much for visiting & if you would like to see more of my creations please visit my blog, sbartist : painting in the dark HERE. Happy Monday : )

Thursday, January 26, 2012

And Now For Something Completely Different!

Viva Las Vegastamps! is thrilled to have the whimsical designs of Mary Vogel Lozinak now available in rubber. We sent the boards to the engraver today so they're on pre-order at 20% off through February 2nd... hope you love them as much as we do.

http://www.vlvstamps.com/pre-order-plates-o-rubber.html


Wednesday, January 25, 2012

DIY Washi Tape part II

Hey everybody!! Welcome back :) 


Today the card I'm sharing is a simple beauty using the Washi tape that I made on Sunday! 


Besides adding my tape in a "strategic" way - I did a bit of doodling around the edge. I picked a very graphic background since I didn't want to do much embellishing! This card makes the perfect "Thank you" or small note slipped inside a gift! 
VLVS! Items used:
Memento Black Ink

Thanks so much everyone!! -DeeDee

Sunday, January 22, 2012

Pug Birthday Card!

One of my best friends loves Pugs. She has two of them and their names are Frankie & Piglet. She had a birthday recently, so I wanted to use this cute Pug In Party Hat stamp from Viva Las Vegastamps! to make her birthday card. To start off, I stamped the image on white cardstock and colored with Copic markers. My friend’s favorite color is purple, so I used a purple card for the base and I colored some Spellbinders shapes with purple chalk for my background. I added some Sakura Crystal Lacquer to the eyes and nose to make them look wet as well as dimensional. On the inside of the card, I stamped a simple and fun Happy Birthday! My friend loved the card by the way! She is so into Pugs that every year she organizes the “Pug Picnic”. Anyone can come as long as they have a Pug and bring it with them. She even knows all the Pug’s names! I gave this stamp to her and suggested she use it next year for her Pug Picnic invitations. She loved the idea!

For anyone who missed our blog hop, here’s another project where I was able to use this same versatile stamp for a New Year’s card. I had a lot of fun with this card since I am a cat person, and I enjoyed making the little dog annoying!

Feel free to comment below and be sure to come back to see new cards & projects posted every Monday, Wednesday and Friday. Thanks for stopping by!


DIY Washi Tape!!!


Hi Everyone!! DeeDee here for an extra post this month!!

I kind of stole the opportunity of doing a DIY video for VLVS! on how to make your own Washi Tape with VLVS! Supplies!!!

I used :
Tissue paper
Scissors


Please please.. tell me what you think!!!!
I'll show you a project using this tape on Wednesday so come back!!!! -DeeDee

Thursday, January 19, 2012

Age Is Relative


I thought I'd have fun with one of my favorite persons in history!!  I had to have this Einstein image and then these gears were the perfect touch to add "another cog in the wheel," for a birthday card.  The Masquepen is fabulous with Einstein's hair...it prevented the MicaColor Watercolor from seeping onto the hair!

Supplies:

Viva Las Vegastamp Images -

Other Items - Miracle Tape

Other Supplies:

White, Teal, and Green Cardstock
Masquepen
Dimenstional Gears and Wheels
Brads
USArtQuest MicaColor Palette
Gears Embossing Folder and Embossing/Die Cut Machine
Scissors
Copic Markers
Brown and Black Permanent Ink
Dark Green Pigment Ink
Soft, pointed Brush
Sponge

(Inks = Permanent won't move with water, Pigment is juicy for coverage and embossing powder, and (not used in this project) Dye Based inks moves with water like watercolors)

1.  Stamp Einstein image onto white cardstock.  Use the Masquepen and cover  the WHOLE Einstein image.  Let dry.

2.  Prepare your Micacolor Palette color by dipping your soft brush into water and letting the water drip onto the color.  Let set a second or two, and then swirl your brush into the color.  The consistency should be creamy - if not - add a little more water.

3.  Pick up color from your MicaColor Palette and brush onto the gear stamp image, covering the whole surface.  Tap lightly with a sponge to remove excess color. Stamp like you would normally stamp, going over Einstein image (See photo).  Let dry.

4.  Remove Masque material by using your forefinger and slowly moving your finger down over the the edge of the masking material.  It will start to roll and you can roll the material down and off the card.

5.  Color and shade Einstein with Copics.  Run green cardstock through die cut machine (I used a Cuttlebug) using the Gear Embossing folder.  Swipe the dark green pigment ink over the surface.    Mount Einstein card to green Gears with Miracle Tape. Add Gears and Brads. 

6.  Mount Teal for background cardstock with Miracle Tape.

Note:  My quote about "another cog in the wheel," I generated by computer, but, VLVS has a HUGE selection of quotes and birthday images that would be perfect with this project.  Pick and choose and personalize this Einstein card the way you want.

Enjoy - Lea


Wednesday, January 18, 2012

Clear vs Rubber Stamps

The cheaper silicone stamps - I don't think will ever stamp as well as rubber. The material just does not exhibit the desired qualities of ink pick up and transfer as rubber. The ink has a tendency to bead up and provide less coverage with the silicone material.

Rubber: the surface of rubber is more porous. If you were to look at the rubber surface under a microscope you would see lots of tiny cups and valleys. This pocketed surface allows rubber to pick up and transfer more ink than the smooth surface of a photopolymer stamp.
Therefore, an image stamped with rubber is always going to be darker and more vibrant - because more ink has been transferred to the stamped surface.

Photopolymer - the surface of a photopolymer stamp is very smooth. It has been formed/hardened against a plate of glass. So the amount of ink that can sit on the surface of the photopolymer stamp is less than what sits on the surface of a rubber stamp.

Tuesday, January 17, 2012

Viva Las Vegastamps! A Month of Celebrations

January is a month of "Celebrations" 
At Viva Las Vegastamps! 

Today I am sharing another CELEBRATION card celebrating friends!!!  I am using VLVS! Cowgirl-Granny from Plate 1355 that just came out in November!  

Be sure to check out the savings when you buy stamps by the plate!  You get an even greater savings when you pre-order as new plates are introduced.  Be sure to check the front page in the Viva Las Vegastamps! store each month for the newest plates. 

Stamp VLVS! Cowgirl-Granny using Stewart Superior Memories Black ink on white card stock, using COPICs color her face and scarf.  

Stamp sentiment VLVS! "If friends could be bought..."  using Stewart Superior Memories Black ink on background pattern paper (Memory Box).  Heat emboss sentiment with Viva Las Vegastamps! Ultra High Gloss Embossing Powder.

Attach VLVS! Cowgirl-Granny and feather to the card using foam tape. Layer the pattern paper background on black and adhere to the card using Viva Las Vegastamps! Miracle Tape.

Add a little bling with red Stickles to her hat and blouse.

Gotta love your friends!
Check out my blog
Dreaming of Castles


Want to win some blog candy!!!


The Monthly Challenge is been posted

This Months Theme is
"CELEBRATION"
Interpret “Celebration” any way you like... 
a Birthday, Anniversary, Party
or whatever you would like to celebrate!

Learn more HERE
Winner will receive a $25 shopping Spree 

Post the Viva Las Vegastamps Blinkie on your blog 
and get a Free Grab bag of Unmounted Rubber.
Find more details on the VLVS! Sidebar beneath the “Blinke”


Sunday, January 15, 2012

Senior Ladies, Best Friends - A Card For Your BFF

Old Friends Card by Joe Rotella using Viva Las Vegastamps! stamps

Senior Ladies (#8671) from Viva Las Vegastamps!Until this project, I don't think I've ever used a "photo stamp." You know the kind - stamps made from photographs rather than drawings. I've seen many that have interested me, but just didn't know what to do with them or how to use them. That brings me to the pound of rubber I received from Viva Las Vegastamps! For only $25, you can buy one pound of unmounted, deeply etched red rubber stamps. Viva Las Vegastamps! will select, at random, a pound of images and sayings from their collection of over 16,000, mostly "non-cute" stamps. I got a pound and when I sat and went through them I found Senior Ladies 3 1/2" x 4 3/4" (#8671).

Every time I looked at this stamp, a story went through my head. These two woman knew each other for years. They often went to the park together. They fed the birds. They played BINGO. They were best friends.

Given how many times I stopped and looked at this stamp (yes, I go through the pound of rubber over and over again), I knew I had to use it on a project.

I started by covering some glossy photo paper with distress ink. Then I stamped Senior Ladies 3 1/2" x 4 3/4" (#8671) using black dye ink. Once trimmed, the result looked like an old photo!
Bingo Card (#8431) from Viva Las Vegastamps!I picked up some vintage BINGO cards at a flea market this summer and decided to use one as a background for this photo. If you don't have a real BINGO card, you can create your own using Bingo Card 4 3/4 x 5 3/4 (#8431).

Scrabble Alphabet (#1948) from Viva Las Vegastamps!For the sentiment, I stamped letters using Scrabble Alphabet Unmounted Regular Size (#1948) on white paper. I applied distress ink, used a Copic marker to color the edges of each tile and then embossed the letters with Ultra High Gloss Embossing Powder. Once cut out, they look like real Scrabble tiles.

The card base is made from Designer Paper (DP) that fits the vintage look I was going for.

Now that I've finally used a photo stamp, I know they will become a standard part of my stamping portfolio. I hope you'll give them a try too. In fact, why not challenge yourself? Get a pound of rubber and see how creative you can be with stamps you didn't select. I bet you'll find it as fun as I did!

Check out my blog on Create & Craft for more project ideas.
Happy crafting!
Joe

Wednesday, January 11, 2012

Celebrate the Every Day

If you haven't heard or haven't been paying attention... VLVS! is hosting a monthly challenge where a selected winner receives a gift certificate to the online store! Very generous of our fearless leader, Wayne! 

This month's theme is "CELEBRATION"

and I made my first piece for January based off the idea.. but with a twist.. I'm a big fan of "the small things" and so I went with "Celebrate the Every Day"

I recently got my little grubbers on two fabulous stamps that are going right in the front of my stash.. 


I used the chicken wire as a background.. I stamped it in clear embossing ink and then doused it Ultra High Gloss Embossing Powder by VLVS! I then smeared, sprayed and spritzed a combination of Broken China distress stain and water all over my tag. Once that was dry I laid newsprint over my tag and ironed out the embossing ink. Then I grabbed the bird stamp, my Memento Ink and a clear block.. some creative placement and VIOLA! the "Sing" "Chatter" and "Spread Joy" were written by hand in black ink on manila to match the rest of the tag. Swipe the edges of the tag with the same ink as the stamp and some creative doodling... And we get....


Thanks for coming by again this week!! Don't forget to enter your own piece into the competition!

-DeeDee

Sunday, January 08, 2012

What Was I Thinking?


Valentine's Day is coming soon! I am sure that most of us, at least one time in our lives, could relate to this card. Some people will go buy a nice mushy card, but in the back of their mind they'll be thinking "I need that card that Joe Morgan made!" Anyway, it's just for fun, because Valentine's Day isn't all about hearts and flowers for everyone. Sarcastic people like me would prefer that we skip it and have Halloween twice a year instead. So on to my card!

I used two Viva Las Vegastamps! for this project:
Hugging Lovers
Looking Back Over the Years

For my background, I used a conversation heart embossing folder to dry emboss pink paper. I stamped the sentiment on white and used a decorative punch to punch it out. I stamped the Hugging Lovers stamp on white and colored it with Copic markers and then fussy cut it out. I assembled the card as shown with some green and pink ribbon behind the sentiment and I also inked the edges.

I hope you enjoy my card and at least got a good laugh from it! Viva Las Vegastamps! has a ton of sentiment stamps for everything. I get ideas just by reading them!


For more of my project ideas, visit my blog on Create & Craft.

Saturday, January 07, 2012

WE Have WINNERS

First off I can't thank everyone for all the wonderful comment the team got.  WE had so much fun and I think you guys did too.

Here is a list of the $15 winners - to claim your prize - please email Terri Sproul at
Terri@ultimatescrapbookretreat.com with WINNER in the regard (so you don't get deleted).
Please stop by their blog and see your name there too... 
On Dee Dee Catron blog the winner is Cheryl
on Susan Brown Blog the winner is Jocely
On Joe Morgan Blog the winner is Lee Steel
On Joe Rotella blog the winner is Yvonney
on Lea Coici blog the winner is Clare D. 
On Lyneen Blog the winner is Marcia P.
On Terri Sproul blog the winner is Gwyn

Now the Big Winner:  the winner will receive $25 to our on line store.
Robert Rosendale

Now it's time for me to post the winner from last Month Challenge
Darlene Mullins

please contact me to claim your prize...  and THANKS for playing...

Hope to see more play our Monthly Challenge for your chance to have 
your project on our blog 
and 
win $25 to our on-line store.  
This Month Theme is
"Celebration"

thanks for stopping by
Terri Sproul

Aunt Ethel is the Life of what Party???

Happy New Year!!! It's Susan here with the top of the month Saturday post and today I'm feeling a little quirky. I am sharing two cards with you today. The first one falls into January's Theme Challenge of "Celebration". This kooky gal is dressed to the nine {NOT} and she's ready to P-A-R-T-Y!!!

Isn't Aunt Ethel the life of the party???


Here's the details: I started with a plain piece of matte finish cardstock that is painted with my special mix of gesso shimmer primer. Sounds fancy but it's a mixture of gesso and glazing medium with a small amount of gold shimmer, pale green and creme acrylic paint. It makes a nice buttery background that has a little texture. I mix this up so often I made a whole bottle of it complete with a dauber top.

Now to the fun part...stamping. I used Stewart Superior Memories Black Dye ink and stamped the image on the base layer. I love this ink! Especially for stamping images that I'm going to do a lot of coloring...there's no bleeding or smudging. Then using the ovals, I stamped a patterned floor using peeled paint distress ink. The gesso in the background tones down the intensity of the distress ink. I use my marvy dye markers and my  water brush to paint in her skin, hair and lips. With a makeup sponge, I used old paper distress ink to darken the background around her.

Now to dress her up! I have these metallic textured papers from an altered book club goody bag and have been saving these for something special {hehe}. I had a matching purple and pink paper with a wavy modeled texture like wallpaper that I stamped the image on with black staz-on. Then I stamped it again on a royal blue foil paper for just the balloon. I cut out the balloon, hat, dress, shoes and socks and paper pieced this doll back together. I added some finishing touches with a white opaque pen and my favorite gelly stardust pen. I stamped the quote on a piece of the same painted paper, matted with the textured pink metallic and VOILA..."A Party Queen"! These stamps just bring out the kid in me : )
Now for the second card...

I did a little bit of extra work here. I started out with a piece of crumpled hand-painted brown packing paper {like a brown paper bag}. I had made a couple huge sheets of it to make mini book covers. This is painted with a purple/bronzy shimmer spray and purple & brown acrylic paints with glazing medium. The top half of the card is the front of the paper. For contrast, and because it was pretty too, I used the backside of the same paper for the bottom left and right panels. The center panel is the same painted paper overstamped in black with a Texture/Chevron #9771, a natural pattern stamp from Viva Las Vegastamps! The quirky Birdhead #4026 is also from VLVS and is stamped in brown ink and embossed with clear embossing powder on tan cardstock. I trimmed around the image, sponged a little yellow ochre on the beak, added white to the eyes and raised with 3D dots. I finished off with an acrylic bezel word from SEI, burlap cording from May Arts and this silly quote #14908 in cardstock ovals to make a thought bubble. I love this monochromatic card - it is just so irresistably cute!
Thanks for dropping by and staying until the end. I invite and encourage you to submit your creations for the VLVS Theme Challenge for January! Submit your "CELEBRATION" theme creations using Viva Las Vegastamps! for a chance to win a $25 gift certificate at the VLVS online store. CLICK HERE for info on submissions. Don't forget to check out the Viva Las Vegastamps! store - there is something for every occasion and everything from breakfast to weiner dogs! Don't forget to hang out a little while to see what our talented Design Team has been up to.

Thanks so much for visiting & if you would like to see more of my creations please visit my blog, sbartist : painting in the dark HERE. Enjoy the rest of your week : )