Showing posts with label VLV DT. Show all posts

Monday, March 27, 2023

THANK YOU CARD - by Fran Chalmers

Hello everyone!

It's finally Spring, and as I had to make a thank you card for a friend, I decided to use bright, Spring-like colours.  I loved this stamp and thought it would look great in yellow!


 I made the background by inking up only part of the stamp and randomly stamping over the card.


I stamped the main image onto card, coloured it in Copic pens and fussy cut it out.  It was easy to cut despite the edges of the petals.


I mounted the card onto a green mat, and added the sentiment (handwritten, as I don't have a printer at the moment!).


I hope you like this card.  It made me look forward to Summer even more!

Stamps Used:

Blowing dandelion and extra seed 19045

Girl in flower Plate 1410

Other Items Used:

Versafine Clair ink in Verdant

Memento Ink in Tuxedo

Copic Pens


Monday, September 26, 2022

WELL BEHAVED WOMEN by Fran Chalmers

Hi again everyone! Today I have made a card .....


 First of all I made the background with Distress inks and water smooshed on my mat.


I then stamped the main stamps onto thick card so I could colour and cut them out.


I then went round the edge of my mat with a darker Distress Ink.


I stuck the images onto the background.  With the sentiment, I cut the words out separately and outlined with a fine liner. I also went round the main image with a grey pen, to make it stand out more from the background.


Stamps Used:

Nun Licking Gun 19285

Well Behaved Women Rarely 8418

Crime scene tape 19133

Other Items Used:

Distress inks in Wilted Violet, Blueprint Sketch, Villinous Potion

Polychromos pencils

Black Fine Liner

Versafine Clair ink in Nocturn


Wednesday, September 21, 2022

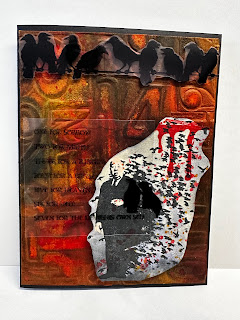
Counting Crows... by Tracy Blackwolf

 Hello Everyone!!!   Happy Fall!!!

My favorite time of year in every way... Today I made A card for the blog project. Hope you enjoy.

I started this card by running some heavy weight mixed media paper through my big shot with the Numbered embossing folder. Then I sprayed it with several colors of distress spray stains to get the creepy, grungy look. Tip the card so the colors run a bit to get what you like. While that dried, I stamped the crows on a wire onto acetate and let that dry as well.
Next I stamped Hitchcock with birds and watercolored with the spray stains around him. I also stamped the drips of blood at this time.


Then I went to my computer to print a very old phrase to go on my card. I printed on transparency. I prefer this one from the 1800's

I used foam tape behind the cut out image of Hitchcock and tiny black foam tape behind the birds on a wire. A little clear tape on his arm to attach the phrase and two crows to hide the tape. Attach it all to a black card and done!!
Easier than it looks and here is another Halloween card for your collection. Stay artful! until next time~

Stamps used:
Birds on a wire        18098
Blood dripping      18961
Banksy Hitchcock birds      20078

Other supplies:
TH 3D texture fades- Numbered
Distress spray stains: Cracklin campfire, mustard seed, candied apple, black soot
Black staz on
Desert heat kaleidacolor ink pad


Friday, September 09, 2022

Skull sun flowers by Tracy Blackwolf

 Hello All!! Where has summer gone!? I don't like the melting hot but I'm not ready for snow and we know how fast that comes after my favorite season~ fall!! And with that, I am totally ready to get into all the fall and Halloween art!! So here we go with a spooky card for today.

This was so fun to make. So I stamped the sunflower three times using pinecone versafine clair ink. and then stamped again on scrap card as I wanted to cut the center out of the middle flower and raise it for some dimension, along with a few petals.
I also grabbed some resin skulls from my stash I made a while ago. All I needed to do was paint them to look old. These are my centers for the flowers. I set them aside to dry and got started on my background. Working on a glass sheet, I sprayed three colors of spray stain on the glass and used my paint brush to paint in around the flowers.


Then it was time to paint the flowers. I used lots of colors for this.

I sprayed all the colors on my glass and painted the flowers in, layering the colors starting with two yellows first.
You can spritz with water and reapply color to get the color you desire. Just keep playing until you are happy. Colors will lighten when completely dry.

At this point, I put foam dots behind all my flower parts and stuck them on the card where they belonged. Then I used hot glue to stick the skulls in the center of each flower. I painted a bit more yellow on select petals and called it done. layered it onto a black card for the finish.

Hope you enjoyed that card~ Until next time my friends~ stay crafty!

Stamps Used:
Leafy Sunflower    1170

Other Supplies:
Distress spray inks:
Mustard seed, Squeezed lemonade, cracklin campfire, spiced marmalade, salvaged patina, shaded lilac, wilted violet, aged mahogany, forest moss, twisted citron

zuri mould (skulls) Lover of darkness


Friday, August 26, 2022

Pale moonlight by Tracy Blackwolf

 Hello  friends!

I am here today with a new art tag for the blog. I love space so I hope you enjoy this tag-


So this kind of tag is fun to do because you don't really know what you'll get until the end when its dry. And if you hate it , keep working it. This is why I use 110 pound paper or higher- I make these really wet and the paper can handle it. So to start, I try to figure out where I'm going to want my "nebulas" or light areas. Then leave them light as you can.

I dry the yellow and blue most of the way at this point. Then I start to add darker colors.

I need some red in there for sure- I like cracklin campfire for this as its a red orange.

You can dry it a bit at this point but not too much, were going to add the black now and you want it to blend while still keeping the light areas.

keep that yellow spray handy and also your water spray bottle. some places may need a bit of water to help blend. Now you can start drying more. spray on some yellow if things are getting too dark. Things will definitely lighten up when dry all the way through. This will be totally wet for a while. When the black is dry you can spray on more light colors if you like, even some pink looks good in there.

When dry, or mostly dry, You can splatter on some white pigment ink from a re inker for the stars. I used a gel pen as well.
You will also want a regular qtip to make the white smoke or gas among the stars and if you want the glow effect on the stars. The key with this is to dip the qtip in the white ink and then dab most it off on a paper towel . You want it pretty dry to get the right effect. Then just dab away. Its a bit fussy but so worth it. Too much in one spot, get a clean qtip and keep dabbing.
I cut out my stamped image and needed the swing ropes to be longer so I stamped the ropes and yes, I cut them out and attached them to the image with glue. I know- crazy. Then I painted her with the sprays using a paint brush. Put some foam tape behind her as I wanted her to stand out.

See how much it lightens when dry! I did add a few spays of colors in here between dryings.
Now for the moon, well I don't have a VLV moon stamp so I used The Christmas ball for my moon. I just needed a bit of it- works great!

Play, play play with this technique. You will get something different every time. If you hate what you have, walk away, let it dry and come back later and spray more light colors~ you'll  end up with something great I bet!
Until next time, Keep stamping!

Stamps Used:

Pale moonlight   19351

Christmas ball    9234

Banksy Swing Girl   19425

Other Supplies:

Distress ink sprays: Salvaged patina, squeezed lemonade, cracklin campfire, black soot, spiced marmalade, mustard seed, twisted citron, picked raspberry, blueprint sketch

While gel pen, silver sparkle gel pen

White pigment reinker

foam tape, qtips

 #8 tags TH


Friday, July 22, 2022

Vitruvian Man by Tracy Blackwolf

Hello everyone~ hope you're all keeping cool !

Here is my new blog post for this week.

So for this project I used the "smooshing " technique to create the colorful background.

I put a bit of the three colors I used on a sheet of glass, spread them with my finger and then spritzed them with some water to blend a bit.


Keep smooshing card or tag on ink until you like the result. Let dry and then drip water onto it to give a more distress look. I used oxide inks for this card.
When it was dry, I added a little yellow distress spray to give a sun break like look. I then stamped the Vitruvian man  on card stock and on a sheet of acetate, I painted the cardstock one and fussy cut him out. I cut out the entire image on the acetate.
Then I used several inks and stamps and randomly stamped the background on the tag.
I put two strips of 3d tape on the back of the man as I wanted him to stand off the tag,. I went into my Dresden trims wings stash and found the perfect wings for him. Those coper wings gave him a steampunk vibe so I stamped some cogs around the edges of the tag.
I also added some metallic wax around the edges of the tag to pull it all together. Last, I found some verbage stickers  to finish the tag.

And that's a wrap! I hope you enjoyed my art tag today! until next time~ stay arty!!


Stamps Used:
Vitruvian Man-Lg.     19763
Periodic table        19449
Atomic structure     19451
Human heart    20143
DNA strand     19437
Nesting gears 2      18077

Other supplies:
Distress oxide reinkers: Abandoned coral, Fired Brick, Black Soot
Distress ink spray: Squeezed  Lemonade
Redesign decor wax- Cosmic ray
Dresden trims- copper wings
acetate
#8 tags -TH
Versaclair inks- Black, Pinecone, morning mist