Welcome to the blog today :) -- It's time for our August Guest Designer to make an appearance -- Welcome Samantha Klaebe!!
"Hi there, my name is Samantha Klaebe. I live in Adelaide, South Australia with my wonderful husband, Adrian, and gorgeous soon to be one-year-old boy, Liam. We also have a furbaby - a very playful, energetic, loving and intelligent (though at times a little on the dopey side) Golden Retriever-cross-Labrador.
These three are the light of my life, inspiration and driving force behind many of my creations. I started my scrapbooking journey in 2003 when my husband and I moved to Brisbane, Queensland, for work. I needed a hobby and discovered a scrapbooking shop close by to where we were living.
From there, I started creating calendars and Christmas cards which over the years has evolved into a full-blown passion - some may call it an obsession. I now create invitations, cards, scrapbook pages, artist trading cards, mixed media and wall art. Anything really!
Over the past 12 months I've been able to build on my scrapbooking/craft skills after taking a year off from working as a registered nurse to be a stay-at-home mum. During this time I have created a blog called “my little paper world” (http://mylittlepaperworld.blogspot.com.au/) and branched out into the scrapbooking community. I am beyond thrilled to have been asked by Viva Las VagaStamps to be a guest designer and cannot wait to share my work with you.
Products Used:
o Kaisercard – Grey
o White Card Stock - Bazzill
o Pink Card Stock - Bazzill
o Pattern Paper (from my stash of paper scraps)
o Embossing Folder – Cricut Happy Birthday / Darice - Chevron
o Distressing Tool
o Silouette Cameo (though it’s easy enough to cut these with your paper trimmer)
o Double sided tape
o Memento Tuxedo Black Ink Pad
o VersaMark & White Embossing Powder
o Heat Gun
o Stamp-a-ma-jig
o VLVS Happy Birthday Sentiment (wood mounted)
*tip - post it notes make for fantasic masks.
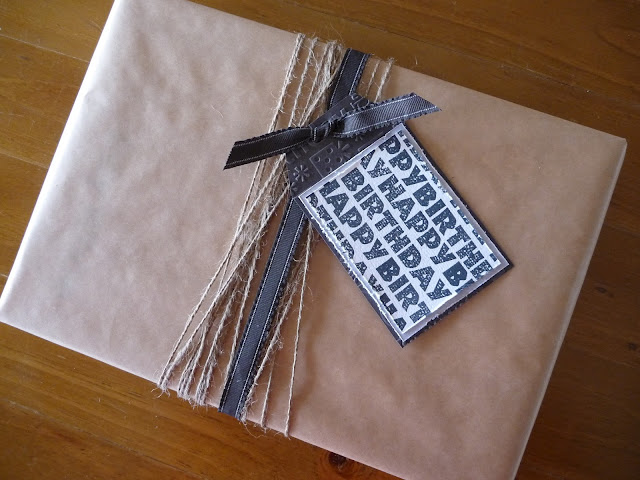
I started with white cardstock cut 12x10cm. I then stamped VLVS Happy Birthday in the centre of the cardstock. Using my stamp-a-ma-jig I then filled in around the initial stamped imaged (using a masked technique to avoid stamping over the already stamped sentiment).
I then cut the stamped cardstock to fit pre-cut tags that I cut from my silhouette machine (9.5cmx6.5cm). I distressed the edges. I then glued this to some patterned paper and distress the edges again.
Next I embossed the tag using my cuttlebug. I stuck it all together and created a very simple tag that as you can see was used immediately as August/September seem to be the months where everyone I know has their birthday.
With the second tag I used the same method, except I used VersaMark and White embossing powder on pink cardstock.


5 comments:
Lovely tags!!
Beautiful tags!
Looks awesome
Wow!! I'm off looking for my heat gun!! Nice!! :)
Love these tags!
Post a Comment