Wednesday, April 18, 2018

Banksy Rolodex cards with Majo

Hello everyone,

today is my turn for another tutorial for you.


I haven't made any Rolodex cards in years. I once made a whole wheel as a present for a friend, now I thought it was time again to start a new one.

I bought some ready made cards, but they were so thin, I had to glue two together. I didn't like that, so I cut my own and use a corner rounder and the Heidi Swapp punch. It's an American Crafts Metall memorydex 2-Bay Loch punch.

I started by creating a master board with Distress Oxides, stencils and stamps:


I cut the cards (2 ¼ x 4"), rounded the corners and punched the holes for the wheel.


I stamped Banksy images and sentiments on my cards.


I wanted to get extra attention to the text, so I stamped it again on cardstock and adhered it to the cards.


All I had to do now was distress all edges and get the cards "wheeling".


These are all the stamps I used:


Thanks so much for stopping by today, have a good Wednesday and Happy Crafting ♥


Tuesday, April 17, 2018

People Are People

Michele here today with an art journal spread...I know, can you believe it?!!!

I started with a background I created with Dina Wakely paints and a stencil.  Stamping and doodling and this is what the final pages look like.


Stamps used:  Whimsical Boarder, Whimsical Lettered ManWhimsical Face with Horns, Whimsical Horned Boy, Numbers Set, Kids in Futuristic Hats, Cross Marks Background, Carved X's


I had so much fun coloring all of these characters on my page with my Prisma color pencils.


And this background...the stamping with the doodling...ahhhh.  I just LOVE it!

I had so much fun with this page!  Thanks for stopping by to see it.

Until next time...get inky!

Wednesday, April 11, 2018

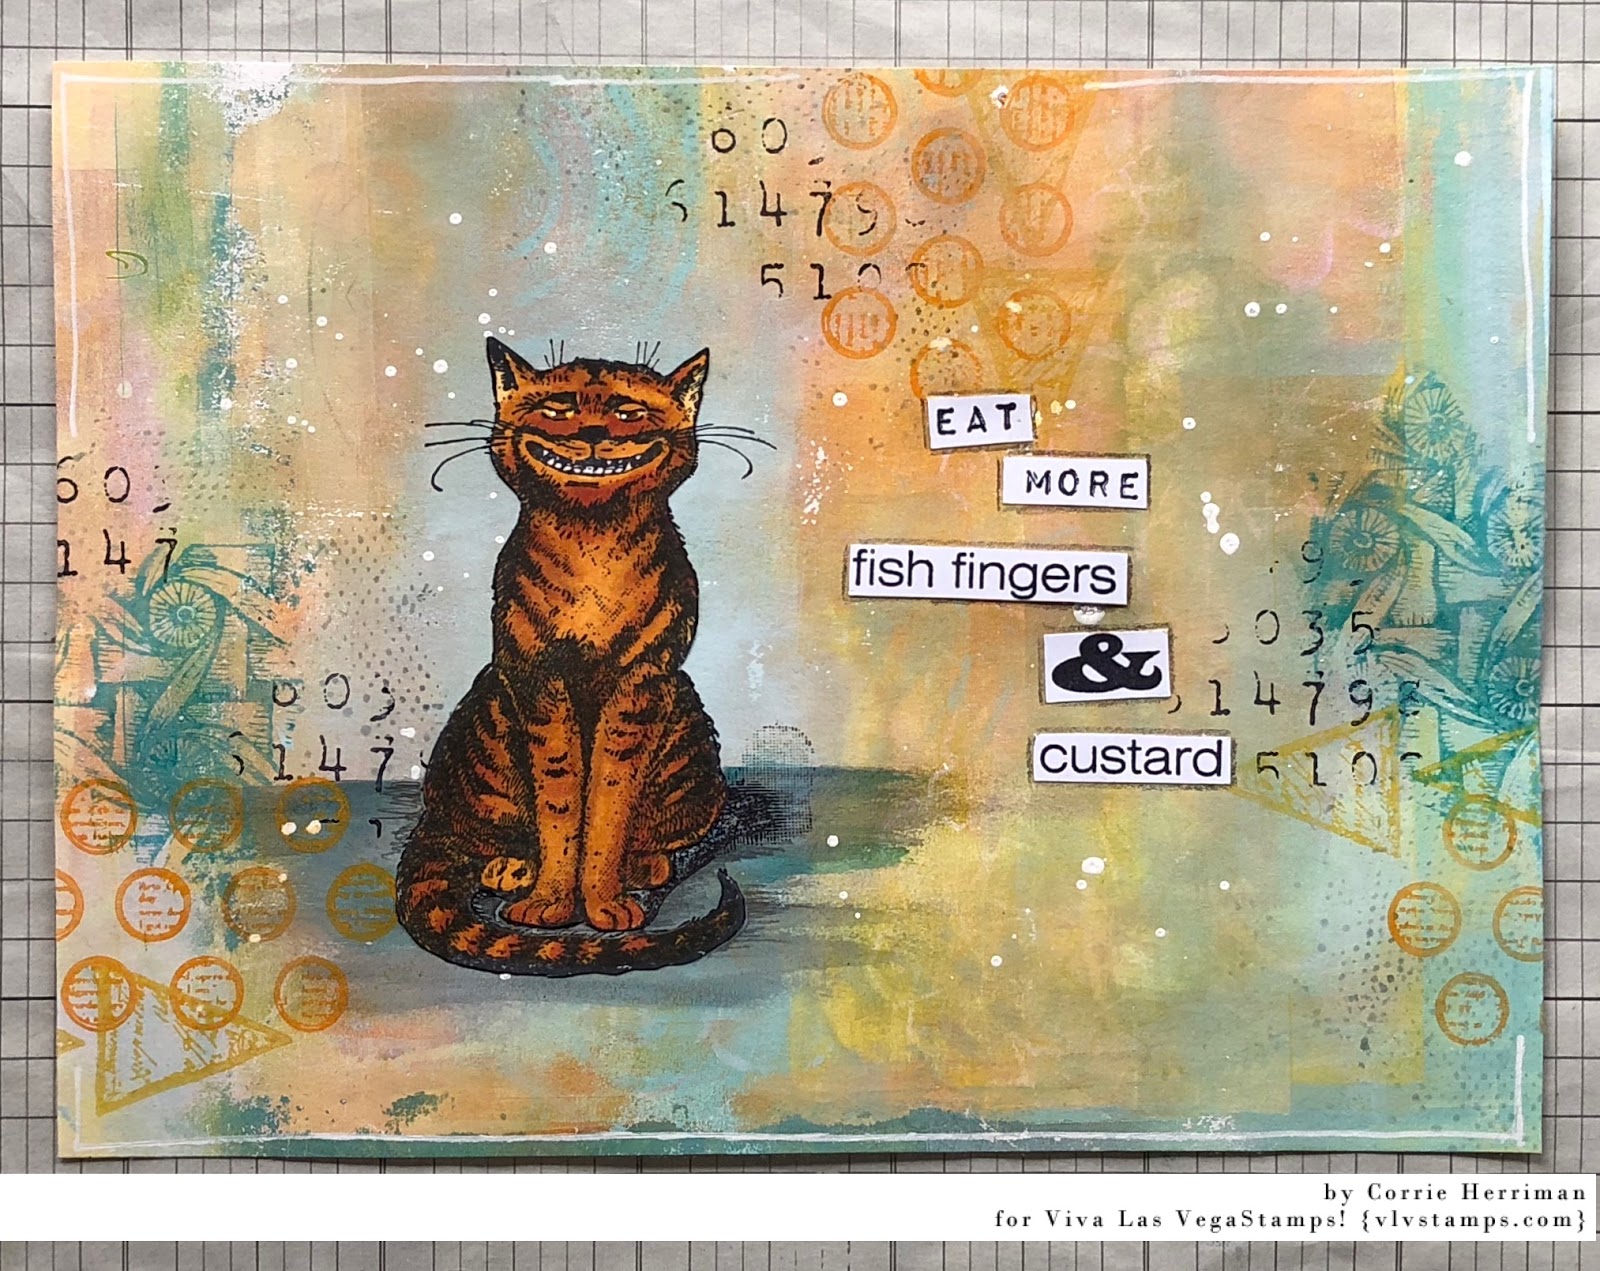
Eat more...

Hello everyone,

For today's post I have an art journal page to show you. This cat has just got the cream eh... custard I think. lol.


The background is a mop up page from a gelli plate, you know at the end where there are so many left over paint bits. Sometimes these turn out really nice and I thought this one was great so I decided to use it for this page. I added some stamping and white splatters. After the cat was adhered I also added some more shading under him. 


He looks like he's having a great time, doesn't he ...


Not sure I'll take his advice though.. 

Anyway, I have used the following stamps:


Thank you so much for stopping by today ! 


Tuesday, April 10, 2018

A Punk Page by Fiona

Hello my VLVS! peeps. Fiona here with you today to share a very colourful art journal spread I have created using the fabulous red rubber from VLVS!

 I really let my hair down with this one. Colour was my inspiration .... can you tell?

 I featured some of the punk style VLVS! stamps .... they are honestly some of my favourites!

 I decided that "Born To Be Wild" was the perfect sentiment for this page. I think we should all aim to be a little bit wild every now and then.


Viva Las Vegastamps! used:


Monday, April 09, 2018

Mail Art Monday!!!

Hello Again Crafty Friends!!!

Today I am excited to share one of my vary favorite things...
Yes, you guessed right, Mail art!!


Anyone who follows me knows that mail art has a special place in my heart! 
Something about it just makes me giddy!


Today I want to share a fun and kind of silly/whimsical envelope that I just LOVE. 
I love animal/people hybrids so this donkey was instant love for me, but he needed a kind of whimsical envelope to keep him in his own little world.

Maybe a forgotten part of wonderland?

Stamps Used:

I started with and A2 size envelope and a piece of scrap paper.  On the scarp paper I began by stamping the "typeset scallop", and the "writing chevron".  I also stamped these two on the envelope where I wanted them to be. (*note if you want to "mask" the donkey, rather than cut him out and glue him down he should be stamped on the envelope 1st*, and a mask should also be created). 

On a separate piece of paper I stamped my donkey gentleman so that I could color him and cut him out.


Next, I colored then covered my 2 stamped images with my "masks", this allowed me to lay down a heavy layer of inks and some stenciling.  When the inks dried I added a few flicks of water to add extra depth. 


You can see below I added a label to add an address.  I added a bit of ink around the box for extra depth. (this was before I glued down my awesome donkey gentleman).


Below you can see the finished piece, and the postage stamp that I picked to go with it. 
(I haven't stuck it on yet, just in case I send international)


Thank you stopping by the blog today!!


Friday, April 06, 2018

"Failure to give a shit" art journal spread | Sue Plumb


Hi everyone!
Sue Plumb here today to share a spread I created in my altered book art journal recently. I use this journal not only as a creative outlet, but also as a way of expressing my thoughts and feelings. This spread was created on one of "those days" - you know, the ones when you are just over worrying about all the insignificant things in life? 


I felt like working with acrylic paints for this project, so I pulled out my Flutterby Designs Flutter Colour paints. I used a medium sized brush and randomly spread some paint across the pages.


Once I had the colour down and dry; I decided to tone down the remaining print a bit, so I used some Colour Blast white heavy gesso over the text, which I applied simply with a brush.


After I was happy with the colour, it was time to add some depth and structure to my background with stamps. 
I used Staz On ink and the following stamps:


I then used some purple acrylic paint (applied with my finger) to add some colour to the centre of my coffee ring stains.


For my focal image I used the Fed Up Vintage Lady stamp. I smeared some ink acrylic pant onto some cardstock and then stamped the image over the top before cutting it out. (Confession time: after stamping and cutting the image I decided I wanted less colour, so I re-did it.)
I also stamped out a few copies of the quote I was using with the What We Have Here stamp; which I cut into small strips.


I decided my page need some more contrast, so I added a few areas of contrast using Colour Blast black heavy gesso; and a few smears of the pink paint where my quotes were going to be placed. I also added a little bit of light stamping with my favourite Doodle Dots stamp.
I then stuck down my quotes and feature image.


To finish my spread, I added a few highlights using a Flutterby Designs stencil; white paint pens (Posca and Sharpie); and also a black Sharpie.


Here's a closer look at the finished details...


Thanks for stopping by so I could share this with you. I hope I have inspired you to get inky too!


Stamps used:
Stitching Lines
Stitching
Measuring Tape Section
Coffee Ring Stain
Fed Up Vintage Lady
What We Have Here
Doodle Dots

Other materials:
- Miracle Tape
- Flutterby Designs Flutter Colour paints
- Color Blast white and black heavy gesso
- Staz On ink
- Flutterby Designs 'Bubble O'Fun' stencil
- Sharpie pens
- Posca pen

Thursday, April 05, 2018

Art journaling with Whimsical Leaf Lady

Hi!
Elina here with you today, sharing my latest mixed media page I made in my Moleskine art journal book:

I had so much fun playing with the Whimsical Leaf Lady stamp! To start with, I stamped the image twice on white paper, and colored both faces, using two different color sets of my alcohol markers. The lady with red hair and purple leaves was a nicer match to my black/yellow/white page background, so that's the one I chose for this project. The other green color themed lady will be used later for another project.

Black paint marks I pressed on the page background with my gelli plate. To mute down the dark color I brayered some white acrylic paint on top, and added hints of yellow paint here and there. Before gluing down the main image I decorated the background with stamping.

I placed the lady on the bottom of my page, but then realized that to my taste there was too much open space on the top of the page. I decided to make a bit larger collage of the leaves in her hair: I re-stamped the larger set of leaves on white paper, colored them with alcohol markers, cut out, and layered on the page. I do love the image as it is, but I think that this version is also quite cool!


Hope this page inspires you to take a fresh look at your VLVS! stamps; they can be used in so many various ways!

For this art journal page I used the following VLVS! stamps:

Whimsical Leaf Lady Face
Cross Marks Background
Carved Xs
Rows of Numbers

Wishing you a wonderful day!


Wednesday, April 04, 2018

Ready for Spring?

Hello my Crafty Friends.

Finally we some sort of spring over here in Germany.

I was inspired by the sun and some warmer temperatures to create my Art Journal page.


I started with a 41/2 by 111/2“ water colour paper and applied distress Oxides in three different colours. I spritzed it with some water (Still my most used and most favorite technique!) 

To add texture I added more colour with stencils and added some stamping in the same colours.

For the main image I stamped the beautiful Nature Collage and used the sentiment stamp on the side without re-inking it.

A little close up ...


Here are all stamps I have used:

 
  I hope you like my page, enjoy the spring ♥


Happy Crafting!


Tuesday, April 03, 2018

We Could Be Heros!

Hi everyone!!
Michele here today with a T.A.G. that was inspired by a childhood memory of how we always thought we could be superheros when we were pulling crazy stunts that would have made our mothers have a heartattack if she knew what we were doing!

I haven't done a tag in s long so I am so excited that I was inspired to create one!!


Stamps used:  Boys Playing With Shopping Cart, Banksy Shopping Carts, Numbers Set, Cross Marks Background, Rows of Numbers, We Could Be Heros.
The background is Distress Oxide Inks and the boys are colored with Prisma pencils.  Some washi tape and of course DOODLING...and we are done.  The tag is topped off with some black sari ribbon.


That sentiment is absolutely PERFECT.  I distressed all the edges with Distress Ink.


I selected colors in honor of Evel Kenevil...
I had so much fun creating this tag, I hope it brings a smile to your beautiful faces!!
Until next time...get inky!

Sunday, April 01, 2018

April Monthly Challenge ---


Be inspired by words like nature, natural, trees, forests, camping, mountains, skies & water, fishing, birds, reflections, boats, dogs, gray, tan, white & black, gray + anything else that you might be inspired by!

Meet us back here shortly for inspiration & our last challenge's winner!

Don't forget the rules:
-Create a new project based on our inspiration board (it has to be posted this month, but you can certainly link up to other challenges as well!)
-Use at least one (but certainly more if you want) Viva Las VegaStamps! rubber stamps
(We are now allowing competitors stamps to be on your work, but please make VLVS! the focus of the project, thank you.)
-Post it to your blog with a link back to us
-Upload to our linky using your direct blog post link (You may also upload via facebook, flickr or other gallery)
You could win a Project Spotlight post on our blog + some new rubber of course.
And visit us back here for inspiration!