Thursday, November 13, 2014

Door stopper

Hi Hermine here, this time I found a children's hobbybox to make a door stopper, but I wanted my own unique one of a kind version by altering it. This is so much fun.

front view

side view

close-up

in function (doens't it match my new flooring perfectly)

works perfect

the children's hobbybox I bought (for once I didn't forget to make a picture of the before phew)


step 1: take all the parts out of the box, I kept the fabrix, the buttons and the fiber with the pompoms, the rest I put aside.
step 3: sew all parts together, I did this by hand because my sewing skills are that great, and even worse with a sewing machine, but its easy because they are all rectangles.
step 4: fill the door stopper with heavy material like pebbles. Sew on the handle.
step 5: give the focal image some white accents with a white gel pen.

Hope you like it!

Warmly Hermine

Used material:


Tuesday, November 11, 2014

Pure Imagination

Hello all :) Nataliya is here :) Today I will show you my new wall art with VLVS!
About imagination, of course :)


In this time I been able to use the 15 stamps, this is my personal record! The moon is 2 stamps: Moon Circle and Art Doll Set-ATC Size.
A boy is part of the Children Playing on Toy Car, and then I given to him a star :) (Row of Stars)


I stamping with black StazOn and different violet ink (all on the one stamp, for ombre effect) and adding shadow with grey Faber-Casrell Pitt Brush.

And my VLVS!
Stars 2 x 2 1/4
Caterpillar 1 x 2 1/2
Moon Circle 1 3/4 x 1 1/2
Art Doll Set-ATC Size
Butterfly 3/4 x 3/4
Butterfly/Spotted Wing/Sm 1 1/4 x 1 1/4
Butterfly Side/Sm 1 1/4 x 1 1/4
Pure Imagination 3/4 x 4
Unicorn 3 x 4
Children Playing on Toy Car 1 3/4 x 4
Row of Stars 1 x 5
Mushroom 1 3/4 x 1 1/2
Small Mushroom 1 1/4 x 1
Tall Daisy Arrangement 1 3/4 x 3
Cow With Spots 3/4 x 3/4

 Have a day of pure imagination!


Monday, November 10, 2014

Feed Your Soul Mail Art


Hello Again, It's me Tera here with more fun Mail Art!! 
Today's envelope is a little sweeter/cuter than my normal style and I must say I love it!!

Stamps Used:  

Feed Your Soul 3/4 x 4 1/4

Line of Grass 3/4 x 3 3/4

Boy in Tub Boat 2 1/2 x 3 3/4

Plate 1449 (plane found on this plate) 

Place Stamp Here 1 1/4 x 1 1/4


Start by stamping your line of grass in various green inks along the bottom of your envelope, don't be afraid to stagger them for depth. Next stamp the Boy in Tub Boat in versaFine Sepia ink. While that drys you will want to make a mask to cover the image so you can sponge on some clouds without getting any on the boy image. After I used a mask to create some clouds, I then stamped the plane in VersaFine sepia ink. I removed the mask from the boy, and colored him with various markers, and added a touch of red to the plane too!

Now pick your quote to stamp along the grass.. Mine was "Feed Your Soul" I 1st stamped it in black ink, then added white highlights with a gel pen to make it pop! To finish the piece off I stamped the "place stamp here" square so everyone would know yes, it really will go through the mail!

Thank you for stamping along with us!! 


Friday, November 07, 2014

Guest Designer : Corrie Herriman


Today we have the talented Corrie Herriman joining us as a Guest Designer and I couldn't be happier! Her work is so fun and we're glad to have her. 


Hello everybody!

I am very excited to be here as Guest Designer for the month of November.

My name is Corrie Herriman and I live in Venlo in the Netherlands with my hubby. I love art journalling and making tags, cards and ATC's. Mainly I love getting painty and inky ! I hope you will like my contributions this month. My style is mostly colourful with a bit of humour but occasionally I also love doing something in vintage style. If you want to see more of my work please visit my blog at www.MadeByCHook.blogspot.nl.


I am very excited showing you the first project I did for my Guest Designer Term here at VivaLasVegaStamps! It is an art journal:


I made this journal with a gelli print as a base. Of course you could paint a background too. Then use stamps and stencils to create more interest. I used the following VLVS! Stamps in the background : 19416 – Waybill/invoice background / 19454 – Grunge 3 / 19456 – Grunge 5 / 19459 – Grunge 8 and a Crafters Workshop stencil with white ink. Next cut some borders from scraps with a die or a punch and tear some book text. Adhere randomly to the page. Doodle around the edges of the page. Stamp main images on separate cardstock, color, cut out and adhere. I reversed the roller skate using tissue paper. Stamp sentiment & adhere. I used the following VLVS! Stamps for this : 19036 – Boy in cape / 19419 – Rollerskate (reversed) / 19414 – Toy airplane.


Her are some close-ups :


I also used the following supplies : Gelliprint made with acrylic paint, StaZon ink, Memento, Hero Arts Unicorn white pigment ink and Distress Inks, TCW stencil : Mini cut circles, Blending tool, Scalloped border punch by Fiskars, Scraps of gelli print & book text, Tissue paper to reverse roller skate stamp, Copic Markers, India Ink for splattering

Hope to see you next time !

Thursday, November 06, 2014

Doodling with a Stamped Background

Hello and Happy Thursday!  Tina here today with an Art Journal Doodle page, using stamps to create a textured, whimsical background.


I am currently obsessed with Doodling.  I love creating whimsical pages using stamps to create a wonderfully textured background. 

This is such an easy fun way to create and any stamp will do to create an amazing background.

To create my background, I started with a sheet of heavyweight watercolor paper, spritzed with multiple colors of Shimmerz Sprays!  Love the gorgeous color!

After the sprays have dried, randomly stamp on the background, overlapping images and shapes.


VivaLasVegaStamps Used:
Periodic Table
Color Wheel Lines
Design Crosses
Design Open Ovals
Texture Open Suburbia


Once you are happy with your stamping, add your doodles or whimsical shape.  I first drew my Owl shape with a pencil, then outlined the shape with a Scarlet Lime pen.


I then colored the Owl Image with Montana Markers, allowing the textured background to peek through the drawing.


Once I had finished painting the Owl image, I wanted the background to blend into the background, so I covered the entire thing (minus the owl) with watered down Gesso.  I love how you can still see the color and pattern underneath, while muting the intensity.


Here are a few close-ups of the details and doodles!


I hope you enjoyed my Art Journal Doodle page!  Thanks for stopping by!  Have a great day!


Wednesday, November 05, 2014

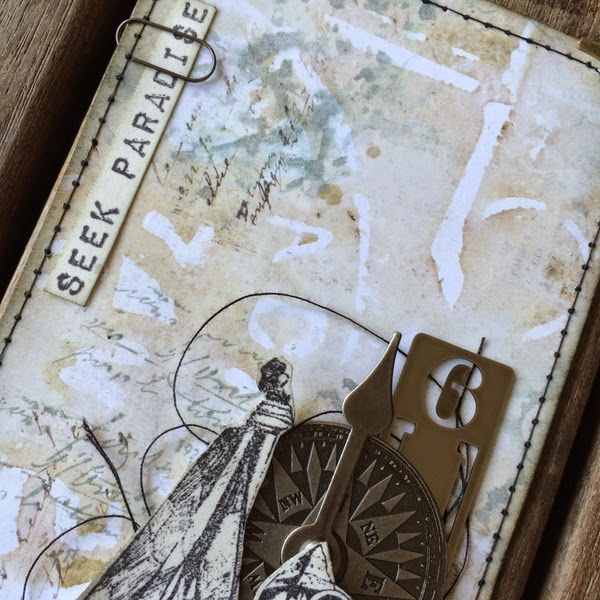
Seek Paradise

Hi Guys Karen with you again today.. I'm so happy to be back after a little break to share with you again.
 
I fell in love with the gorgeous little Boy in Tub Boat on plate 1449,


 so I thought it would be perfect to use for my project today.
 
I started off by doing some mono printing on to my tag as my first background layer using some of  The Crafters Workshop Stencils and some distress ink.
 
The Crafters Workshop stencils I used were
 
 TCW455 Love post
and
TCW460 Ring Doily
 
I love how this background looks!


I then added in some machine stitching around the edges, and a little bit of random stamping using  one of my go to background stamps


 I don't think I could ever get sick of using this stamp!
 
I then stamped the
 
 
and
 
 
Seek Paradise 3/4 x 2 1/4
 
 on to some cardstock and cut them out, added in a tiny bit of distress ink around the edges and mounted them onto my tag along with some of my favourite idea-ology embellishments and I was done, Nice and simple, but I love how it turned out!


Thanks so much for stoping by today, Until; next time.. Happy Stamping!
 
Karen xx


Tuesday, November 04, 2014

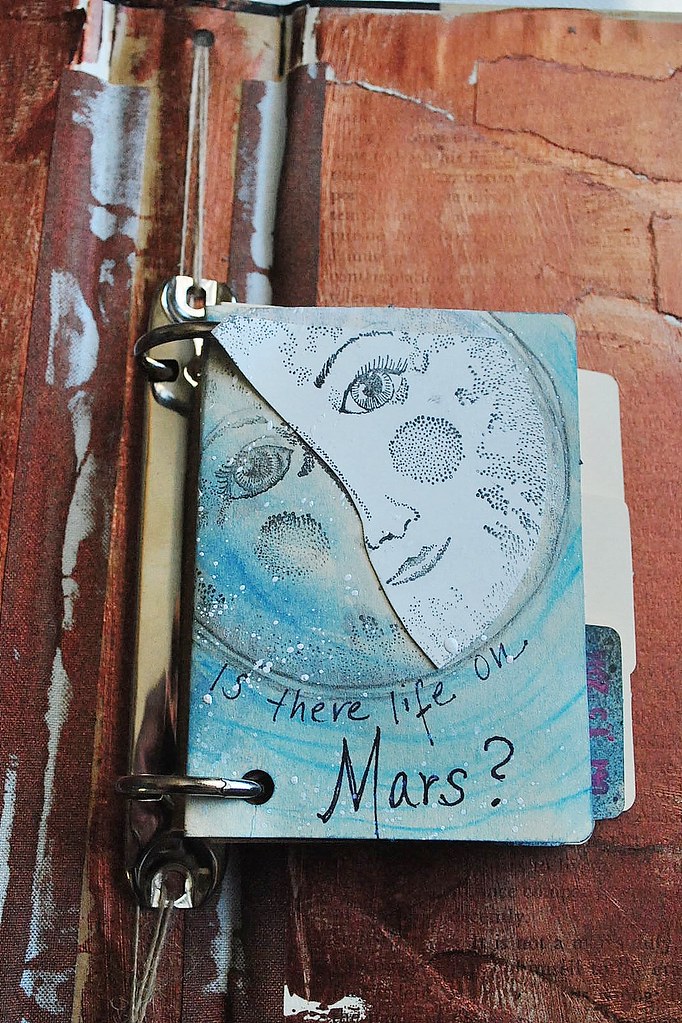
Is there life on Mars? (ATC folio)

ATC folder inside
Hello stampers!! It's Amy, and I have a little ATC folio I created to share today!
I am a big fan of the show "American Horror Story- Freakshow," and at the end of the first episode, Jessica Lange's character sings a cover of David Bowie's "Is There Life on Mars?" This got my creative juices flowing for some funny reason. I wanted to make something out of my box, with an element of freakiness.
I started the card by water coloring the front of the folio, using watercolor pencil to create space like rings, and used some white ink splatter across the page as well, for stars.


I then stamped the Man in The Moon stamp, using tuxedo black memento ink. On a separate bit of smooth cardstock, I stamped the moon again, and cut it out to give an angular illusion, and some layering. I then hand wrote the song quote underneath.


For the inside of the folio, I sprayed Dylusions ink in black, and added splatter of Hero Arts ink in neon pink. I stamped the Banksy Gas Mask Flower Girl stamp onto cardstock, but to give the fading illusion, I stamped using Big Brush pens from Faber Castell Design Memory Craft, and colored her skirt and tights with watercolor.

have started a little book holding ATC's and I'm so happy this silly little (different for me) bit is the first I see when I open the book!

Thanks so much for having a look! I hope you were inspired today!
~Amy

Stamps Used:
Man in the Moon
Banksy Gas Mask Flower Girl

ATC Folder:
7 Gypsies
Ink: IMAGINE Crafts, Hero Arts
Adhesive: Helmar
Hole Punch/Binder Rings: Tim Holtz
Pens: Faber Castell-Design Memory Craft, PaperMate Flair


Monday, November 03, 2014

Winners & Design Team Call

Thanks so much for joining us this past week during our Hop with The Crafter's Workshop!

Tons of inspiration EVERY where --- not sure what we're talking about? Check out :
Monday
Tuesday
Wednesday
Thursday
and Friday
to be inspired using stamps and stencils!

And we have a couple of winners to announce -- each of whom will be receiving some Stencils and some Stamps!!

So please would the following ladies send us an email @ deedee430@gmail.com with your shipping info, and we'll get this stuff sent out to you ASAP!

Lissa Goldsmith and Marilyn H (mcgoo4@gmail.com)


And now for some REALLY exciting news!

DESIGN TEAM CALL!!!!

We’re looking for all types of artists and welcome anyone who has a passion for rubber stamping to apply! Bring on the Mixed Media Artists, the Card Makers, the Scrapbookers, the Altered Artists, the Scene Stampers… we want you ALL!! International applicants welcome to apply, too.

Our terms last six months. This term will run from January 1st – June 30th and has 8 openings.

Design Team requirements during your six month term are as follows:
1) Regularly promote VLVS! through:
a. online galleries
b. your blog
c. social media like facebook, twitter, youtube, flickr and pinterest
d. and by submitting to publications.
2) Complete a minimum of two (2) projects per month to be posted on the VLVS! blog, always using only Viva Las VegaStamps! images. Your posts must include at least one over all finished photo, one detail photo, a product list with appropriate working links to our online store and a short description on how you completed the project. Keep in mind occasionally you may be asked to follow certain criteria, ie; using a given product, following a theme, or creating for the season. We may also request an additional post in which case you would only be asked to share a project as inspiration with working links to the appropriate stamps. No need for tutorials or step by steps on inspiration posts. It is important you possess the necessary skills to photograph your projects well. We want to see them in their full glory; you should be able to provide well lit, focused, center of attention photos.
3) Participate in the online private facebook group for the team. Important information like schedules, future hops, logos, links and contact information are all kept in the group. I run a lot of ideas by the team and value their honest opinions.
4) Participate in blog hops and/or product swaps. (Some may be on a volunteer basis only)
5) Mail two (2) completed projects to the store for display. This is out of your whole six month term. We love having projects posted all around the store for people to ogle as they peruse through our stamps.


In return VLVS! will:
1) Provide you with regular shipments to keep you fully stocked on supplies, including but not limited to VLVS! Stamps, Miracle Tape, Embossing powder, and any product swap goods.
2) Provide you with a detailed schedule at least 2 weeks in advance.
3) Compensate you for extra work outside of the regular schedule. This will be based upon volunteer projects and any extra hops or swaps outside of said schedule.
4) Regularly promote you and your projects through online social medias, as well as display you and your personal blog address on our company blog.


How to apply:
Please email me the following information:
- your name
- a brief bio.. Who are you? Why do you create? That type of stuff!
- attachments including three (3) of your best stamped pieces. (could be cards, layouts, tags, jewelry, anything using rubber stamps -- VLVS! not required but appreciated)
- the link to your facebook, twitter, pinterest and/or other accounts
- the link to any and all online galleries you regularly upload to
- any other important links you think I’d like to see
- a list of current and past design teams you have been on. (no previous experience necessary)
- and last please also include in your post why you want to be on the VLVS! DT.


Email to deedee430@gmail.com with subject line “VLVS! DT CALL -YOUR NAME-” due by 11/21 (November 21st) at midnight pacific standard time.


Applicants joining the team will be notified by December 1st.
 

Sunday, November 02, 2014

VLVS November Inspiration!!

Hi there Glenda here,  and it's my turn to show my take on the Viva Las VegaStamps! inspiration piece and here is the inspiration
and here is my take on this piece
I can't tell you how much fun I had making this!!! I started off with blank pages that I painted green, sprayed orange mist at the top and let it drip down and then glued on some scraps of paper.
Then I used my Gelli plate, white paint and some stencils as well as stamped the numbers in black ink onto the pages.
Next I used a fabulous stencil I have from a book called "Stencil 101" along with a can of black spray paint.
and here are some close up pics of the project


and here are the fabulous Viva Las VegaStamps! I used: the coffee ring stain, the writing arrow, the censored, the one way, the stars, the adventure awaits, the insert your life story here, the french writing background, the arrow, the spotty background, the row of stars and last but not least the grunge numbers from Plate 1444.

I hope you enjoyed seeing how I was inspired by the November inspiration piece and would love to see your take on it!!


Saturday, November 01, 2014

Monthly Challenge - Artsy Fartsy

The year is quickly winding down and before everyone gets swamped with winter wonders let's do a bit of ARTING! 

Our November challenge brings you lots of opportunity for interpretation.


Please be inspired by all the colors (lime green, TEAL, orange, black, white and more,) the heavy thick grungy numbers, circles, color wheels, grass and borders, GRUNGE, paint, splatters, >>arrows, coffee and tea and more. Please feel free to enter any type of project; altered art, ATCs, cards, layouts, journal pages and more!  Visit us this time next week for October's Winners. We'll now be having TWO winners. One voted winner will receive a grab bag, a badge, and a spotlight. One random winner will receive a grab bag.


Don't forget the rules:
-Create a new project based on our inspiration board
-Use at least one (but certainly more if you want) Viva Las VegaStamps! rubber stamps
(We are now allowing competitors stamps to be on your work, but please make VLVS! the focus of the project, thank you.)
-Post it to your blog with a link back to us
-Upload to our linky using your direct blog post link (You may also upload via facebook, flickr or other gallery)
You could win a Project Spotlight post on our blog + some new rubber of course.
And visit us back here tomorrow for some inspiration from Glenda Tkalac.