Showing posts with label scrapbook layout. Show all posts

Monday, June 24, 2019

Happy Days | Sue Plumb


Hi everyone!
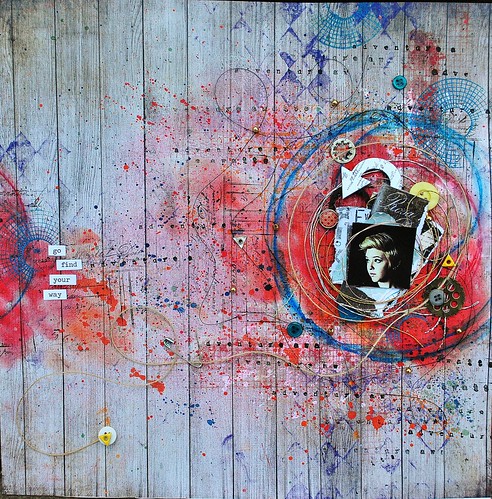
It's Sue Plumb here to share my latest design team project with you. Today I have a mixed media scrapbook layout I created using a variety of Viva Las VegaStamps floral stamps. This page was created to document a photo from dress up night at my scrapbook retreat last year, which had the theme "Trouble in Paradise".


For my layout I began with a sheet of Bazzill Marshmallow cardstock and Ranger 'Mermaid Lagoon' Distress Oxide to create a simple watercolour style background. I swiped the ink pad onto my messy mat, added a couple of spritzes of water, then laid the cardstock over the top to soak up the colour and set it aside to dry.


With my background drying, I then set about creating the embellishments for my page. I gathered a variety of floral stamps that I thought would work well for my tropical themed page - Hibiscus FlowerFancy FlowersBeautiful LilyLilies; and finally Hawaiian Ginger for those fabulous tropical style leaves. I stamped them out onto some smooth white cardstock.


I then used my Faber-Castell watercolour pencils to colour each of the images, sticking with shades I thought would work well with my photo and give my page that "tropical vibe". I then used a water brush to blend the pencil lines, before cutting each of them out.


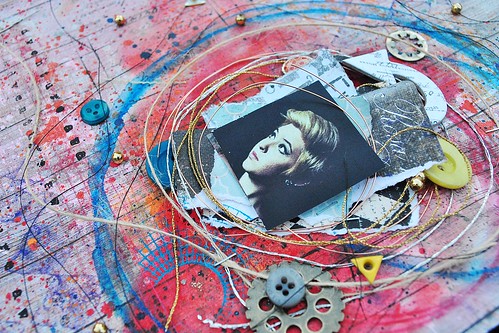
To construct my page, I started with the photo, adding some scrap cardboard underneath it to pop it up from the page. I then added a Cocoa Vanilla Studio floral cut file that I had cut from some white cardstock along the bottom edge of the photo.


I then arranged my stamped floral images across the page, following along the line created by the cut file. I tucked some underneath, and added others over the top using foam tape, to give the page extra dimension.


To finish off my page I stamped the Seek Paradise sentiment several times using black ink, and used some die cut words from Cocoa Vanilla Studio for my page title. I also added my handwritten journalling with a felt pen.


Thanks for stopping by so I could share this with you. I hope I have inspired you to get inky too!


Stamps used: 
Lilies

Other materials:
- Bazzill cardstock
- Tsukineko StazOn black ink
- Ranger 'Mermaid Lagoon' Distress Oxide
- Faber-Castell watercolour pencils
- Cocoa Vanilla Studio 'Colour Me Happy' cut file
- Cocoa Vanilla Studio die cut title words
- foam mounting tape
- felt pen

Thursday, December 27, 2018

Alice in Wonderland on Scrapbooking Layout | by Elina

Hi!
Hope you had a wonderful Christmas. My Christmas days were all about relaxing, spending time with my family, eating a lot of chocolate, and some crafting, too! :)

On Boxing Day I took out a pile of photos I had planned to use on scrapbooking layouts, chose some of my favorite patterned papers, and started playing. I had to start with a cute photo I had taken in Singapore summer '17; I knew my VLVS! 'Alice in Wonderland' stamps were going to match to it perfectly:


I started with stamping, coloring, and fuzzy cutting the stamped images:

The background I decided to keep quite simple; layers of patterned papers, splashes of white paint and black ink, and stamped patterns were all I needed.

The rabbit had too many fine details to cut out, so I re-stamped the image on the background, and glued the fuzzy-cut image on top:


Then it was all about placing the lovely images on the page! It was such a fun project to create.


My kids had a lot of fun when looking for the small Alice in Wonderland statues in the beautiful Flower Dome garden. I'm happy that this precious memory is now recorded

For this project I used the following VLVS! stamps:
Queen Of Hearts 3 x 3
March Hare 2 3/4 x 3 1/4
TweedleDum And TweedleDee 2 3/4 x 3
I'm Late I'm Late 1 1/4 x 2
Mad Hatter 1 3/4 x 2 3/4
Pocket Watch 2 x 2 1/4
Cross Marks Background 2 1/2 x 3 3/4
Staple X 3/4 x 3/4
Three Staples 3/4 x 3/4

This was my last project for this year and for VLVS! design team. What a year it has been! I want to thank you all for your lovely comments and your heartfelt support.
In 2019, my VLVS! inspired projects can be viewed in my blog Elina's Arts And Crafts. Hoping to see you there!


Wednesday, July 04, 2018

Feeling the Love | Sue Plumb


Hi everyone!
Sue Plumb here with my latest design team project for you. Today I have a mixed media scrapbook layout to share that features an abstract painted & stamped background and a photo of one of my most treasured scrappy friends taken at a retreat last year.


I began this page with some heavy weight white cardstock and a few Dylusions acrylic paints. I used a brush to apply the paint randomly in a few different directions; simply following my instinct and a rough idea of where I was going to put my photo.


Once I had the paint in place and it had dried, it was time to add some stamping to the background. I started with a few stamps from one of my very favourite plates, #1495. I used the Rows of Numbers and the Typeset Scallop to add some vertical and horizontal structure to my page using black Staz On ink. I then used the Cross Marks Background stamp with Ranger Archival Ink (Paradise Teal) to add some extra depth. 


Next, I added my photo to the page using Miracle Tape and then began building layers around it. I started with a few Jane Davenport patterned papers, which featured gorgeous painted style backgrounds. I used the Large Butterfly Gossamer and stamped out a couple, then fussy cut them and set them aside. I then repeated the process with the Whimsical Leaf and the Leaves stamps. I then began assembling my page.


I used the fussy cut leaves and placed them along the horizontal line created by the scallop stamp, tucking the ends in under the photo. I layered the whimsical leaves and tucked them in beneath the photo.


The two butterflies were adhered along the body only, allowing the wings to be bent up away from the page. I then took some white cotton thread and added some on top of each one, wrapping a few strands around the wings.


My page still need more though, so I took the opportunity to use up a few old Heidi Swapp acetate ephemera pieces that I had in my stash. These were perfect for layering over the painted and stamped background as they allowed the colours and patterns underneath to still be visible, while adding an extra layer over the top.


To finish off my page I stamped some Scribble Hearts with Vivid Chartreuse Archival Ink. I also added some scribbles with a Stabilo All Pencil; and some tiny splatters of Colour Blast 'Mermaid' Colour Artist Ink.


Thanks for stopping by today so I could share this. I hope I have inspired you to get inky too!


Stamps used:
Leaves

Other materials:
- Bazzill cardstock
- Ranger Dylusions acrylic paints
- Ranger Archival Inks
- Staz On 
- Jane Davenport Mixed Media Paper Pad
- white cotton thread
- Heidi Swapp acetate ephemera pieces
- Stabilo All Pencil
- Colour Blast Colour Artist Ink

Monday, July 21, 2014

You & Me

Hi everyone, Glenda here with a scrapbook layout using 5 Viva Las VegaStamps!  I know I said I was doing project life my way but I also did a regular layout. Yeah I'm a rebel like that! haha  I had a bunch of pics of the hubs and I and decided to do a layout on us and how many years we have been together. I had a lot of fun making this layout using some pictures that I had of the hubs and I.
What I love about stamps is that if you don't have the right embellishment you can custom make your own!  I used the Banksy painter (love this guy!!)


and the You color my world
and the Admit ticket
and last but not lease the checkerboard border 
 and here is a closeup
 I wanted to make it look like the banksy painter had paint dripping from his brush so I sprayed different colors of Glimmer Mists and let them drip down and then dry before gluing him onto the page.
I hope you enjoyed seeing my layout and until next time,


Wednesday, May 14, 2014

Stamping with Pan Pastels {with technique video}

Our 2nd post today is brought to you by Amy Lassiter and she's stamping with a paste made from her PanPastels -- CHECK IT OUT!

 
Hello stampy friends! It's Amy here today,to share a layout I created using some fun techniques with Pan Pastels AND Viva Las VegaStamps! It was so fun to play with a new medium, and to create something a little bit out of my box in style. :)
go full, VLVS, allassiter


I used the Pan Pastels both wet and dry. I had fun finding a few techniques, that were easy and gave a big impact at the same time. The vibrant colors were great to blend and layer, and I used them all over the page, to give the paint splash look, as well as to stamp with!
photo, go, close
top stamping, go


For the wider sections of the page that are covered in color, I used the sponge wand, and gently blended colors from the inside out. Between each layer I added, I sprayed the page with Fixative to keep the pastels from flaking off. As you can see in my video below, even after using the pastels wet(which makes for a great texture relief), the fixative keeps it all in place. I could even stamp with black and blue ink over the top,as well as draw and blend (using water) with Aquarelle without smudging the pastels.
pan pastels, side, close


Have a look at the quick video I created to show the stamping technique I used with the Pan Pastels:
 If you'd like to see how I created a chalky type texture "paint splatter....." head over HERE to watch that video.
Thanks so much for having a look today....and give Pan Pastels a try, you may find a new medium you love (like I did!)  
Supply List: Viva Las VegaStamps!: Harlequin Diamond Background, adventure awaits, color wheel lines,, waybill/invoice background
Paper: 7 Dots Studio- Nature Walk, Prima, Glitz Design, Graphic 45
Ink: IMAGINE Crafts/Tsukineko, Liquitex, Lindy's Stamp Gang, Heidi Swapp Color Shine
watercolor pencil: Faber-Castell Design Memory Craft Aquarelles
 Fibers: May Arts (twine), vintage Chipboard: UmWowStudio, Pink Paislee
Embellishments: 7 Gypsies, Bead Landing, Gauche Alchemy (yellow color kit), vintage
Pan Pastels: Violet, Permanent Red, Orange

Friday, April 04, 2014

Bewitched {Mixed Media Scrapbook Layout}

ouija stamp, bew, allassiter
Hello stampers, It's Amy here today, sharing a layout I created with some pretty rad stamps. I used a photo of my daughter, and used some of her favorite things........mystical, magical things.
Bewitched, ALLassiter, VLVS
I started by painting my background, and then finding a few coordinating papers, that I then stamped with the ouija board onto them, using Momento ink in Tuxedo Black. Next I stamped random lines with the washi grid background, using Ranger Archival Ink in Coffee; and then layered on the photo and playing card, as well as some more paper bits and washi tape.
title bewitched
When those were complete and adhered, I stamped with the directional circle
, as well as inking up only bits of the ouija board stamp, and randomly adding some stamping to the background. After adding my embellishments, I stamped throughout using paint, with the cross square background stamp...which really completed it for me. 

close flower, bewitchedbottom section, bewitched,allassiter

 Thanks for having a look today, and I hope you have a creative day! :)

Supplies used: Viva Las VegaStamps-ouija board, directional circle, washi tape grid background, cross square background
Paper-7 Dots Studio-Illumination, Messy Head, Domestic Goddess
Flowers-Prima
Chipboard-UmWowStudio
Stickers-7 Dots Studio
Paint-Plaid folk art Ink-Hero Arts, Tsukeniko/Imagine Crafts, Ranger, Liquitex