Showing posts with label Sandra Strait. Show all posts

Thursday, October 03, 2013

Autumn Gray--Keep the Blues Away

Sometimes, you just don't feel too creative.
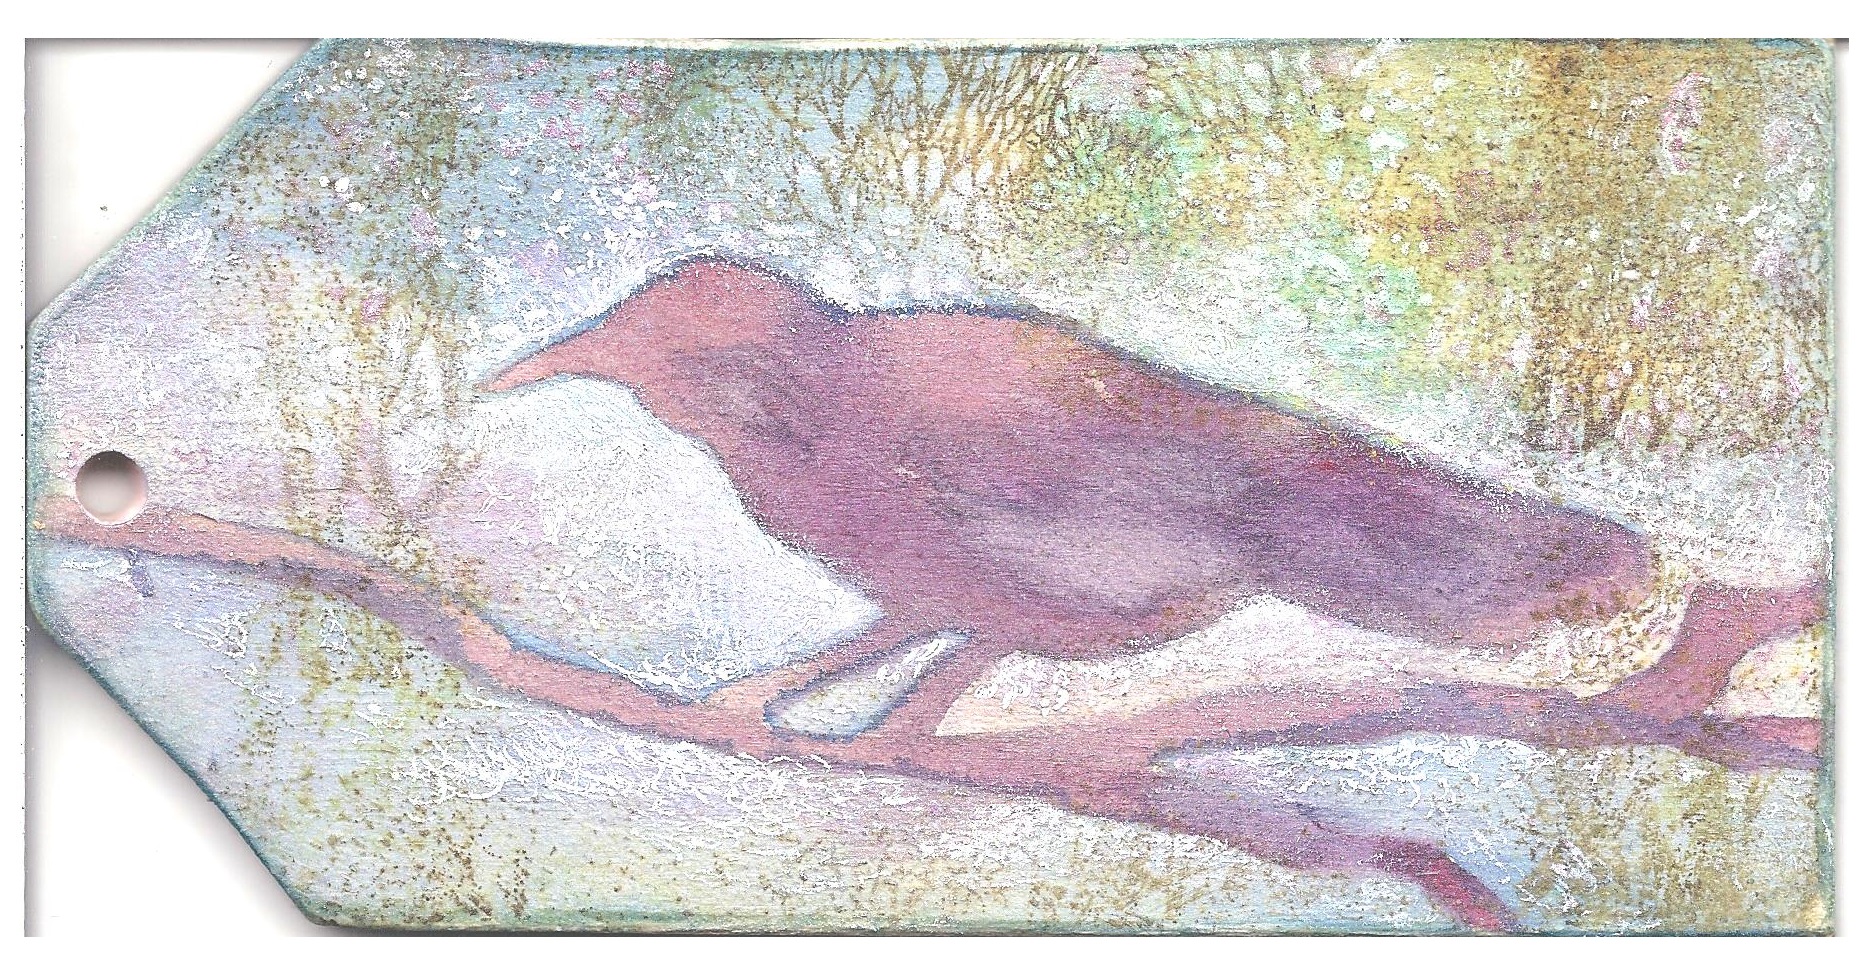
Morning Bird
Here in the Pacific Northwest we get a certain kind of weather--it's wet, windy and gray, gray, gray.  Sort of a perpetual twilight that makes you want to dig into your cave and hibernate.  I'm certainly not the only one who is affected by it.  
Usually, you adjust after a few days, and most of us who live here come up with certain routines to get us through those first few days of funk. I know that a creative slump can be a problem for many, so for my design team post, I thought I'd share my routine  that I've come up with to keep me creating.
Pretty Pear
When the autumn twilight days hit, I know that ideas will be scarce.  I'll find it hard to decide what I want to do.  So I have a plan template.  It's simple, designed to help me make choices.
My plan template:
Use whatever compatible media is closest to hand.  I grab them in this order -- the closest paper or *substrate; a painting or coloring medium; remaining tools necessary for the project.
Flip through books or magazines and let one fall open at random.  Use something on the page for my subject matter.
Based on media being used, set a time limit for the piece to be done.
Choose a second project, using the steps above, so I can alternate between projects while items dry.
K.I.S.S. (keep it simple, stupid)
That's the plan.
(*substrate-any surface that is used for your art work.  It could be paper or wood or glass or fabric or anything you can draw, paint or glue on).
So, the closest substrate to where I was sitting was a wood tag. The closest drawing/coloring media were Daniel Smith watercolors.  The wood tag was already primed with Golden Acrylic Ground for Pastels.  If it hadn't been, I would have moved on to next medium closes to me--acrylic paints.  Watercolor on unprimed wood doesn't work so good.
I decided to do both sides of the tag, so first I flipped through a magazine.  There weren't any pictures, but I saw the word 'bird' and made it the subject for one side of the tag.  For the second side, I flipped through a book--Dory Kanter's 'Art Escapes', and landed on a painting of a pear.
The remaining tools needed were for applying the paint.  Brushes were closer than sponges or foam brushes, so I picked the first round that was small enough for the tag size, and cheap enough for using on wood.  I set up a container of water, and laid down a non-stick craft mat.
If I didn't have a purpose for this project, I would have stopped here--the fewer items used the better.  But this was stamping project so I needed more. I picked up the two stamps that were at the top of my stash--a Trees background and a Grunge writing background.  I chose a StazOn Jet black inkpad because it was the closest inkpad.  For the trees, I chose Shabby Shutters because trees are green, usually.  I also wanted to use my Sakura of America gellyroll pens.
I decided to give myself 15-20 minutes for painting the tags, and another 15-20 minutes to stamp and color.  
I drew the bird lightly on the wood, and traced it on the deli wrap.  I painted the bird and let it dry, while I switched to my alternate project.
When I came back to this project, I cut out the mask and set it on the on the bird, inked up the trees background with Shabby Shutters ink, and stamped the image on the wood. I didn't feel the contrast was strong enough, so I used a white gellyroll pen to add sky.  Then I added a touch of Rose-star Stardust pen to add the glow of sunrise and a little sparkle (which didn't show up well in the scan).
Then my time allotted came up, so I quit fiddling, and turned to the other side of the tag.
When the watercolor was thoroughly dry, I decided to experiment.   This wasn't part of the plan, but any stirring of creativity is welcome, so I went with it.  
I'd read a blog post recently where the author used transparent gesso to seal her art journal pages.  She explained in some detail how she carefully applied the gesso so it wouldn't cause water media to run.
Hmmmm.
Not sure if was because I was painting on wood, faulty application by a beginner, or just the technique itself--but I smeared my pear into mush!  I ended up lifting off most of the watercolor to save the piece..  It didn't look too bad--just like a very faded wood sign.    I stamped over the pear with the 1787 writing background, and upped the contrast with a dark green brush marker in the background.  I smeared color from a metallic gold gellyroll to punch up the pear, smearing a bit of the marker color for shading, and used a white gellyroll for highlights.  The last step was to add swirls with the gold gellyroll.  
My experiment added an extra 1/2 hour or so, but that's okay.  The time limit is set to keep me from fiddling in discontent, not to stifle experimentation.
So am I out of my creative slump?  Not really.  But I'm not worried.  I managed to finish three decent pieces (finished the alternate project too).   Even if they had been total fails, that would have been fine.  For me, the main thing is that instead of fretting that I couldn't create, I created.   There is a feeling of satisfaction that comes from that, and I know it will help me get out of my slump all the  sooner, better than ever and ready to roar.
Supplies
VLVS! stamps used:
Sakura of America Gellyroll pens -- Stardust: Golden-star, Rose-star/Metallic:Gold/Standard: White
StazOn JetBlack ink pad
Distress Shabby Shutters ink pad
Daniel Smith Watercolors: Phthalo Blue (red shade), Azo  Yellow, Quinacridone Magenta
Marvy Brush Marker-Posh Green
Golden Acrylic Ground for Pastels
Round watercolor brush
Water container
Deli paper for mask

Tuesday, August 27, 2013

Bees Singing in Lavender

This summer I went to a lavender farm.  
There were bees everywhere.  Their humming a song in the air.  Their energy--bursts of flight, wings sparkling with light.  
I wanted to capture some of that in a painting.


Supplies
VLVS Stamps Used:
Large Bee Item 19013 Plate 893

Small Bee Item 19012 Plate 893 

Bee/Small Item 1896 Plate 472

Genuinely Jane Studios Wood Book page (Picket Fence)
Cray-Pas® Specialist® Oil Pastels: Sakura Of America-Dioxane Violet, Mauve, Cobalt Blue, Titanium White/ Cray-Pas® Expressionist® - Sakura Of America: Purple, Yellow-Green, Yellow, White

Clairefontaine Rouge Mer 300 lb Cold Press Watercolor paper
Faber-Castell Gelatos:Tangerine, Mango, Butter Cream
StazOn Inkpad: Jet Black
Golden Fluid Acrylic paint: Micaceous Iron Oxide
Golden Soft Gel medium
Clay-shaping tool
Plastic eraser

I prepared my wooden panel by priming it with Micaceous Iron Oxide, an acrylic paint with particles that produce a dark surface with a fine tooth, and sparkle.  It's a good surface for pastels, and light on dark painting.


I blocked out the areas where I wanted lavender. Layering purples and blues, I moved and blended the color with a clay-shaping tool and a plastic eraser.   Long strokes of yellow and green were added for grass.  I made sure to leave areas of the Micaceous Iron Oxide showing for contrast.  I just kept layering the colors, blending and pulling out details with the shaper until I was happy.

In the upper right, where I used mostly yellows and whites, I ran the plastic eraser over the color, blurring most of the detail, and then, lightly, laid in long strokes of yellow and white to get a strong impression of sunlight.

I sprayed the complete piece with hair spray and let it set overnight (this sets it so you can layer on a medium without disturbing the pastel, but it isn't enough to be permanent on it's own).

The bee images were stamped onto the watercolor paper that I had colored in yellows and oranges using gelatos. I added strokes of yellow and white oil pastel.  I cut the images out, and folded the legs and wings downward to get some dimension.

To seal the piece, and to glue down the bees, I used soft gel medium, covering the bees completely on both sides, and layering it heavily on the oil pastel.

I couldn't catch it as well as I hoped, but the Micaceous Iron Oxide glitters in the light giving the impression of dust motes sparkling in the sun.


Thank you for stopping by, and I hope you've enjoyed my oil pastel painting.

There are still a few days left for you to enter the Viva Las VegaStamps! August challenge. It's great fun and a chance to share your projects with the world!


For more of my work with Viva Las VegaStamps!, Amazing Mold Putty, zentangle-inspired art, and daily links to tangles, tutorials, and giveaways please visit my "Life Imitates Doodles" blog.   ~ Sandra Strait

Helpful Links: VLVS! Store for all your stamping needs; the  VLVS! Blog for new projects; VLVS! on  FaceBook,  Pinterest and Twitter

Tuesday, July 16, 2013

Wanderlust

I have to admit I was never a wild child.  
I always envied those who were.


So I decided to celebrate the spirit of Wanderlust!

VLVS! Stamps used: 
Children Playing on Toy Car-19187 Plate 927
Wanderlust-19170 Plate 927

Sakura of America:
Cray-Pas® Expressionist® Oil Pastels-Red, Orange, Yellow, Pale Blue, Black, Yellow, Green
Gelly Roll® Stardust® Glitter Pens-Rose, Sky Blue, Gold, Red
Gelly Roll 1.0 Metallic: - Gold, Blue 

Other Supplies:
Heavy 5" x 5" Chipboard or Masonite tile
Silk Tissue Paper (aka very thin rice paper/mulberry paper.  White tissue paper would also work, but would harder to color)
Faber-Castell Stampers Big Brush pen-Ivory 103, Light Flesh 132
Miracle Tape
StazOn Inkpad-Jet Black
Hair Spray
Golden Regular Gel Medium
Golden Acrylic Ground
Plastic Eraser
Stylus
E6000 adhesive
Scissors
Bone Folder

The Tile-Using Cray-Pas® as Scratchboard (Sgraffito)


  1. Seal the tile with two coats of regular gel medium and 1 coat of Acrylic ground, letting each layer dry in between.
  2. Color the tile with the Cray-Pas®, adding each color at random applying the color heavily. DO NOT USE BLACK AT THIS TIME.
  3. Blend the colors together with the plastic eraser.
  4. Lay down a heavy coat of black, completely covering the other colors.  Don't worry--the other colors won't smudge.
  5. Use the stylus to carve designs into the oil pastel, allowing the first layer of colors to show through. 
  6. Spray with cheap hair spray and let set overnight to set color..
  7. Seal with regular gel medium. Let dry.
(NOTE:  Julie Fei-Fan Balzer has a video showing this technique )

The Chipboard Hexagon


  1. Seal the chipboard with two coats of regular gel medium and 1 coat of Acrylic ground, letting each layer dry in between.
  2. Lay down stripes of yellow-green Cray-Pas®, alternating with sky blue stripes.
  3. Spray with cheap hair spray and let set overnight to set color.
  4. Seal with regular gel medium. Let dry.
  5. Attach chipboard to tile with E6000.
The Stamped Images


  1. Stamp the ''Children Playing on Toy Car' and the 'Wanderlust images onto the silk tissue paper with StazOn ink.
  2. Cut around each image, leaving a generous border around each.
  3. Flip over and add layers of Miracle tape onto the paper to stiffen it. Leave the backing on the tape for now.
  4. Flip right side up, and color the children using the Gellyroll and Big Brush pens.
  5. Trim the Wanderlust image so it has a white border all around,
  6. Pull off backing and stick to the bottom corner of the tile.  Burnish with bone folder or spoon, taking care not to tear the tissue.
  7. Fussy cut the Children's image so no border is left.
  8. Pull off backing and stick to the bottom corner of the tile.  Burnish with bone folder or spoon, taking care not to tear the tissue.
Check out the VLVS! Store for all your stamping needs and the  VLVS! Blog for new projects. VLVS! FB - VLVS! Pinterest - VLVS! Twitter

For more of my work with Viva Las VegaStamps!, Amazing Mold Putty, zentangle-inspired art, and daily links to tangles, tutorials, and giveaways please visit my "Life Imitates Doodles" blog.   ~ Sandra Strait

Thursday, July 04, 2013

One of These Is Not Like the Others

Have you ever played those games where you have to pick out the object that is different than the other objects?


VLVS! Stamps used: 
Sitting Elephant - 19157
Whimsical Elephant - 19219
Whimsical Sheep - 18979

Sakura of America

  Gelly Roll Standard  -White,  

  Gelly Roll 1.0 Metallic: - Gold, Silver, Blue, Emerald and Purple

  Galaxy Gelly Roll Stardust Pens - Rose, Sky Blue, Lime Green, Purple, Gold, Red
   Pigma Micron Pen .08

Strathmore Toned Tan Art Journal

StazOn Inkpad - Jet Black
Pencil

This journal page was fun! The toned paper of the Strathmore journal makes everything POP, and gellyrolls are one of my favorite ways to color Zentangle-Inspired Art.

The steps are few:

  1. Stamp the elephants and sheep. I put the sheep in the middle...'cause its the 'Not Like the Other' one, if you hadn't guessed, lol!
  2. Write out the wording in pencil, to get the placement you want.
  3. Outline the words with the Micron pen.
  4. Draw strings (lines to create sections on the page).
  5. Fill the string sections with tangle patterns.
  6. Use the Gellyroll pens to color, color, color!
Some tips with using Gellyrolls:

Draw on some scrap paper to get your pen flowing well if you haven't used it in a while.  You'll see ink forming on the tip.

Make sure you've done most of your Micron Linework before using the Gellyrolls, or else wait until the gellyroll ink is completely dry before using Micron over it.  Otherwise, you risk clogging your Micron.

The slower you draw, the more even coverage you'll get.

The color that beads up on the tip is a mixed blessing.  It means you'll get a lovely flow, and fantastic coverage.  But that bead will dry, and then prevent flow.  So when you stop using the pen, wipe the tip.  If your flow gets thin, wipe the tip.  If you want a thinner line, wipe the tip before drawing it.

If you want to add a second layer of color, let the first layer dry or you'll just move the ink around.

If you want to lighten the intensity of the color, scribble a line or two and smear it with your finger (yep.  You'll get your fingers smudged).  You can also let the color dry and add white gellyroll pen over top.  Different effects, but both lighten.

You can find tangle patterns online.  Some of my favorite sites are Zentangle.com, Tanglepatterns.com and you can search for Tangle Patterns at my Life Imitates Doodles blog.

Check out the VLVS! Store for all your stamping needs and the  VLVS! Blog for new projects. VLVS! FB - VLVS! Pinterest - VLVS! Twitter

For more of my work with Viva Las VegaStamps!, Amazing Mold Putty, zentangle-inspired art, and daily links to tangles, tutorials, and giveaways please visit my "Life Imitates Doodles" blog.   ~ Sandra Strait

Wednesday, July 03, 2013

A Walk Down Memory Lane for the 4th of July

Have you ever come across something that brings back memories from your childhood?


For years my father had one of those free promotional calendars posted on his workshop cork board.  It was open to a 4th of July spread, and he never flipped the pages, presumably because he referenced the phone numbers or notes that had been scrawled on the page.  Or he just got so used to the calendar being there, he didn't even see it anymore.

When I found this fabulous Eagle and Flag stamp from Viva Las VegaStamps! I immediately flashed back to that calendar.  The details of the page were fuzzy, but the image of my father, standing in the garage, sorting his tools was very strong.  Dad's been gone some 30 years now, and I cherish every memory of him. I decided to recreate the calendar as closely as I could . 

VLVS! Stamps Used: 


Eagle And Flag


Other Supplies:
Kromecote A2 Cardstock
Miracle Tape
Molding Paste
Clairefontaine Cold Pressed 300 lb Watercolor Paper
Faber-Castell Gelatos-Red, White & Blue
Star-shaped Punchinella
StazOn Jet Black Inkpad
Distress Inkpads-Old Paper, Tea Dye
Marvy Brush Marker-Navy Blue
AD Marker Bleu Cobalt
Brush, water and Scissors
2B Pencil


I started by stamping my eagle image on Kromecote paper with StazOn and cutting it out, rounding off the corners.  I ran the Tea Dye distress pad over the surface to age it.

Setting the eagle aside, I  lightly traced the punchinella circles and measured off the stripes onto the watercolor paper.  I dipped my gelatos in water and painted the circles blue, and the alternate stripes in red.  I remembered those circles on that calender, but couldn't for the life of me remember what was in them.  I  finally decided to add stars.

I cut my circles from a strip of punchinella stars (you can buy it at Gauche Alchemy), and held each one down, firmly, with one hand while I used a finger from my other hand to cover the circle with molding paste.  I gave it a few seconds to set, just a little, and pulled the punchinella away.  I repeated this for each blue circle, and then did the same thing in random spots over the page.

Miracle tape was used to adhere the eagle to the page, and I used the Old Paper and Tea Dye around the edges of the watercolor paper to distress it.  Something still seemed missing, and I remembered there were lines of some kind on my calendar page.  I also needed something to tie the eagle into the layout, so I added the lines with Marvy and AD Marker.   I ran the Navy Blue marker around the edges as well and scribbled in some fake phone numbers (we were a Mohawk 5 phone number in those days), and a few notes in pencil.

Overall, I'm very happy with this piece--it brings back lovely memories each time I look at it.  The plan is to add matting, and a year-at-a-glance calender at the bottom.  Then I'll put it up in the garage, and I'll celebrate the 4th of July with my father for years to come.


For more of my work with Viva Las VegaStamps!, Amazing Mold Putty, zentangle-inspired art, and daily links to tangles, tutorials, and giveaways please visit my "Life Imitates Doodles" blog.   ~ Sandra Strait

.................................
__________________________________________
.................................

Check out the VLVS! Store for all your stamping needs and the  VLVS! Blog for new projects and news every day. Follow VLVS! as the VLVS! Forum - VLVS! FB - VLVS! Pinterest - VLVS! Twitter.

Friday, March 29, 2013

Clearsnap + VLVS! Final Day!!

WOW! What a week jam packed with BEAUTIFUL inspiration!!

Here's a GIANT thank you to Clearsnap for partnering up with us :) Both design teams have presented some beautiful work using their inks and our stamps!


It's a sweet sadness that I get to share with you today.. the final day of our collaboration! At least it's one more chance to revel in beauty.

So one more time... I'm sharing THREE projects with you today!!

The first by Sandra Strait!


Supplies:
VLVS! Stamps

Art Is The Last 1 1/2 x 1 1/2

Charred Wood BackGround 4 1/2 x 5 3/4

Clearsnap Colorbox Inkpads
Archival dye-Gooseberry, Coral, Key Lime Pie
Fluid Chalk-Peach Pastel,,Aquamarine, Alabaster
Clearsnap Smooch Pearlized Accent Ink-Molasses, Green Apple
Other
5x7 Vellum Bristol paper, Golden Clear Granular gel medium, Ultra High Gloss Embossing Powder,

White gel pen, 3D foam dots, Palette knife, Ink blending tools--bullet and brush tips.
 To create this beauty she says "Recently I've been painting landscapes using inkpads for color.  When I was allowed to choose some products from Clearsnap for this blog hop, I went hunting through the catalog for just the right colors to match a photo that I had.


I blocked in all the colors by pouncing the inkpads where needed.  I dotted part of the Charred Wood stamp and embossed it to create ripples in the water (whichh doesn't show well in the scans). Then I loaded up a brush tip ink blending tool with Gooseberry and Aquamarine to draw the trees. I added more colors with the ink blending tools and when satisfied, I slathered on the granular gel medium.  When it was dry, I colored it with the molasses smooch, and added some Green Apple smooch for the leaves.  When you hold it up to the light the smooch glimmers as though the sun is shining through.  The last step was to stamp the 'Art is the last form of magic that exists' on a seperate piece of paper and adhere it with 3D foam dots.  Including drying time for the gel medium to dry, this took about 45 minutes to do."
Second we have Lyneen:


  Lyneen says "Spray Smooch Spritz on Kromcote Cardstock 5 1/2 x 8 1/2 for base background.  Use star shaped puncinella and ColorBox Raspberry Ink with finger dauber. Cut in half to make two cards.  Stamped images with ColorBox Chocolate Ink and hear embossed with VLVS! Ultra High Gloss Embossing Powder.  Highlight images with Smooch. Trim with May Arts fibers. "

She's used the following supplies:

Kromcote Cardstock
Miracle Tape
Ultra High Gloss Embossing Powder
Chevron Banner
Walkies for Otto
Large Flying Bird
Men in Balloon Basket


Clearsnap Products:
Smooch Spritz - Pink Sprinkles
Smooch - Mocha
Smooch - Silver Fox
Smooch - Gold Lame
ColorBox Chocolate Ink
ColorBox Raspberry Ink

And we're rounding off the week with Pinky!

 Pinky says these cards are easy peasy and that's great because they're sarcastic, witty, snarky, and so perfect for SO many of our closest friends! Whip a couple up and pop 'em in the mail!
Products Used:
Clearsnap Colorbox Inks
VLVS Plate 1404
Clear Scraps acrylic
Bazzill Cardstock
Miracle Tape 1/4"

1. Trim Acrylic to 4X6.
2. Trim Bazzill to 4X7.
3. Punch Bazzill edge.
4. Use bone folder to fold card at 6" mark.
5. Adhere to acrylic using Miracle Tape.
6. Using Colorbox ink pads, VLVS images and white cardstock. Graduate color on stamp and stamp onto white card stock.
Repeat with second word image.
7. Adhere stamped phrase to front of card.

Here's a great big THANK YOU to everyone who's participated this week and everyone who's shown up to be inspired.

Don't forget both Clearnsap and VLVS! are having giveaways.. comment all week long for a chance to win your choice of a plate o' rubber.. and enter Clearsna's rafflecopter giveaway for some of their favorite inks!!

Tuesday, March 19, 2013

Grungy elephant art

Warning! This project is grungy.  Perfection need not apply.  It took about 45 minutes of actual crafting time (not counting letting ink sprays dry overnight) and most of that was taken up drawing the patterns. All that beautiful color took about 10 minutes!


Viva Las VegaStamps! used: Elephant And Mountain 2 x 4 1/4 and Elephant On Bike 2 3/4 x 5Elephant And Mountain 2 x 4 1/4 Elephant On Bike 2 3/4 x 5

Dylusions Creative Blank Journal
Dylusions Ink Sprays-Lemon Zest, Pure Sunshine, Squeezed Orange, Melted Chocolate
 CraftersWorkshop 6x6 Stencils- Mini Cubist and Mini Harlequin
StazOn Inkpad-Jet black
Pentel White Gel pen
Pilot FriXion Color-Pencil-Like Gel Pen-Sky Blue, Rose Pink, Gray
Micron Pigma Pen .05-Black, Sepia
Roll of Paper Towels
Water Mister
Heat gun (optional)
Wet Coffee Cup (optional)


The Dylusions journal has a mix of white and manila cardstock pages and I wanted to test both so I did a two-page spread where the left side was the white paper and the right was the manila (the results were about the same on both sides).

The ink sprays:
1. I sprayed both pages with the ink, using these techniques: 
  • inks were sprayed lightest to darkest 
  • the distance from which I sprayed was varied
  • the length of time of time I sprayed was varied--I did short, barely there bursts of color and long saturated close ups of color.

--all common sense techniques, but you do get different effects by doing them.

2. The paper towel (the whole roll) was swiped across the page to soak up excess. I keep the paper towels to use in other projects because they are so pretty.
3. I let it dry overnight:. The pages were thoroughly drenched, so I wanted to make sure they were completely dry.

The Stencils:
4. I laid my stencils down randomly on the page and used one or more of these techniques each time:
  • Misted with water, rolled paper towels over stencil to pick up color.
  • Sprayed through stencil with ink spray; flipped stencil over and rubbed off color somewhere else on page

I didn't worry about using the entire stencil.  It's cooler if you just get bits of them.

I happened to be drinking coffee and the bottom of my cup had a little condensation on it--I stamped it on the page to get a few coffee ring shapes!

5. I let the pages dry for a few hours, but I could have used a heat gun.

I'd seen the outline of the elephant, and that determined what I wanted to stamp and draw.

The Pens and stamps:
6. I drew the elephant's eye and colored it with the Microns.  This is the only place where I used the sepia Micron.
7. I outlined the elephant's shape.
8. I stamped the Elephant images-- the interior cover of the sketchbook flexed when I stamped the Elephant & Mountain, and the elephant's head was lost!  I just scribbled a tree, so now the image is an elephant standing behind a tree and mountain! It don't matter when you're having fun!


9. I added zentangle-ispired patterns in some places and just picked out shapes that the ink and water had made in others.  My choices throughout were driven by the shapes of the color.
11. Color-Pencil-Like Gel pens were used to color the stamped images, and to add a bit of pink and gray here and there around the page where I thought an area needed to be brightened or dulled down.
12. The white gel pen was used to add highlights and make the stamped images pop.

I borrowed heavily from Dyan Reavely's ink spray and stenciling techniques for this project.  You can find many of her video tutorials online.

Check out the VLVS! Store for all your stamping needs and the  VLVS! Blog for new projects and news every day. Follow VLVS! as the VLVS! Forum - VLVS! FB - VLVS! Pinterest - VLVS! Twitter.

Friday, January 11, 2013

He's a Strange Bird


Supplies:

Viva Las VegaStamps! image used: 

Bird With Worms 2 1/4 x 3

Wild Paper 300 lb 8x10
Black Marker 
Dylusions Ink Sprays-London Blue, Pure Squeezed Orange, Bubblegum Pink
Stazon Inkpad-Midnight Teal 
Claudine Hellmuth Studio Acrylic Paint-Purple Palette, Dab o yellow
Faber-Castell Big Brush-White


I'm not sure where this idea came from, lol.  I was trying out some paper for a review, and had smeared some yellow paint (there was another color in the brush, that I forgot to keep note of) and sprayed with Dylusions. 


I stamped one of Mary Vogel Lozinak's wonderful images, Bird with Worms, and was wondering what I wanted to do next. 


The expression on that bird's face.... I'm not sure if it's one of indecision--"Which worm do I eat first?" or guilt-"These worms is so cute. But I'm going to eat them, anyway!"  At any rate, he looks like he might be calling on strange forces to help him out.  So I grabbed a black marker and echoed the shape of the bird.  Because ultimately, he's calling on himself for answers.


The paper has a deep tooth so I was able to let the paint show through in some places just by using lighter pressure.


To marry the light and dark portions I dabbed on some purple acrylic paint and then spotted white around the stamped image.

Check out the VLVS! Store for all your stamping needs and the  VLVS! Blog for new projects and news every day. Follow VLVS! as the VLVS! Forum - VLVS! FB - VLVS! Pinterest - VLVS! Twitter.


Monday, October 01, 2012

I am the Terror that Stamps in the Night!

Did you ever make gelatin  and pour it onto a cookie sheet, then use it as a printing plate? Like it's  a giant stamp to press paint and images onto paper?  I never did, and I think I missed out on a lot of fun.

But recently I purchased a Gelli Arts Gel Printing plate, which is a more permanent version of the same thing. Your home-made gelatin plate breaks apart fairly quickly, while this fancy new version should last for a long, long time and is washable so you can use it over and over.

Supplies
VLVS! Stamps:
Mary Vogel Lozinak's Steampunk Woman's Head 2 1/2 x 3 Item 18365 Plate 1400
I Am The Terror That Stamps (in the night) 3/4 x 2 Item 1987 Plate 385

Two pieces 5.5 x 8.5 in Plike White Cover stock and one 3 inch square piece (You get an unusal tactile feel with Plike Paper, but any cardstock would work)
Tim Holtz Alterations Texture Fades 'Bingo' Sizzix Die (if paint dries in dies, they might not work properly in machines)
Ink Pads-Versamark Watermark, Ranger Archival Black
Acrylic Paints-Claudine Hellmuth Studio 'Dab of Yellow', 'Altered Orange' and 'Sky Blue'
Black Embossing Powder
6x6 inch Gelli Print plate

Scissors
Brayer
3D foam
Painter's tape
Sharpie Ultra Fine Point Marker
Optional: Studio Slow-dry medium (so acrylic won't dry as fast)

I started this project going in one direction and changed my mind mid-stream. But I'm writing the instructions as though I planned everything from the start, so you'll never know I screwed up!  Pretty sneaky, huh?

Process
With the Ranger Archival black, stamp the 'I Am the Terror' text on the 3 inch piece of the Plike paper.

Tear off a piece of painter's tape, big enough to cover text with some room to spare.  Tear edges all around tape to get jagged edges.  Place tape over text.

Using the Gelli Print Plate:
note: if using Slow-dry mix in paint now according to directions
1. Apply about a fingertip's worth of  'Dab of Yellow' acrylic paint to the Gelli plate.
2. Smear the paint wth the brayer until it covers the plate completely.
3. Press the 'Bingo' die firmly onto the plate', then set the die aside.
4. Press the 3 inch piece Plike paper onto the plate, masked tape side down, and lift off some color.
5. Press one of the 5.5 x 8.5 pieces of Plike paper onto the plate.  Don't try to cover the entire piece of paper.

Don't bother cleaning anything at this point, just repeat steps 1 thru 5 using 'Altered Orange'.  When you press the Plike onto the plate this time, reposition it so that another part of the paper is colored, with some overlap of colors.

Repeat the entire process with the 'Sky Blue' paint. Most of the Plike paper should be colored, but don't worry about bits of white--they add to the charm.

Now, quickly, grab the other piece of Plike paper, before the paint dries and press it onto to the plate to pick up as much left-over color as possible.


While the Plike is drying, clean the dies, brayer, and plate with soap and water.  Best not to let the acrylic paint dry on them.

...Intermission entertainment....


Please ignore the stamped images on the left, lol.  They are part of my my original idea.  But I wanted to show you what both pieces of card stock look like.  I cut out the text from the left to use on the right, but in the instructions I'm giving, you'll use the 3 inch piece of Plike.

Process...continued
Using the piece of cardstock you prefer, stamp the Steampunk Women's head with the Versamark ink.  Apply the black embossing powder and heat.

Remove the painter's tape from the 3 inch piece of Plike, and cut it so there are jagged flame-like edges.  Use the foam tape to adhere it where it looks like it is coming from the Steampunk Woman.

And, lastly, take the Sharpie and add some Zentangle®-Inspired Artwork!

You don't have to buy a Gelli Print plate to try this process.  For a video showing how you can make a temporary gelatin plate http://www.youtube.com/watch?v=JZgBkBv8y5s.

Meanwhile, check out the VLVS! Store for all your stamping needs and the  VLVS! Blog for new projects and news every day. Follow VLVS! as the VLVS! Forum - VLVS! FB - VLVS! Pinterest - VLVS! Twitter.


Thursday, July 12, 2012

GA and VLVS! Day 4

Welcome to Day 4 of our swap with Gauche Alchemy!!!!

Don't forget... what's a swap with out PRIZES?? Fill out the rafflecopter form at the end of this post for multiple entries into our giveaway!

First up today we have DT member Sandra:
Sandra made a file folder book to keep all her ephemera (old and newly acquired) sorted and easy to flip through and see! From Gauche Alchemy she used 3 Punchinella Strips, Sheet Music torn into pieces, Crimson Lace, and Blue Lace. And of course the extras that she added to her stockpile.
 
She used stamps from Plate 1425 and a glorious amount of Miracle Tape.


and second is DT member Sheri:
Sheri used all sorts of plastic, metal, and paper bits n bobs from her kit. She went with a gorgeous purple and brown theme, adding in pieces from a vintage Sears catalog, some music paper and a bottle cap as center stage.She also use some of the punchinella that GA sent as a mask for her light and dark spots in the background!

She chose to go with images and sayings from the Mary Vogel Lozinak category of VLVS! Including:
Man in short pants

Braids Lady
Birds Head on Stick
and 
Director
among others.


Thanks so much for checking out what the DT had to share today!! Now for the giveaway details... Like us on Facebook, follow us on Twitter and Pinterest, sign up for our newsletter and get connected with us via networked blogs. Everything you do on the list gives you one more chance at a a FREE Pound O' Rubber! that's A LOT of stamps! Fill in the Rafflecopter form below to be entered :)
a Rafflecopter giveaway
Now hop on over to the GA blog - they've got wonderful projects to display for the swap as well! They also have a coupon code to use in our store, available only to their blog readers! So become one and have access to a VLVS! discount :). And here is a coupon for you to use in their store: "VLVS10" good for10% off anything you order. They've also got a special giveaway going on this week!

--Check both blogs SATURDAY for prize announcements!--