Showing posts with label 12 tags of 2013. Show all posts

Tuesday, December 10, 2013

Happy Holly Greetings... 12 Tags of 2013 for December Viva Las VegaStamps! Style!


Welcome to Viva Las Vegastamps! Susan here today to with my take on T!m Holtz' December installment of the 12 tags of 2013. YES - I did complete the tag for November... you can click here to sneek a peek. OK - I'll start out by saying I took liberties with creating this month's tag. I created my own dimensional plastic using stuff I have in my crafty stash. I had a bit of fun with this and the result is STUNNING!


Using a section of a recycled #6 take out container, a scrap of vellum cardstock and a section of miracle sheet - I fashioned my own faux frosted plastic by adhering the two together. If you have made your own DIY shrink plastic using a recycled #6 plastic container - you know that the plastic will warp and bend when heated. If you heat it a lot - it will shrivel up into a shrinky dink.


I stamped Holly Large #18930 repeatedly onto the vellum cardstock side using Timber Brown StazOn and then fussy cut out all of my pieces.


I started out this month's tag painting the base tag background by dragging tag through smattering of Old Paper, Antique Linen, Antique Bronze and Picket Fence Distress Stains. I distressed the edges with Gathered Twigs Distress Ink. 


Then I began adding my stamped images (Holly Small #18929Holly Leaf 3760Leafy Border #6292; and Ornate Corner Left #18928) creating a border using Timber Brown StazOn Ink. I wanted to keep with the vintage feel so the dark brown ink really compliments the background and will make my colorful holly "POP". I added pattern to the background using an ink blending tool with the Harlequin Mask from UmWowStudio; first using Frayed Burlap Distress Ink. Then I shifted stencil over to hit reverse areas with Iced Spruce Distress Ink. It was a little bright now, so I toned the background down by brayering on a layer of Picket Fence Distress Stain. I finished off with some splatter dots of Picket Fence Distress Stain - the splatter is subtle, yet gives the snowy effect.


Now it's time to color my holly leafs. They all got a quick douse of color with Peeled Paint, Brick Red and Vintage Photo Distress Stains. When dry, I added more detail and color with various Distress Inks and an ink blending tool.


I know it's hard to see here in the photo - but these are my heated and curled dimensional holly leaves. Holding with heatsafe tweezers, I gently heated and shaped each leaf to my liking. In a couple areas I heated the leaves a little too much and the plastic began to shrink a little, but it just added to the charm of the shaped leaves. It's clear and on the backside - so it's not really noticeable.


Now for final assembly! I added some Diamond Glaze to add some "POP" to the holly berries and to accent details on holly leaves (here and there). I layered the sections of holly to my liking and added a piece of black 3-D pop dots to anchor leaves down as they lay. I finished off with adding some pink sticky back crystals and pearls for berries that I colored red with a permanent marker (and they match perfectly). 

Happy Holly Greetings!


This tag is complete... all tied off with a shimmery gold/red satin ribbon. I may go back and add the white splatter for snow overall - but for now I'm pretty happy the way that it is.

• • • • • • • • • • • • •

Viva Las VegaStamps used: "Holly Greetings" #6043Holly Large #18930Holly Small #18929Holly Leaf 3760Leafy Border #6292; and Ornate Corner Left #18928. Supplies used: Vellum Cardstock; Recycled #6 plastic take out container; Timber Brown Staz-On Ink; various Ranger Distress Distress Stains; various Ranger Distress Inks; Versafine Black Ink; Miracle Sheets, Harlequin Mask from UmWowStudio; Diamond Glaze Dimensional adhesive; Red permanent marker; sticky back pearls and gems; black 3-D pop dots; and ribbon from stash.


Thanks so much for dropping by. Have you entered the monthly challenge??? Its a brand new month with a new inspiration board. Just make a creation using the inspiration and your stash of VLVS! stamps... you could win more RUBBER! CLICK HERE for challenge details. Also, you definitely want to subscribe to the blog feed and to the Viva Las VegaStamps! newsletter to be IN THE KNOW of everything going on at the Viva Las Vegastamps! store. There's so much amazing inky inspiration to see!

If you would like to see more of my creations please visit my blog, sbartist : painting in the dark HERE. I'll be back soon with another stamping adventure!  Sb

Tuesday, October 29, 2013

Welcome to a Winter Wonderland... October's 12 Tags of 2013 Viva Las VegaStamps! Style!!!


Welcome to Viva Las Vegastamps! Susan here today to with my take on T!m Holtz' October installment of the 12 tags of 2013. I had to break the Halloween habit... and finally move on to the winter holidays. And since I am creating a winter version of this tag... I also am adding a splattering technique to give the effect of snow falling for the Craft Stamper Take It, Make It Challenge #5.


On a 4" x 6 1/2" section of off white cardstock, I created the marbelized background using Ranger Distress Paints (colors Weathered Wood, Crushed Olive, Dusty Concord and Antique Linen). I applied a second layer of just Weathered Wood and Antique Linen to tone down the bright colors.


I heat set to dry completely. Using an ink blending tool I applied Broken China, Weathered Wood and Iced Spruce Distress Inks around the edges. I completed the background by splattering with a brush Picket Fence Distress Stain.


I needed a frame for this month's tag technique and I don't have one for this purpose... BUT... I do have a lacy oval frame stamp (Doily #18849) that would be perfect. I could use Ranger Embossing Ink and a glue heat embossable powder to add the Distress Glitter... NAH! I want MORE DIMENSION. So I'm got out my Amazing Mold Putty and made a border mold of my stamp.

**WARNING** You need to thoroughly cover your stamp with petroleum jelly to protect your stamp - the rubber of the stamps and Amazing Mold Putty touching are reactive with each other. Watch closely and limit the time of stamp in contact with mold putty and remove it as soon as curing is completed.


As you can see here with stamp removed from mold. Some of the Amazing Mold Putty has stuck to stamp, which I cleaned off with soap and water immediately so the detail of my stamp is not clogged up and to stop any reaction the two compounds may have.


Now with a mold of my decorative border stamp - I filled it with Creative Paperclay® and let it cure. When paperclay is dried I inked and covered with Ranger Embossing Ink and heat embossable glue powder; then dredged in Antique Linen Distress Glitter. I went back with Vintage Photo and Broken China Distress Inks to add some depth and color to the edges.


I stamped several stamps (see list below) creating a collage scene using Weathered Wood Distress Ink and also Stone Grey Staz-On Ink. I really love how the Distress Ink just fades into the painted background giving subtle depth. I stamped snowflakes (see list below) with the embossing ink and applied the heat embossable glue powder; then applied a blue iridescent glitter to give the snowflakes shimmer.

Welcome to a Winter Wonderland...


The finishing touch was a Tattered Angels vintage icicle chipboard embellished with Distress Inks and a combination of blue iridescent and Antique Linen Distress Glitter. I accented Santa Collage #18933 with a little color using water brush and Ranger Distress Markers. Because of warping and to give the tag some stability to support the frame and icicles, I mounted the tag to chipboard with a section of Miracle Sheet cut to size and I embedded a sheer organza ribbon to act as a hanger from the top.

• • • • • • • • • • • • •

Viva Las VegaStamps used: Small Snowflake #18945; Medium Snowflake #18947; Large Snowflake #18946; Jingle Bells 10686; Early in Morning Swahili Script #1692; Christmas Trees Large #18942; Christmas Trees Small #18941; Santa Collage #18933; and Doily #18849 (oval lace border used to create mold). Supplies used: Cardstock; Stone Grey Staz-On Ink; various Ranger Distress inks and Picket Fence Distress Stain; Ranger Embossing Ink; various Ranger Distress Paints; Miracle Tape, Diamond Glaze Dimensional adhesive; Creative Paperclay®Amazing Mold Putty; Antique Linen Distress Glitter; Iridescent Blue Glitter; Ranger Distress Markers; and Heat Embossable Glue Powder.


Thanks so much for dropping by. Have you entered the monthly challenge - you have two (2) days left to make a creation using the inspiration and your stash of VLVS! stamps... you could win more RUBBER! CLICK HERE for challenge details. Also, you definitely want to subscribe to the blog feed and to the Viva Las VegaStamps! newsletter to be IN THE KNOW of everything going on at the Viva Las Vegastamps! store. There's so much amazing inky inspiration to see!

If you would like to see more of my creations please visit my blog, sbartist : painting in the dark HERE. I'll be back soon with another stamping adventure!  Sb

Thursday, August 08, 2013

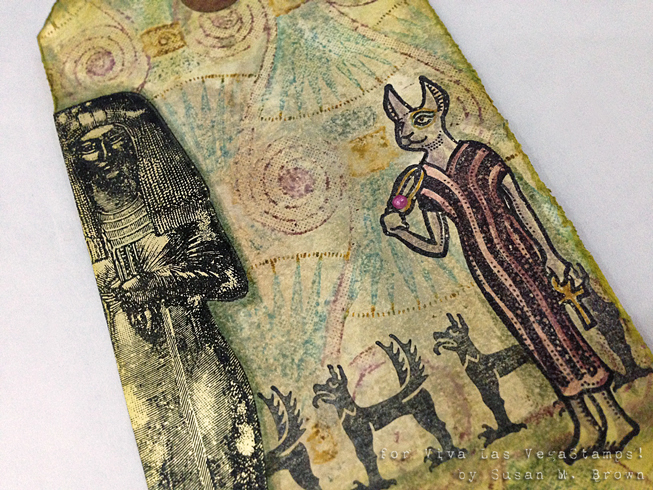
Tag ARTifact from the Pyramids... 12 Tags of 2013 for August Viva Las VegaStamps! Style!!!


Welcome to Viva Las Vegastamps! Susan here today to share my take on T!m Holtz' 12 tags of 2013 for August... but done totally Viva Las VegaStamps! Style. Grab your shades... were heading to the Egyptian Pyramids to find some creative treasure.


First on a sheet of freezer paper {because my teflon sheet is currently handling a resin project}, I applied side by side three Ranger Distress Stains - Brushed Pewter, Old Paper, and Antique Linen. I misted my #8 manila tag with a light amount of water then dragged the tag through the puddle of ink. I tapped off the excess liquid and then heat set to dry. 


I built up the layers of color with three applications using the same technique above and heat set to dry between layers. The brushed pewter gave a subtle metallic shimmer over the tag that looks like aged sandstone. I overstamped the "Basket Egyptian Goddess" #6101"Mummy Case/Female" #5806 and "Stylized Dog Border" #9827 using Staz-On Black ink. I also stamped each on acetate and a scrap paper to create masks for layering and scene building.


I prepared my masks, two on acetate and the others on paper and adhered to my tag with some removable adhesive runner. The colored image will not appear where the masked areas are. This process of building scenes is a bit time consuming with fussy cutting - but the end results are AMAZING!


I mounted the "Nile Flower Background" #1657 stamp and then began coloring with Ranger Distress Markers adding different colors directly onto the stamp. This is a detailed pattern, so I had to concentrate coloring similar sections. This was quite fun and relaxing coloring this large background. I remoistened the marker applied to the background stamp by breathing on it then stamped onto the tag. 


The "Mummy Case/Female" #5806 was not as clear as I liked on the painted tag, though I did stamp clearly - so I stamped it again onto a brushed gold cardstock, fussy cut and adhered with my Miracle Tape right over the top. This did the trick! The gold gave the pop and extra bling that I desired. I went around the edge with a distressing tool for a frayed effect and rubbed edge with a couple colors of Distress Markers. To finish off - I added a pink pearl gem, some additional hand coloring and some ribbon to the top and bottom and this tag looks like it's an artifact straight from the Egypt.

Tag ARTifact from the Pyramids...


•••••••••••
Supplies used: STAMPS - "Basket Egyptian Goddess" #6101, "Mummy Case/Female" #5806, "Nile Flower Background" #1657, and "Stylized Dog Border" #9827. Other supplies: #8 manila tag; Staz-On Black inkMiracle TapeRanger Distress Markers; Ranger Distress Stains - Brushed Pewter, Old Paper, and Antique Linen; water brush; brushed gold cardstock; pink pearl gem; and ribbon/trim.

Thanks so much for dropping by. I invite you to play along with the monthly challenge - make a creation using the inspiration and your stash of VLVS! stamps... you could win! CLICK HERE for challenge details. Also, you definitely want to subscribe to the blog feed and to the Viva Las VegaStamps! newsletter to be IN THE KNOW of everything going on at the Viva Las Vegastamps! store. There's so much amazing inky inspiration to see!

If you would like to see more of my creations please visit my blog, sbartist : painting in the dark HERE. I'll be back soon with another stamping adventure!  Sb