Showing posts with label stamping on fabric. Show all posts

Thursday, December 07, 2017

Art is anything you can get away with.

Hello everyone,

Today I have a tiny little book to show you. Sometimes I just fancy doing something different and one day I made a little booklet from one sheet of 12' x 12' paper. It was lying on my desk when I  thought to cover the outside of it in fabric and next to add gesso to the cover and the pages too. Before I knew it I had stencilled, stamped and doodled on the pages and this little book was born ! I love it and will make more !


Here is the outside. If you want to make one of these books; there are lots of tutorials on the internet and youtube. Just look for 'book from one sheet of 12 x 12 paper'. 

There are 8 double spread mini art journals in this book and here are the photos. 


Spread no. 1
I used an UmWow Studio stencil and Distress Oxides for this. 


Spread 2. Stencil used is by UmWow Studio and I used Distress Oxide Ink.


Spread 3. Stencil by UmWow Studio, used with Distress Oxide Ink.


Spread 4. Stencil by UmWow Studio, used with Distress Oxide Ink. 


Spread 5. Stencil by PaperArtsy used with Distress Oxide ink.


Spread 6. Stencil by UmWow Studio, used with Distress Oxide Ink.


Spread 7. Stencil by UmWow Studio, used with Distress Oxide Ink. 


Spread 9. Stencil by UmWow Studio, used with Distress Oxide Ink. 


Another view of the book. 


And the back. 

I have used a lot of stamps for this book. 


Thank you so much for stopping by today ! 


Friday, October 02, 2015

Pumpkin Flavored Inspiration.

Hello, Mary here, with a bit of inspiration for this month's challenge.  If you haven't seen the inspiration board, hop on over and CHECK IT OUT!

It seems the whole word goes pumpkin crazy this time of year---and I'm no exception!  I've been jonesin' for pumpkin flavored treats of all kinds.  Well, today, I bring you a little something sweet and pumpkin that won't add to your waistline...


The challenge this month has inspired a new tradition for me.  With the creation of this pumpkin, I now want to grow a nice handmade pumpkin patch of my own to spruce up my fall home decor.

I began by cutting out circles in three sizes from a lovely, smooth cotton fabric.  I then stamped stars onto the circles with the Field Of Stars and the Stars images.


I then stitched them to a length of cream colored corduroy with some messy machine stitching with black thread.  I simply sewed the side of the fabric together to make a tube, and gathered each end with a running stitch and stuffed it with filling to create my basic pumpkin shape.

I added a few lengths of May Arts twine to give it a more pumpkin-like shape, and embellished with buttons, beads and sequins along with adding a few leaves and an old spool for a stem.


All in all, I'm in love with my new pumpkin!  And I think with words like---fall oranges, cream, pumpkin orange, black, heritage, home, polka dots, Harvest, farm and pumpkin patch, you can say I was completely inspired by this month's challenge.

Now, go grab your favorite VLVS! rubber, and get your craft on!!

xx Mary

Friday, September 18, 2015

This Is Not A Photo Opportunity.

Hello, Mary here.

Today, I have a project to share featuring one of my all time favorite ways to use rubber stamps!  It's well known that I LOVE fabric.  The only thing I love more that fabric, is creating my own printed fabric.


To create the covers for this book, I grabbed some of my favorite unbleached cotton fabric along with my StazOn ink pad and stamped myself a one of a kind pattern with the Flying Saucer Diagram and Field Of Stars rubber stamp images.


To embellish the cover, I stamped a small section of white cotton with the Banksy This Is/Photo Op image, and stitched it on (I thought it was a funny nod to the cliche of a UFO enthusiast's desire to catch one on film!  HA!!). I then layered together several panels of cotton, felt and chipboard and sewed them together to create a soft, quilted book cover.


I love the vintage look of this book!  And the versatility of stamping your own fabric is endless.  How sweet would it be using nursery rhyme images for a baby book?  We're talking Humpty Dumpty, The Cow Jumped Over The Moon, and The Dish Ran Away With The Spoon stuff here.

Oh, yeah...

Well, that's it for me today---thanks so much for joining me.  Now, go grab some rubber and get crafty!!!

xx Mary

Monday, July 13, 2015

She Was...

Hello!  Mary here with a little inspiration for this month's challenge.  If you haven't seen the inspiration board, hop on over and check it out!

I gotta say, I'm totally lovin' this month's challenge.  Not only did it inspire me to create a little somethin', but a very BIG something!

It all started with a few paper and fabric postcards...


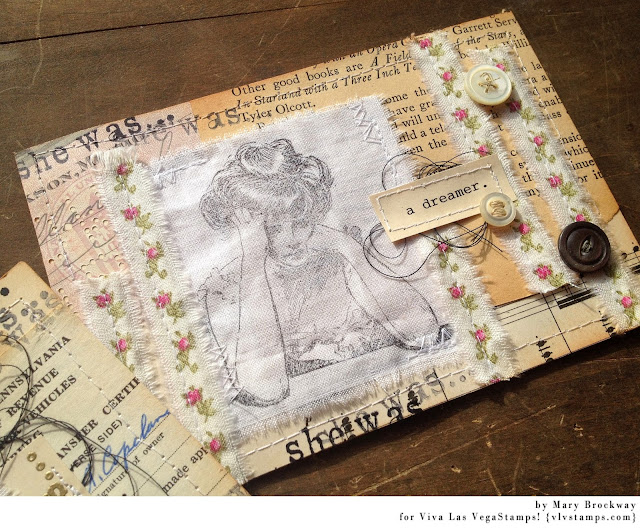
I began by layering up some vintage ephemera from my stash onto a postcard-sized sheet of cardstock.  A bit of generation stamping with the She Was sentiment added texture.  Then, I stamped the Fed-up Vintage Lady onto a scrap of muslin fabric for a focal point, and stitched it down.


For the back, I stitched lines to mimic a postcard onto another scrap of fabric and my card was done!
 

Because I liked the process of creating that card so much, I was inspired to create a whole album of postcards in the same style!  I plan for it to be a heritage album of all the fabulous women in our family from great-grandparents to my sweet baby girl.

Here's a peek at the cover...


The focal image is the Squiggle Heart stamp.  I can.  Not.  WAIT to finish up this album!!  It's going to be a true labor of love and it'll be fabulous to pass on down as my girl grows up and has her very own children.

SO, in all I was inspired by the stripes, music notes, vintage, women, scribbles, black, white, tan, pink, off white and tea stainy awesomeness of this month's challenge!!  How about you??

Thanks for stopping by today!!

xx Mary

Monday, May 19, 2014

It's A Wrap!

Hello, Mary here!  Today, I bring you pattern

Not only is stamping your own pattern a great way to jazz up your cards or scrapbook layouts, it's FAB for creating unique gift wrapping, too.

Here, I've stamped the Lightbulb image repeatedly in varying directions onto some simple brown postal paper with StazOn jet black ink to create a fun and funky gift wrap.


A bit of black jute, and this package is ready to go!!


Not only can you stamp onto your favorite papers, but fabrics, too.

I LOVE personalizing ribbon and creating all types of  stitched treasures with my custom stamped fabric.  I've found that a tightly woven, smooth fabric lends the best results.  Below, I've used a white muslin.  It's my favorite for stamping!!  And I definitely recommend using a permanent ink.  You want those images to stay put through any wear and tear.  Once again, I've used StazOn jet black ink to stamp my images every which way.


And here's a little peek at what I've done with my freshly stamped fabric...


These sweet little pockets are the perfect size for gift cards, handmade jewelry and so much more!!


I've simply folded my patterned fabric roughly into thirds and run a stitch along the edges to create a pocket.  A bit of hand-dyed ribbon colored up with my favorite Distress Inks stitched to the bottom and an eyelet will keep the pocket closed.


And finally, here's a closer look at the stamped pattern on the back.

VLVS! stamps used:


I gotta say, with a bit of paper, fabric and my favorite VLVS! stamps on hand, I may never buy gift wrap again!!

xx Mary