Showing posts with label black. Show all posts

Tuesday, February 25, 2020

Clean and simple art journal pages with Josefine

Hi everyone! Can you believe it's the end of February already? So much to do and not enough time in the day. Does that happen to you? I'm in the middle of several projects at work, doing my MBA, life in general - sometimes there is just not enough time to craft. But crafting is what keeps us sane, right? That's why I wanted to share some "clean and simple" (CAS) art journal pages with you that can be done in a few minutes. Just some fun, crafting, mess - and at the end, happiness.

To do that, I found a small art journal, so it feels less daunting to start. A small page is easier to fill, at least that was the idea. I added just a bit of white paint as my first layer.


Next, I used my small, round Gel Press, added three little paint drops to it, and spread it out. Then I used the "Cross Marks" and "Row of Numbers" stamp to remove paint from the Gel Press. Because I didn't want to waste it, I stamped them onto the next page.

To incorporate the mono print a bit more into the background, I used my palette knife to scrape a bit more white paint on top of it.

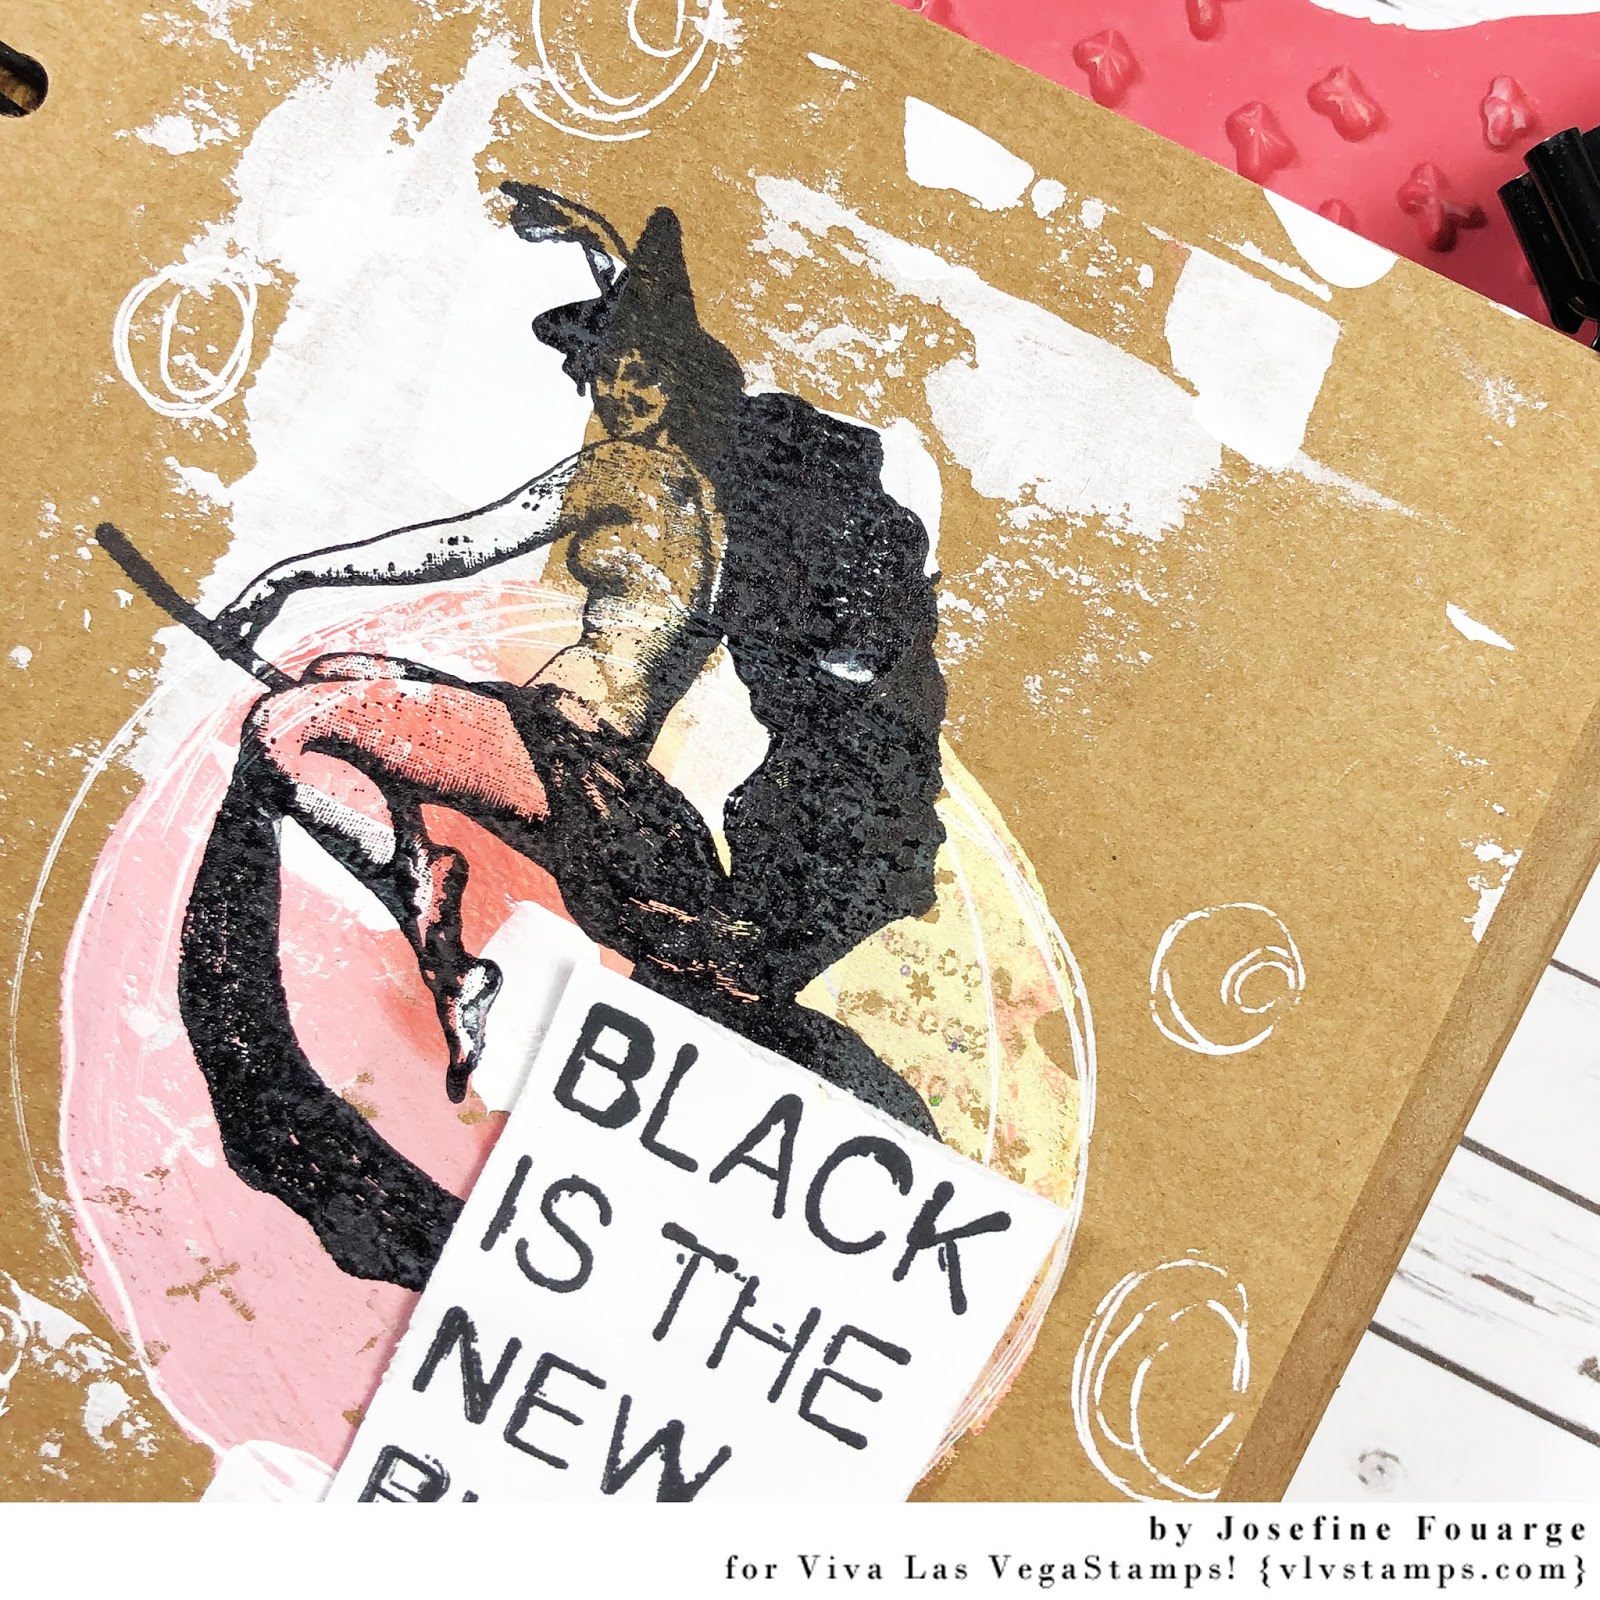
I added a few additional marks using a white gel pen and then stamped "Witch with Scarf on Broom" on top of the page. 

For the sentiment, I stamped the "Black is the new Black" stamp onto a separate piece of paper, crumbled it up a bit, and then adhered it to the page.

And here is what I did with the second page. I also added a mono print with the same colors, but then stamped the "Scribbled Circle" on top in a slightly darker color.

For my focal image, I stamped "Death riding Pegasus" onto a piece of tissue paper and adhered it onto the page. Unfortunately, the tissue paper didn't disappear far enough into the background, so I had to get creative.

First, I added some white, watered-down, paint to simulate a cloud...

and then I added the "I'm not afraid" sentiment around it. Now it's barely noticeable.

Here are the two CAS art journal pages. I hope you enjoyed them and got some ideas for your quick projects when you have just a few minutes time.


Thanks for stopping by!


Stamps I used:


Saturday, October 01, 2016

October Challenge - Demonic

Hiiii! We are here with the October Challenge and it is a bit spooky... but rest assured we do not require you to get spooky with your entry. Just be inspired by a single element OF our mood board. 

Here it is :


You might draw inspiration from the star and or stars, the text, dictionary, the numbers, the list aspect, stripes, oranges & tans, blacks & whites, neutrals in general, a SPLASH o' color (any color,) the demonic little being, other stamps by Mary Vogel Lozinak and or anything else you find inspirational about our mood board. 

Don't forget the rules:
-Create a new project based on our inspiration board (it has to be posted this month, but you can certainly link up to other challenges as well!)
-Use at least one (but certainly more if you want) Viva Las VegaStamps! rubber stamps
(We are now allowing competitors stamps to be on your work, but please make VLVS! the focus of the project, thank you.)
-Post it to your blog with a link back to us
-Upload to our linky using your direct blog post link (You may also upload via facebook, flickr or other gallery)
You could win a Project Spotlight post on our blog + some new rubber of course.
And visit us back here for inspiration!


Friday, August 01, 2014

August Challenge

Hello hello hello!! It's sweltering hot here in the desert and our August Prompt kind of speaks to that!

First please visit back to our July Challenge and check out what the talented entries have linked up.

Now for our challenge this month :


Please feel free to enter any type of project; altered art, ATCs, cards, layouts, journal pages and more! Also, be inspired by whatever you want; the rays, orange, grunge, black, bombs, Banksy, rats, chains, girls on swings, splatters, drips and drops. Just go for it :) Visit us this time next week for July's winner!


Don't forget the rules:
-Create a new project based on our inspiration board
-Use at least one (but certainly more if you want) Viva Las VegaStamps! rubber stamps
(We are now allowing competitors stamps to be on your work, but please make VLVS! the focus of the project, thank you.)
-Post it to your blog with a link back to us
-Upload to our linky using your direct blog post link (You may also upload via facebook, flickr or other gallery)

You could win a Project Spotlight post on our blog + some new rubber of course.

And visit us back here tomorrow for some inspiration from Amy Lassiter.


Friday, November 08, 2013

October WINNER

It's time for our October Challenge winner!

And that winner is... GERDA!!! with this Halloween stunner:


Please email me @ deedee430@gmail with your shipping address to get some FREE RUBBER! YAY! :)

Want to win your own rubber? Get entered into our NOVEMBER CHALLENGE!

Monday, October 22, 2012

I Steam 4 U

DeeDee here, we're taking a break from Time 2 Stamp, and instead today I'm sharing a card I made that ended up being declined for an ad. No biggie, because it's still super cute and I got to give it to my honey!!


The steam for the engine is a cotton swab cut and I've done a tiny bit of doodling with a black pen. The letters are TH Grungeboard and inked with the Memento pad. 

Super easy, but super effective!!

Wednesday, October 03, 2012

A Journal page layout hybrid.. Photo Booth

DeeDee filling in today and here is a journal page/scrapbook layout I did to preserve the fun memory of my husband and I taking our little guy into a photo booth:


The Faded Raven (2.75x2.25 - $9.50)and Crown (2x2.5 - $7.25) really made this piece!!
The raven was stamped in Archival Black by ranger on the journal page, but the crown was stamped with archival on Kromecote and fussy cut to attach to the corner of the photo.


The brad is BasicGrey, the Webbing and Burlap string are May Arts, the mist is glimmer mist. I also used floral beads, a dymo label maker, a black pen, and gesso. 

Monday, August 27, 2012

Sneak Peek Pen Nibs and Script!

Hey everybody, DeeDee here today :) 

I have a sneak peek of an upcoming event to share with you! I've been working on a lot of "not for the public's eyes" works... publication submissions, future blog hops, and even some collaborations with other artists! Today I'm sharing a sneak peek of a piece involving three different fabulous companies. Of course I had to be there to represent VLVS! and even though you can't see the whole piece yet, you can still marvel at some of the Viva Las VegaStamps! beauty. 


To create the corner of this work I used the
and the

I stamped the pen tips in adirondak's Archival Black ink. For the script stamp I inked up the rubber with vintage photo distress stain and then misted it lightly with water. This created a sort of rained on old letter feel. I've also splashed some tattered angels charcoal mist and luminarte's solar gold silks. 

I promise you will get to see the rest of this project very soon.. and won't be disappointed!! 

Monday, August 13, 2012

VLVS! @ CHA!

I had the pleasure of sending some projects to CHA Summer for 2012 in Chicago.. and one *or maybe a few* happen to have had Viva Las VegaStamps! in them...

one would be this teapot Globecraft Memories globe I altered... check it out:


The
was stamped in Memento's Tuxedo Black and embossed with Viva Las VegaStamps's Ultra High Gloss Embossing Powder on Kromecote cardstock. The cheese was colored in with the Mustard Seed distress marker (we've got the best deal around on these!!) by Tim Holtz. 

Papers used are from Echo Park's Be Mine collection, and the steam for the teapot is the cotton from a q-tip! 

Friday, August 10, 2012

August Guest Designer!


Today I get the pleasure of sharing with your our 2nd guest designer. Her name is Conny and she comes to us all the way from Germany!

Conny had this to say about herself:
"I am 50 years old, married and live with my husband in a small village, Ense, in Germany.
Our children are grown up and study far away from home.
To our household belongs a cat – as is customary for a stamping artist ;-)

If I don’t stamp I like to read (crime fiction), I like black humor and good dinners, meetings with friends or enjoy to relax in the silence of the garden.

12 years ago I bought my first stamp, without knowing what to do with this little thing.
But the image (a little rabbit) was so cute, I coudn`t resist.  Some months later I found an article about stamped cards.
“Wow, that`s what those things are made for”
Beside the article was the advertisement from a rubberstamp manufacturer who offered a catalog. I ordered this and …
the rest - I`m sure - you know from your own experience.

Most of all I like the different options rubber stamping can give. I enjoy to share my ideas with other stampers. I like the give and take of ideas and inspiration around the stamping world.
"

She brings us two beautiful black and white pieces today:
Steampunk Rhino:
Conny says:
"Stamp rhino “Steampunk Rhino 3 1/4 x 2” with black StazOn ink onto glossy paper and cut out.
Emboss black paper with the Embossing folder “Clockworks” and cut to size.
Attach the brad on the rhino and then glue Rhino onto the embossed black paper.
Mat first on white, then on black cardstock.
Embellish with 2 gear wheels from Stampo's Steampunk Sprockets & Gears & Stuff"

and
Call Me, Maybe:
Conny says:
"Such kind of ATCs can arise from a catchy song
“Call Me Maybe” by Carly Rae Jepsen

Stamp woman(now retired) with black StazOn onto Glossy Paper, cut out and affix it on scrapbook paper.
Cut to size. Layer with white and black cardstock. Finally attach the printed words."

Let Conny know what you think of her pieces and be entered to win a free shipping code!

Sunday, July 29, 2012

Chicken Wire

I'm having so much fun art journaling.. Here's one of my most recent:


After I misted my background and did a bit of ink puddling, I gathered my spiced marmalade distress ink and stamped my
Chicken Wire Background

3 3/4 x 4 1/2 - $15.25


to add some orange to my page. I sponged the pad directly to the stamp but then misted the stamp a bit with water. It's an easy way to break up a monotone piece and throw in a bit of excitement without taking away from the whole thing. Gives it sort of a watercolor feel.


When misting.. hold the bottle up high and let the water just "speckle" the ink on the stamp. I didn't let mine puddle.. but that doesn't mean it wouldn't have been a nice effect! Just try it out :)
Other products used include a star punchinella from Gauche Alchemy, charcoal tattered angels glimmer mist, a jar, gesso, art blanche alphas, 7gypsies file tab and a woven web from my friend Paula!

Friday, July 20, 2012

Introducing Guest Designer.. GABI!!

Each month we'll have a new feature here on the blog.. A GUEST DESIGNER!! Each GDer will have two designated days per month to share projects that they've created using our stamps.

Please help me warmly welcome our first guest designer.. Gabi.

Here is what Gabi had to say about herself:
"I am 46 years old, married with a friendly, loveable husband and my grown daughter lives in Berlin. I live in the west of Germany on the Dutch border. Since my childhood I often had tinkered, painted, sewed and knitted. Since 2007 I work with rubber stamps. I saw some stamped works on the Internet and then I was so amazed and thrilled that I necessarily wanted to make this art form. This has become an addiction!
In various forums we share our experiences and projects, participate in workshops and give us tips.
I'm working mainly ATCs, cards, tags and collages. Especially I like the mixed-media style and vintage-style, but also funny and bizarre motives. I like to experiment with different colors (acrylics, watercolors, chalk and pastel colors), materials and tools. So I like to make very different backgrounds for my works.
Sometimes I connect my stamped art is not only paper but also stitched works."

And here is some of the fabulous work Gabi has put together using our stamps:


This beautiful card features our Accordion Player and Fan - 2.5" x 3" - $10.00


 And for this card she used our Rabbit on Bicycle - 1.25" x a.5" - $6.25 and our Gears Make The World - 1" x 1.25" - $5.50


Thanks so much Gabi!! Check back this time next week for other just as fabulous works by her :)

Sunday, June 24, 2012

My first Art Journal Page

I've been working on lots of "new" things lately.. trying new techniques in both scrapbooking and stamping. One of them being scene stamping (which I'll share later) and the other being art journaling!! I'm absolutely falling for the free form open endedness that journaling really DOES have. The page doesn't have to say something to anyone else.. just me. 


Here is my first page (which I'm totally in love with):


I used a Clairefontaine journal which you'll get to see more of later. As well as Distress Stain in Broken China, Distress Ink in Mustard Seed, Broken china, Pine Needles, Vintage Photo and Tumbled Glass. 


First I splattered some of my favorite distress colors on the page. Then I cut a Spellbinders floral silhouette die out of corrugated cardboard and inked it up with vintage photo. After I had it glued down I decided I needed a bit more color, so I created a mask out of white cardstock and dabbed on the same colors of distress I had already used. 


I stamped the 


on Kromecote with Memento ink and fussy cut him out. Then I sponged a little vintage photo on his outside and glued him down. I added some twine and floral beads to finish off this page!! 


I'm back and forth on adding a title.. but basically I'd call it "Inspiration" - as it's something new I'm trying inspired by all those that do do it. 

Sunday, June 10, 2012

Steam-monger

I recently had the pleasure of participating in a steampunk swap put on my DT member Lyneen. So I've sort of been stuck on steampunk goodies.. thought I won't say I'm the best at representing them ;)

The card I'm showing today is a result of the "stuck on steampunk" -- and I'm now wishing I had made my ATC based more around this piece.

oh well, right? Enjoy!

I stamped the 
in Memento tuxedo black ink on kraft cardstock, and embossed it with VLVS!'s Ultra High Gloss EP. 
I then gave it a bit of life with a coloring of vintage photo distress ink by ranger. Just water down a bit of it and use a paintbrush to paint it on like a beautiful watercolor.
Then I stamped the
on a scrap piece of kraft with the same ink and EP. I wrote steam monger on it, fussy cut it out, and popped up with foam squares.

Here you can see the 3Dness of the card and some of the distressing around the edges.

Saturday, May 19, 2012

A script in use..

This is a project I did for the Basically Bare Design Team.. but I can't not show it here, as it uses one of my FAVORITE all time VLVS! Stamps.. 


I used it to stamp on chipboard in black memento ink, and also on canvas in memento which I embossed with Ultra High Embossing Powder. 


-DeeDee


Tuesday, March 27, 2012

A sad farewell.. but a bright beginning!


You've probably noticed a setting trend on the VLVS! Blog the last couple of weeks -- it is with a heavy heart that most of the team is retiring and new kids are here to show you their goods. So it's a sad farewell... AND a bright beginning :) 

It's also quite the bright beginning for me as I've just (last week) Started as an EMPLOYEE of VLVS! -- I'll be working behind the scenes setting up the fabulous stamps that you all purchase :) I'll also be dabbling in pressing the rubber! 

Its' quite fun and I can't wait to show you how things work behind the magical curtain :) 

But here is my last post as a Design Team member.. I will forever be a VLVS! stamp addict -- I enjoy the plethora of images as well as the amazing quality of rubber. Today I've brought you a piece that I have not shown on the VLVS! blog..  a "Brave the storm" style tag --


Using my absolute favorite stamp by VLVS! 


2 1/4 x 3

(don't forget you can get just cushioned or unmounted rubber, too!)

I stamped my trusty umbrella man on white cardstock with Memento Ink. 

The back of the tag is embossed with a TH die and distressed with distress stain. The clouds are hand drawn, and the raindrops and puddle are made with 3D Crystal Lacquer .. after the lacquer was dry I dabbed it with alcohol ink. 

So Brave the storm new kids comin' in! This is a wonderful company to work for, both DT wise and as an employee supplying you with your wildest stampy dreams! Also.. Brave the storm outgoing folks.. the ride was amazing and now we can relax and think fondly of our VLVS! DT days. Take on new adventures! Try new things! BRANCH OUT! I will miss you all!  ♥♥♥
-DeeDee

Wednesday, January 25, 2012

DIY Washi Tape part II

Hey everybody!! Welcome back :) 


Today the card I'm sharing is a simple beauty using the Washi tape that I made on Sunday! 


Besides adding my tape in a "strategic" way - I did a bit of doodling around the edge. I picked a very graphic background since I didn't want to do much embellishing! This card makes the perfect "Thank you" or small note slipped inside a gift! 
VLVS! Items used:
Memento Black Ink

Thanks so much everyone!! -DeeDee

Sunday, January 22, 2012

DIY Washi Tape!!!


Hi Everyone!! DeeDee here for an extra post this month!!

I kind of stole the opportunity of doing a DIY video for VLVS! on how to make your own Washi Tape with VLVS! Supplies!!!

I used :
Tissue paper
Scissors


Please please.. tell me what you think!!!!
I'll show you a project using this tape on Wednesday so come back!!!! -DeeDee

Wednesday, January 11, 2012

Celebrate the Every Day

If you haven't heard or haven't been paying attention... VLVS! is hosting a monthly challenge where a selected winner receives a gift certificate to the online store! Very generous of our fearless leader, Wayne! 

This month's theme is "CELEBRATION"

and I made my first piece for January based off the idea.. but with a twist.. I'm a big fan of "the small things" and so I went with "Celebrate the Every Day"

I recently got my little grubbers on two fabulous stamps that are going right in the front of my stash.. 


I used the chicken wire as a background.. I stamped it in clear embossing ink and then doused it Ultra High Gloss Embossing Powder by VLVS! I then smeared, sprayed and spritzed a combination of Broken China distress stain and water all over my tag. Once that was dry I laid newsprint over my tag and ironed out the embossing ink. Then I grabbed the bird stamp, my Memento Ink and a clear block.. some creative placement and VIOLA! the "Sing" "Chatter" and "Spread Joy" were written by hand in black ink on manila to match the rest of the tag. Swipe the edges of the tag with the same ink as the stamp and some creative doodling... And we get....


Thanks for coming by again this week!! Don't forget to enter your own piece into the competition!

-DeeDee

Wednesday, November 23, 2011

Fall ATC

Heya Folks!! Looks like us on the Viva Las Vegastamps! DT have ATCs on the brain...

Today I'm sharing a fall inspired ATC made using the


I started off with a small piece of white cardstock... I used Walnut Stain and Spiced Marmalade distress inks to foam the background... then when all the white was covered with some thickness of ink I spritzed water over it.. giving it the sort of dappled water droplet effect! 


After drying it with a heat gun I pulled out my trusty http://www.vlvstamps.com/memento-dye-ink-pad-tuxedo-black.html and stamped my reindeer.... while the ink was still wet I poured over some Ultra High Gloss Embossing Powder from VLVS! and viola --- a nice standy-outish reindeer on a darling background.


I then inked some rayon seam binding with walnut ink and dried it with a heat gun. To insure my binding stayed where I wanted it.. I "guided" it with a piece of Miracle tape (my personal testimony goes as is.. "NOTHING beats Miracle Tape!!!!") on the back! Tie a knot, cut a tiny pinecone in half and there's my finished piece!!!


Enjoy your cool days this Autumn!!!! -DeeDee