Showing posts with label rubber stamps. Show all posts

Tuesday, January 04, 2022

Someone cares... by Corrie

 Hello everyone, 

Happy New Year and welcome to the blog where today I am sharing a journal spread. 


I used acrylic paint and a brayer to create the background. I then stamped here and there and added the happy couple and the snarky sentiment. 

I have used the following stamps:


I also used
Amsterdam Acrylics
Archival Inks 
Distress oxide inks
Black pen

Thank you so much for stopping by today! 


Tuesday, December 21, 2021

Tis the season

 Hello everyone, 

For today's project I have made a postcard. It is Christmas themed, well sort of.....


Here's how I made it:


I stamped the stars with VersaMark ink and heat embossed them with white powder. I then dunked the card into Distress Ink and water; I used Faded Jeans, Chipped Sapphire and Black Soot. I 


Next I stamped randomly over the top using and inked the edges with Black Soot. 


Next I stamped, coloured and cut out the images I was going to use. I used Distress Inks again for painting. Tattered Rose and Vintage Photo for the skin, Faded Jeans and Chipped Sapphire for her dress. The top of the hat was stamped with red Distress Oxide (Fired Brick) and I added some shading to it with Copics. I then glued the red top over the black stamped one. 


Next thing was assembling. I put some washi tape at the bottom for her the lean on. I then glued all the elements on the card. 


I have used the following stamps:


Thank you so much for stopping by today ! 


Tuesday, December 07, 2021

Not normal by Corrie

 Hello everyone, 

For today's DT post I have made an artjournal spread. I was listening to the news on the radio on a Thursday in mid November when I heard that the Government was talking about another (third) lockdown. I must say I am fed up with this pandemic and with all the measures that have been implemented and don't really work. So, I felt I had to get it out of my system and that's what I did. 


I used Amsterdam acrylic paints to create the background and a home made stencil for the polkadots. 
I added background stamping and added the face mask and the altered sentiment. 

I used the following stamps:

Thank you for stopping by today!


Friday, November 26, 2021

Jaw-Humbug by Tracy Blackwolf

 Hello all !! 

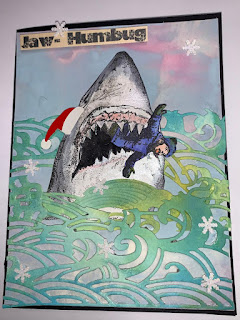
Well its the start of the holidays for lots of people... Here is a snarky card for the occasion...Enjoy the humor!

A friend told me the sentiment and right away I knew what I wanted to do with it!!
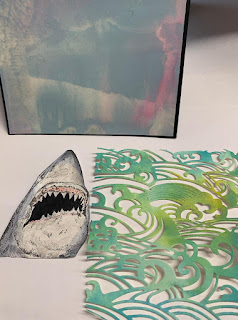
First I started with two postcard size cards and used two color schemes - one for each card . I did the smooshing technique with oxide distress inks. One for the background/sky and one for the waves. 
For those that don't know what smooshing is, Put some ink on a glass surface- usually do at least two colors, spritz with water, then put your cardstock on the ink and dab until you like the result. let dry.
For the waves, I used a die cut and cut into pieces so the shark could look to coming out of the water.
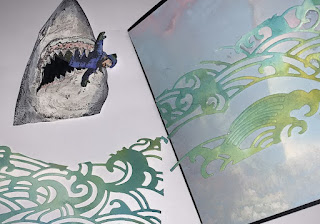
I then took a craft knife and cut around all the upper teeth to create an opening for the kid to go in. After I fussy cut the kid, I put him in the mouth and taped him on the back. I then shaped the shark a bit with my hands, pushing out his nose and bending the sides a bit for a more 3D look. then put foam tape on the back.
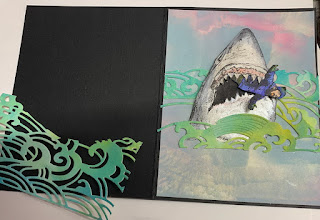
I glued down the upper portion of the waves, then placed the shark and glued down the second layer of the waves over him.

For the final layer of waves, I put some very small pieces of foam tape in the center area and used glue for the rest and placed that down. Then I went to the computer and typed the sentiment. used foam tape for those, found a Santa hat sticker in my stash as well as some snowflake punches I've had on hand forever. Glue those on randomly and done!!
The card is very Dimensional. More so than you tell from the photo. I hope you enjoyed it~
until next time-

Stamps Used:
Boy catching snowflakes    20662
Shark Head Large   4018

Other Supplies used:
Disstress oxide inks: peacock feathers, twisted citron ,picked raspberry, salty ocean
Twinkling H2O's paints for the shark
Markers for the kid
Sizzex thinlet  die Mystical seascape


Tuesday, November 16, 2021

Artjournal pages by Corrie

 Hello everyone, 

For today's post I have made a double artjournal spread. It is very colourful so get your sunglasses out! 


Here's how I made this:


I used these Distress Oxide inks and a blending tool to add colour to my pages. I put the ink straight on the paper of my art journal. This is a Moleskine sketch book. 


Next I dropped some water on it. 


I then stamped the background using the same inks and some darker shades of the same colours.


Adding some black stamping and inking around the edges to frame the pages and some white splatters from a paint pen. 


The focal. I love this stamp. She looks very regal. 


I added some pink to her cheeks. The sentiments are clippings stickers by Tim Holtz. 


I have used the following stamps:


Apart from the stamps I used:
Distress Oxide inks in rainbow colours
Versafine Clair Nocturne ink
White paint pen

Thank you for stopping by today ! 


Tuesday, October 19, 2021

Tis near Halloween by Corrie

 Hello everyone, 

Welcome to the blog where today I am sharing a Halloween themed postcard with a little humour! 


Here is how I made it:


First I stamped and coloured the images I planned to use.


I then heat embossed this start chart with clear embossing powder. I added Distress Oxide Inks over the top and because of the embossing powder the stamped image stays white. I used a blending tool to add the inks. 


 Next I added some blood ! (lol) 


I also added some random background stamping. I used the same inks and a Versafine Clair black ink.


After adding some washi tape I placed the images on the top to ground them. The sentiments are Tim Holtz Halloween Clippings stickers and part of a stamp.


I used the following stamps:

Other materials:
Distress Oxide inks:
Crushed Olive
Fossilized Amber
Wild Honey
Fired Brick
Vintage photo

other inks:
VersaFine Clair - Nocturne
Archival ink - Saffron and Potting Soil

WOW Clear embossing powder
Tim Holtz Halloween Clipping stickers
AALL & Create washi tape

Thank you so much for stopping by!


Tuesday, October 05, 2021

Artist by Corrie

 Hello everyone, 

For today's project I have made a journal page and I have used another Banksy inspired stamp for the focal image. I love them! 


The background for this page was a mop up page from the gelli plate to which I added some stamping,  doodling and splattering. 
I coloured the Banksy Wall Singer using watercolours this time and cut her out. As a sentiment I used some Clippings Stickers by Tim Holtz. 

I have used the following stamps:

For stamping I used Archival Inks: Jet Black, Leaf Green, Aquamarine and Magenta Hue.

Thank you so much for stopping by today ! 


Tuesday, September 21, 2021

It's not art by Corrie

 Hello everyone, 

Welcome to the VivaLasVegaStamps! blog today where I have a postcard to share. 


And here's how:


Fist of all I stamped the images I was going to use and coloured them with Copic Markers. I then cut them out. I also took out some words of the sentiment.


The background was simply made with dunking the card into Distress Oxide ink and water on my craft sheet; I used Broken China. I then stamped over top with the same ink and Vintage Photo. I also used Versafine Clair black. You'll find a list of all the stamps I used at the bottom of this post. 


Next I added some washi tape by Tim Holtz and some more stamping, this time with Distress Ink Faded Jeans. 


I then put it all together. I doodled around the edges here and there with a graphite pencil. 


I used the following stamps:


Thank you for stopping by today !