Showing posts with label christmas. Show all posts

Monday, December 12, 2022

Santa by Tracy Blackwolf

 Hello Everyone!

Here is a card for the season for my blog this time- Enjoy.

I stamped Santa and used distress spray stains to paint him, as well as pearl ex paints. I went for a rather vintage feel for him, hence the the brown coat. after painting, I fussy cut him and used foam tape on the back- love that dimension!

Then I cut the gold and red and gold specked cardstock to size. I stamped the snowflake with versamark ink and then used a fluffy brush to put the mica powder over it. Shimmery blue flakes!
I then Decided on a phrase. I think this Santa just looks a bit tired or irritated, which I love. So I went to my computer and typed up the phrase and printed it out on a shimmer blue vellum to match the flakes.

I then layered it onto red cardstock and then attached to the main card.

And that is all there is to this card. Fun, quick, easy.
Hope you enjoyed, and I hope you have great holidays what ever you celebrate!


Stamps Used:
Santa Claus   20357
Snowflake   12923

Other Supplies:
Distress spray stain: Candied apple, Vintage photo, Weathered wood, tea dye, tattered rose, gathered twigs.

pearl ex watercolor paints
foam tape
Versamark ink pad
Chameleon powder 
cardstock


Tuesday, December 21, 2021

Tis the season

 Hello everyone, 

For today's project I have made a postcard. It is Christmas themed, well sort of.....


Here's how I made it:


I stamped the stars with VersaMark ink and heat embossed them with white powder. I then dunked the card into Distress Ink and water; I used Faded Jeans, Chipped Sapphire and Black Soot. I 


Next I stamped randomly over the top using and inked the edges with Black Soot. 


Next I stamped, coloured and cut out the images I was going to use. I used Distress Inks again for painting. Tattered Rose and Vintage Photo for the skin, Faded Jeans and Chipped Sapphire for her dress. The top of the hat was stamped with red Distress Oxide (Fired Brick) and I added some shading to it with Copics. I then glued the red top over the black stamped one. 


Next thing was assembling. I put some washi tape at the bottom for her the lean on. I then glued all the elements on the card. 


I have used the following stamps:


Thank you so much for stopping by today ! 


Monday, December 13, 2021

Winter Scene by Fran C

Hello everyone!

Today I made a Winter scene using the only Christmassy stamps that I have from VLVS! I hope you like it :)


 First of all I stamped the snowman, signpost and houses onto the card, using a mask made from torn paper under the houses for the snow.

I then stamped the images again and cut them out to use as masks while I did the sky (I didn't need the snowman in the end!)


I coloured the sky with a stencil brush and Chipped Sapphire distress ink, only lightly at first.


I stamped a star in Yellow and made a soft haze round it with Squeezed Lemonade distress ink, then added stripes in the sky with Wilted Violet and Twisted Citron distress inks to represent the Northern Lights, building up the colour slowly.


 cc


I coloured the snowman with Copic Pens, and also stamped the Banksy penguins to add some balance.  I coloured the windows in the houses a bright yellow.


I added some holographic glitter on the top of the snow line, and on the snowman and his tree.


Lastly, I added shadows and then some snow by hitting a white Posca pen with a metal ruler (masking anything I didn't want the snow to cover).


Stamps Used:

Frosty the Snowman with Tree         19810

Skyline Silouette 19812

Sign Post 19808

North Star Symbol 19818

Banksy penguins 20296

Other Items Used:

Distress inks in Wilted Violet, Twisted Citron, Squeezed Lemonade, Chipped Sapphire

Versafine Clair in Nocturn

Copic Pens

White Posca Pen

Holographic Glitter

|Zig brush pen in Fluorescent Yellow

Black fineliner

Glue pen

Copy paper for masks

Hope you enjoy this scene.  Merry Christmas to you all!


Friday, November 26, 2021

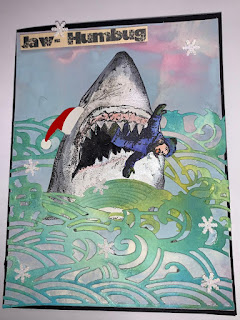
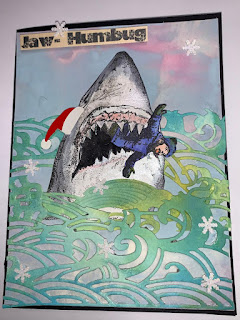
Jaw-Humbug by Tracy Blackwolf

 Hello all !! 

Well its the start of the holidays for lots of people... Here is a snarky card for the occasion...Enjoy the humor!

A friend told me the sentiment and right away I knew what I wanted to do with it!!
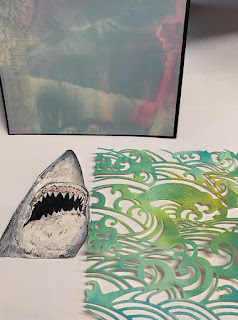
First I started with two postcard size cards and used two color schemes - one for each card . I did the smooshing technique with oxide distress inks. One for the background/sky and one for the waves. 
For those that don't know what smooshing is, Put some ink on a glass surface- usually do at least two colors, spritz with water, then put your cardstock on the ink and dab until you like the result. let dry.
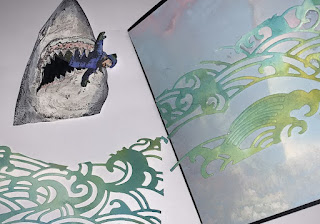
For the waves, I used a die cut and cut into pieces so the shark could look to coming out of the water.
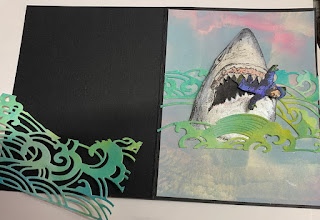
I then took a craft knife and cut around all the upper teeth to create an opening for the kid to go in. After I fussy cut the kid, I put him in the mouth and taped him on the back. I then shaped the shark a bit with my hands, pushing out his nose and bending the sides a bit for a more 3D look. then put foam tape on the back.
I glued down the upper portion of the waves, then placed the shark and glued down the second layer of the waves over him.

For the final layer of waves, I put some very small pieces of foam tape in the center area and used glue for the rest and placed that down. Then I went to the computer and typed the sentiment. used foam tape for those, found a Santa hat sticker in my stash as well as some snowflake punches I've had on hand forever. Glue those on randomly and done!!
The card is very Dimensional. More so than you tell from the photo. I hope you enjoyed it~
until next time-

Stamps Used:
Boy catching snowflakes    20662
Shark Head Large   4018

Other Supplies used:
Disstress oxide inks: peacock feathers, twisted citron ,picked raspberry, salty ocean
Twinkling H2O's paints for the shark
Markers for the kid
Sizzex thinlet  die Mystical seascape


Tuesday, December 29, 2020

Merry Christmas Bags ► Majo

Good morning, my dear friends.

 Since I hadn’t created a lot of Christmas cards this year, at least I gave my little presents away in a stamped paper bag.


I used a lot of silver, gold and copper and embossing powder.

I cut panel from design paper to the size to fit my bags and randomly stamped firs, dots, the cute little deer and the snowflakes. The snowflake is a die from Sizzix, designed by Tim Holtz, the sntiment is computer generated.

It’s such an easy way to dress up a paper bag. I do this a lot, rather than wrapping paper around my present.

 Without further ado here are some pictures for you …..


 I have used the following stamps:

5485

10766

12725

 4526

7986

  I wish you a good start into 2021, stay safe and find time for your favorite hobby "Crafting".

Luv y'all ♥


Tuesday, December 22, 2020

Tis the season

 Hello everyone,

Welcome to the VLVS! blog where today I am sharing a Christmas card. 


and here is how


I used some old not very sticky washi tape to create a stripe pattern on my card.


I painted roughly between the lines of washi tape to get a not perfect effect. 


This is how it looked after drying.


Next I stamped the elf and the sentiment on the card and on a piece of paper. I wanted to colour him with my Copic Markers. I stamped the head and hat again in red because I wanted his hat to be white and red stripes. 


After everything was coloured. 


The completed card. I added some Liquid Pearls over the berries of the holly but because I didn't have red I used a white one and dabbed a tiny amount of red paint over the top. The leaves were coloured straight on the card. I also lengthened the strings with a black pen and added some shading around the box so it isn't floating. 


I only used two stamps for this card:


Other materials:

Acrylic paint, washi tape, Copic Markers, Coloured Pencils, Archival ink, Memento ink. 


Wednesday, December 09, 2020

Not a usual Christmas project

Hey everyone,

I thought I'd share some Christmassy inspiration, even if it's not a classical project. We are all facing a Christmas that might be less merry than usual and even the Santa on my Memorydex card is advising to stay home.

I die cut my memorydex card layers from different papers. The base is a simple black card stock, for the middle layer I chose a metallic green one and the top is from watercolor paper.

My background is made with some of the Distress inks that have been released this year: speckled egg and rustic wilderness. I put some color onto a piece of foil, sprayed that with water and added the color to my top layer. Between each layer (I did three of them) I dried my project.

Once the inking was done, I added some stamping to create light visual texture and interest. Therefore I chose the music sheet as a more classic Christmas element and the illustration of the corona virus for the contemporary aspect.

Next, I stamped my waving Santa and colored him with some ZIG markers. After cutting him I inked the edges to make the image blend better into the background later. As I'm not a very passionate Christmas crafter, I never searched actively for Christmas stmaps at VLVS. This one here I got from a pound of rubber and I thought it might be a good idea to give him a go. 

For the quote I used one of the pandemic ones from the last release. "Stay the fuck home" seemed to be the right one, and it also had the perfect size to cut it with the speechbubble die I had.

Now it was time to assemble everything. I glued my three layers of paper on top of wach other and attached Santa. For the speech bubble I decided to do something special and added an action wobble for a fun effect.


Stamps used:
Waving Santa (4820)
Stay The Fuck Home (20536)
Coronavirus (20547)
Sheet Music Background (19557)


Other material:
- black cardstock
- Tim Holtz metallic cardstock
- Canson watercolor paper
- Studio Light die for memorydex
- Xcut die (speechbubbles)
- Versaclair ink (nocturne)
- Distress ink (speckled egg, rustic wilderness)
- Archival ink (library green, potting soil)
- ZIG real brush pens
- action wobble (small)


See you soon with another project!