Showing posts with label cross marks background. Show all posts

Saturday, August 30, 2025

Steampunk postcard by Cathy N

 Good afternoon, Cathy here with a steampunk postcard. 


                                                                Stamps used: 

                                                        Plate 1386 all the gears 

                                                      18477 round lightbulb (from the same plate)

                                                      20165 cross marks background 

                                                      17545 writing background


I started with making a background with distress oxide inks and watercolor paper.


Then, I stamped cross marks background all over the background.


Next, I stamped all the gears on the top and bottom.


I then made a tag out of some Kraft paper and stamped round lightbulb and then I layered that on black cardstock and made a tag. I edged the Kraft tag with some brown oxide ink and then I stamped writing background around it. Lastly, I added some ephemera around the postcard.


Saturday, November 23, 2024

Grungy winter tags by Cathy N

 Good morning, Cathy here with some grungy winter tags for you today.

                                                                      Stamps Used:

                                                           20695 writing and scribbles collage

                                                           20165 cross marks background

                                                           19723 fir trees silhouette 

                                                           18947 medium snowflake


I started off with some cream tags and I used some distress inks to make the background. Next, I edged them all with a dark brown distress ink.

After I got the backgrounds how I wanted them I stamped them with cross marks background in the same tan color. After that I stamped cross marks background.


Next, I stamped the fir trees silhouette on the one side of 2 of the tags and then the other side of 2 of the tags. Lastly, I stamped the medium snowflake in the light gray distress ink randomly over the tags.


Tuesday, September 10, 2024

Perfect Phase tag by Cathy N

 Cathy here with a tag for you all today. 


I started out with a white tag and made my background with different colors of purple distress ink


I had a lot of ink on my craft sheet, so I ended up making 2 tags. I used the second one to make the tag. I then stamped cross marks background in green and orange all over the background.

Next, I stamped Large Fairy Lady and colored her with copic markers. Before I cut her out, I added a sheet of holographic frosted glitter sticker paper. You can see from the photo the paper has stars on it.
 

Lasty, I added some sticker borders and saying to the tag. 


                                                           Stamps Used:

                                                       18415 Large Fairy Lady

                                                      20615 cross marks background

Monday, May 20, 2024

No.7 mini slimline card by Cathy N

Good morning, all Cathy here with a slimline card. 

I started out with some watercolor paper. I used 2 different pink distress inks, and I made the background.
I then took the cross marks background and stamped in a pink distress ink. After that I took the grunge 1787 writing background and the writing and scribbles collage and stamped it on the background. 

Next, I added the rose image layered on black cardstock to the top and a pink dyed ribbon to the bottom and then I added it all to a mini slimline card base.

                                                                  Stamps Used:
                                                          20165 cross marks background
                                                          17545 grunge 1787 writing background
                                                          20695 writing and scribbles collage

Thursday, September 16, 2021

Tag trio - Banksy girls

Hi everyone,

today I want to share with you a small series of colorful tags that I created. I always like to have a little something at hand to give away when swapping ATCs. 

I started with three tags cut from watercolor paper with a size of 5.25 x 3 inch. I used Lindy's Magicals and water to create a few layers of color. Make sure to dry them beween the colors to avoid a muddy color mix.

Next, I added some of the good old mark making and texture stamps to the background. These stamps from plate 1495 are very versatile and perfect for a lot of backgrounds.
Also, I stamped three different Banksy girls on the tags. I used Versafine Claire ink for the girls as it is a very intense black and Archival ink in the background for a more distressed stamp impression. Then I inked the edges of the tags directly with the Archival ink pad.


I like adding ribbon to my tags for a finished look. Here I chose to tear some strips of cheesecloth and added some of the same stamps to these grungy strips as I have already used on the tags themselves. This really connects all the elements. Another idea might have been to 'dye' the ribbon with some colors from the background, but I think that might have been a little too much here.

From some black cardstock, I cut a base for each of my tags, a little larger than the tag to get this black edge around it. I glued them together and sandwiched the ribbon in between, secured with a little bit of liquid glue. To finish the tags, I added some quote stickers.


Hope you liked this project. Here are a few more detail photos:


Stamps used:
Carved Xs (20162)
Row Of Numbers (20170)
Cross Marks Background (20165)
Punchinella/Sequin Waste Border (20161) 
Plate 1495
Banksy Girl Floating With Balloons (19421)
Banksy Balloon Girl (19430)
Banksy Child Sitting (19940)


Other material:
- Canson watercolor paper
- black cardstock
- cheesecloth
- Lindy's magicals (teenie weenie bikini, umbrella drink pink, nuneka's purple popsicle)
- Archival Ink (jet black)
- Versafine Claire Ink (nocturne)
- Tim Holtz quote stickers


See you soon!


Thursday, August 13, 2020

Dead end - Art journal page

 Hey everyone,

One thing I love about VLVS is that there are some very weird stamps - and I mean that in a positive way. On the art journal page that I'm sharing today I used one of them.


I'm working in my Dina Wakley Media Journal, the blue edition to be exact. The page is made from white burlap which I find a bit difficult to work on. So I chose the easiest way to start for me: a collage. I just grabbed some random pieces from book pages and a piece from a Tim Holtz tissue paper and glued them down with some matte medium. I just filled a little area of my page and left a lot of open space. This just looked like a nice composition to me. To add some color, I brought in two Dylusions sprays. But instead of spraying my page I used them like a watercolor.


Next I stamped my two focal images. I colored the octopus lady with some ZIG real brush markers and cut her and the dead end sign out. I wasn't sure about which color to use for the sign, so I colored that after I decided where I wanted it to be on the page. To make the images blend nicely into the page I colored the cutting edges with a black marker.


Generally, I don't like my images to be "floating" on a page, so the lady needed something to stand on. For that, I got out a charcoal pencil and created some kind of shadows where she and her stool would be touching the floor.


At this point I thought that something was missing. So before gluing everything down, I added some cross marks to the background with a stamp. I wasn't sure if it would work well on the burlap, but it turned out quite cool, don't you agree?


So, all that I added apart from the lady and the sign was a sticker. The inked edges really helped it to stand out more.

Here are some more detailed photos:


Stamps used:
Octopus Lady (19706)

Dead End Sign (20492)
Cross Marks Background (20165)


Other materials:
- Dina Wakley Media Journal - Blue edition
- book pages
- Tim Holtz tissue paper "Melange"
- Dylusions Spray Ink (black marble, ground coffee)
- ZIG real brush pens
- Pitt brush pen
- charcoal pencil
- Versaclaire ink pad (nocturne)
- quote from Tim Holtz clipping stickers "Halloween"


See you soon!


Monday, April 13, 2020

Messy Artist Trading Cards with Josefine

Hello everyone! I'm so excited to be up on the Viva Las VegaStamps! blog again. This time with a variety of ATCs (Artist Trading Cards) highlighting some of Brian Kesinger's images. 


And - surprise - I had enough time to make a video, showing you how these cards came together. I don't know about you, but I feel that I have less time than normal at the moment, so every time I get the chance to craft, my heart is so happy.

But without further ado, here is my video:


I hope you enjoyed it. Have you ever created ATCs? Combined them to a mini booklet? One of these days I have to do that. 

Check out all the ATCs. I love that I now have some backgrounds that I can use when I have little time to craft. Plus, all these marks are just so fun.

Here are some close ups of the main piece.


All the stamps that I've used:


Thanks so much for stopping by. Please stay healthy!


Friday, March 13, 2020

Shopping your stash - Alcohol Ink Art with Josefine

Hands up if you have craft supplies that you've bought a long time ago and then never really knew what to do with it. Probably not just one thing, but several, right? One of those items for me are alcohol inks. I like the effects but everytime when I attempted a project I never knew what to do with it. So, again I was looking through my random craft stash and grabbed my alcohol inks (and between us, I have quite a few bottles...). This time, I was determined to make something with it. Ha!


A few weeks back, I found small panels for the use with alcohol inks at my local Hobby Lobby. They were on sale and I decided that this is the sign for me to try it one more time. As you can imagine it took me a few more weeks till I then finally decided to use them. 

First panel, and I added a few drops of alcohol ink with the blender. The colors looked nice, but I was not really convinced. Texture was missing, so I went with the Police Tag and some Alcohol Lift ink. And voila, much better.


Of course, I had to experiment with a few layers of alcohol ink. You can see that my fingers started to switch colors too.


One more panel. Different color scheme now. But I'm starting to see why people like them.


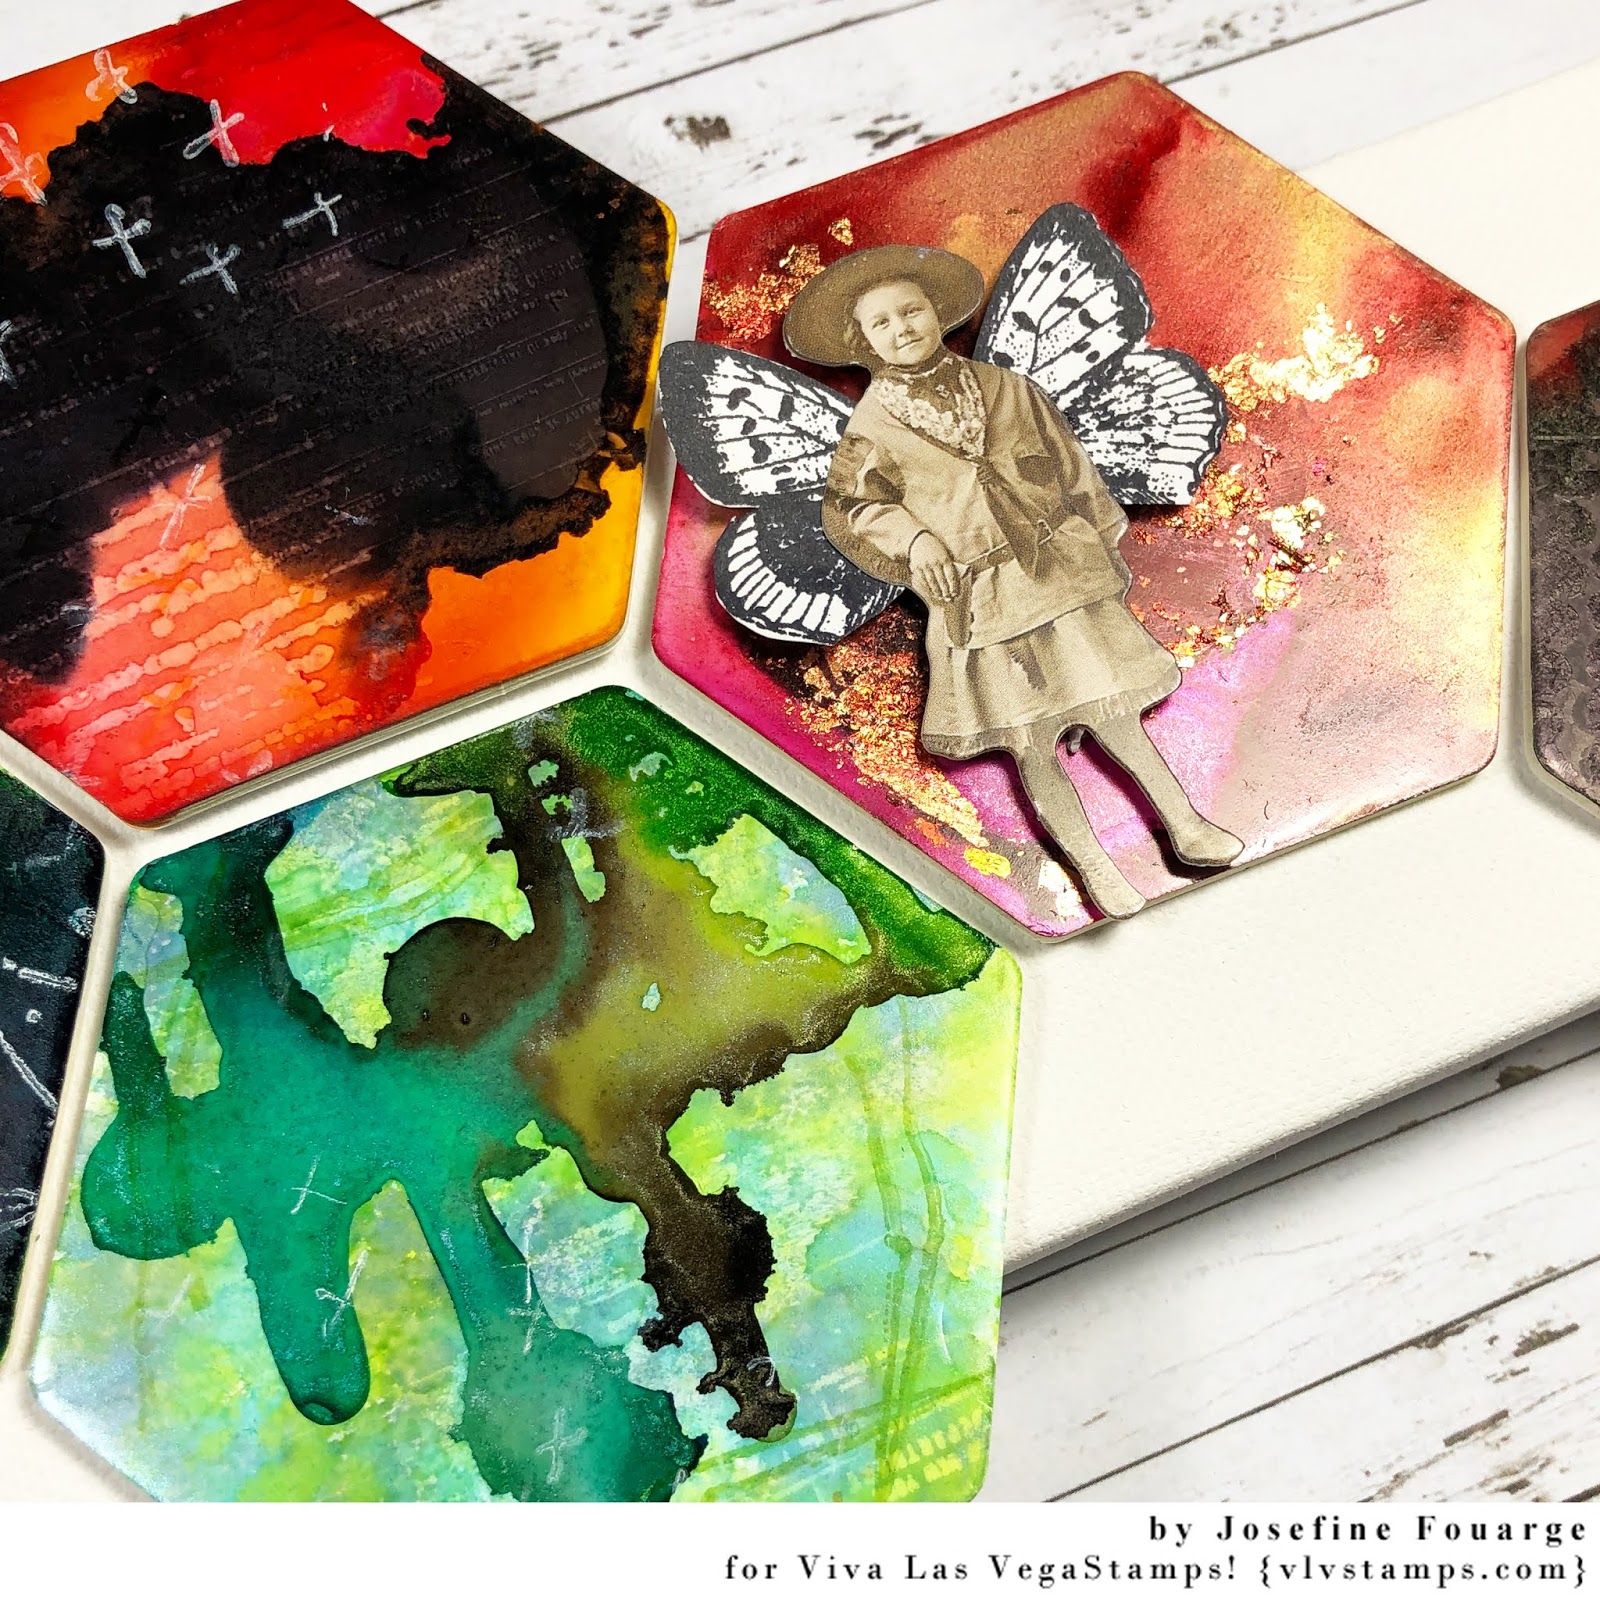
I ended up with five different panels. All using a mix of alcohol inks and alcohol pearls. I guess, it is quite fun. But then again - what to do with them? 


So, I continued with the Alcohol Lift ink, but a different pattern. The Punchinella/ Sequin border looked really nice.


For whatever reason it took some time for all that ink to dry, so while waiting, I stamped the Pair of butterfly wings onto a scrap piece of paper, fuzzy cut it out and adhered it behind a paper doll. At this time, I wasn't sure what to do with it.


I actually let the alcohol panels sit over night and continued with some more texture the next day. Trying white pigment ink turned out to be very interesting. The partial scribble adds a fun feeling to it.


Adding one more item from my "lost craft stash" - glow in the dark embossing powder. By now, I knew that I wanted to create a cohesive piece with these 5 art panels, so one had to have a sentiment on it. Since I had the paper doll ready to go, I thought this "you are beautiful" sentiment works well.


A few more extras, like this stitching lines on the border of two of the pieces and some cross marks using colored archival ink and white pigment ink interchangeably. 


And at the end, I adhered them to a small, long canvas. As you can see, I added a bit of foil to one of the alcohol inked panels. I did that while it was still wet. Just a bit more glimmer, that's all :)


Here you can see in a bit more detail the dimension that the different stamp techniques added - a mix of lift ink and stamping on top with colored and white ink.


And of course, the glow in the dark sentiment. Pretty neat.


Thanks so much for stopping by. I hope you enjoyed my little experiment using craft supplies that are usually hidden somewhere in my craft room.

Stamps I used: