Showing posts with label typeset scallop. Show all posts

Monday, August 25, 2025

FABULOUS by Fran Chalmers

Hi everyone!

Today I have made a tag for you!


 To make the background I blended distress oxides in Squeezed Lemonade, Spiced Marmalade and Picked Raspberry.


I stamped the bottom of the tag for a base for my main images to stand on, and I stamped round the edge of the tag for interest, all in Versafine Clair Purple Delight.


I stamped my main images and sentiment on thick paper, coloured them and cut them out.


I glued the images onto the tag, along with the sentiment.


I scribbled round the sentiment in the same style as the edge of the tag, in black fine liner.


I added some ribbons to finish the tag off.


 Stamps Used:

Writing and scribbles collage 20695

Typeset scallop 20163

Whimsical Beaked Guy in Crown 19530

Whimsical Lady Grey 19909

Can I help it 17900


Other Items Used:

Distress inks in Squeezed Lemonade, Spiced Marmalade, Picked Raspberry

Versafine Clair ink in Purple Delight

Black Fine Liner

Kuretake Zig Pens


Wednesday, January 15, 2025

Happy Birthday by Cathy N

 Good morning, Cathy here with a birthday card for you.


                                                                  Stamps Used:

                                                           16341 slice of cake 

                                                           17545 grunge writing background

                                                          20163 typeset scallop

                                                           20574 round brushstrokes small

I started out making the background with 2 distress oxide colors.


After I finished the background, I stamped typeset scallop on the top in black ink. 


I then started on the background. I stamped the round brushstrokes small in teal ink and I stamped grunge writing background in a brown distress oxide ink.


Next, I stamped slice of cake in teal ink and cut out. I added some white gel pen highlights to the slice. 


Lastly, I added an die cut sentiment of Happy Birthday to the front. 

Monday, February 26, 2024

I WISH MY LIFE HAD BACKGROUND MUSIC by FRAN CHALMERS

Hi everyone!

Today I have made a card for you - I hope you like it.


I used a background which I had made on a gel plate ages ago, and added some more colour to brighten it up.  


I then added lots of background stamps to make it more interesting.


I stamped the main image, coloured and fussy cut it out, then added  to the card, along with the sentiment. 


I went round the mat with a thick black pen before mounting onto the card.


Stamps Used:

Fed Up Vintage Lady 19640

Writing and Scribbles Collage 20695

Typeset Scallop 20163

Sky of Stars background 19819

Writing circles background 19567

Dictionary page 19015


Other Items Used:

Distress inks in Picked Raspberry, Festive Berries and Spiced Marmalade

Versafine Clair ink in Nocturn and Red Tulip

Black pen

Kuretake colouring pens


Thursday, January 28, 2021

Art journal page - All the answers

Hey everyone,

Today I'm sharing a fun and snarky page from my art journal. We all could need something to make us smile in moody January, right?


My background is a simple one. I started with two pieces of gelli printed tissue that I had on my desk from a previous project. For a little more detail I stamped and heat embossed some doodle dots and also added some contrasting pink splatters of acrylic spray paint.

The girl sitting in a suitcase seemed to be the perfect focal point. I stamped her, did some quick coloring with ZIG brush pens and cut her out. Also, I inked up the cutting edges to make her blend better into the page.

I don't like my focal points to just float around on my page. So I stamped the scallop onto another gelli print and cut that out, too. To avoid the details of the stamp to get lost, I stamped it directly on the page before I glued the girl and the scallop I cut out on top.


The last thing I added was a quote. I stamped it onto some white cardstock, cut it into pieces and inked the edges a little to help it standing out from the page.


Stamps used:
Doodle Dots (19827)
Typeset Scallop (20163)
Lady Drinking Tea In Box (20080)
I Used To Have All The Answers (3124)

Other material:
- art journal (mine is from Dylusions)
- Versafine ink (nocturne)
- Versamark ink
- gelli printed tissue and paper (or any other printed paper)
- embossing powder (floral blue medium by Stampendous!)
- acrylic spray (or paint mixed with a little water)
- ZIG real brush markers


Hope you enjoyed my inspiration. See you soon!


Monday, April 13, 2020

Messy Artist Trading Cards with Josefine

Hello everyone! I'm so excited to be up on the Viva Las VegaStamps! blog again. This time with a variety of ATCs (Artist Trading Cards) highlighting some of Brian Kesinger's images. 


And - surprise - I had enough time to make a video, showing you how these cards came together. I don't know about you, but I feel that I have less time than normal at the moment, so every time I get the chance to craft, my heart is so happy.

But without further ado, here is my video:


I hope you enjoyed it. Have you ever created ATCs? Combined them to a mini booklet? One of these days I have to do that. 

Check out all the ATCs. I love that I now have some backgrounds that I can use when I have little time to craft. Plus, all these marks are just so fun.

Here are some close ups of the main piece.


All the stamps that I've used:


Thanks so much for stopping by. Please stay healthy!


Monday, September 02, 2019

Monocle Mail Art Monday!

Hello Again Crafty Friends!

Happy Labor Day to all of you in the USA or just anyone wanting to celebrate!


Today, I will be sharing one of my favorite things...
Yep, Mail Art!!!

( And not just Mail Art... but Halloween Mail Art!)


Stamps used:
Monocle cat and pumpkin
Typeset scallop
Stitching
Stars

Starting with an A2 Envelope I stamped my "monocle cat" in archival - jet black ink. However if you are going to color with alcohol base markers like I am you may want to use Memento for this. My Memento needs refilled and I wanted the cat to be very crisp which is why I was okay with a little bit of smearing of my colors.

With the leftover ink I stamps the cat a second time on scrap paper to create a mask. I cut the cat out and masked him off.


Next using memento ink I stamped my scallop along the edge.

(And of course many of you know this is one of my favorites so it would have to be a prominent stamp on this envelope.


Next remove the mask from the cat and shows to color at the border and Cat with various alcohol-based markers. I wanted to see how they look before picking out my background color. Following traditional Halloween colors..  I went with of course: purples, oranges,yellows, and greens.


With my main images colored I am ready to create the background. I re masked off the cat and scallops.

The background was Inked with distress oxide in mustard seed and ripe persimmon. While everything is still masked off, I added my star details to the background (also using ripe persimmon distress oxide ink).

Of course the fun part is always removing the masks and seeing all your colors pop together.


Now for the finishing touches...
I added a Avery address label, used a black marker to trace the inner Edge oh, then finished everything off with my stitching stamp.


Thank you for visiting!

Friday, August 23, 2019

Your Jealousy is Showing | Sue Plumb


Hi everyone!
It's Sue Plumb here today to share my latest design team project with you. Today I am sharing a mixed media scrapbook layout that I created whilst I was away at a craft retreat last weekend. It was actually created for a challenge that was on offer, which was to be inspired by a canvas created by my fellow Aussie VLVS teammate (and friend) Fiona Paltridge. I decided to design a scrapbook layout so I could document these fun photos of my brother and I as we shared a giant margarita.


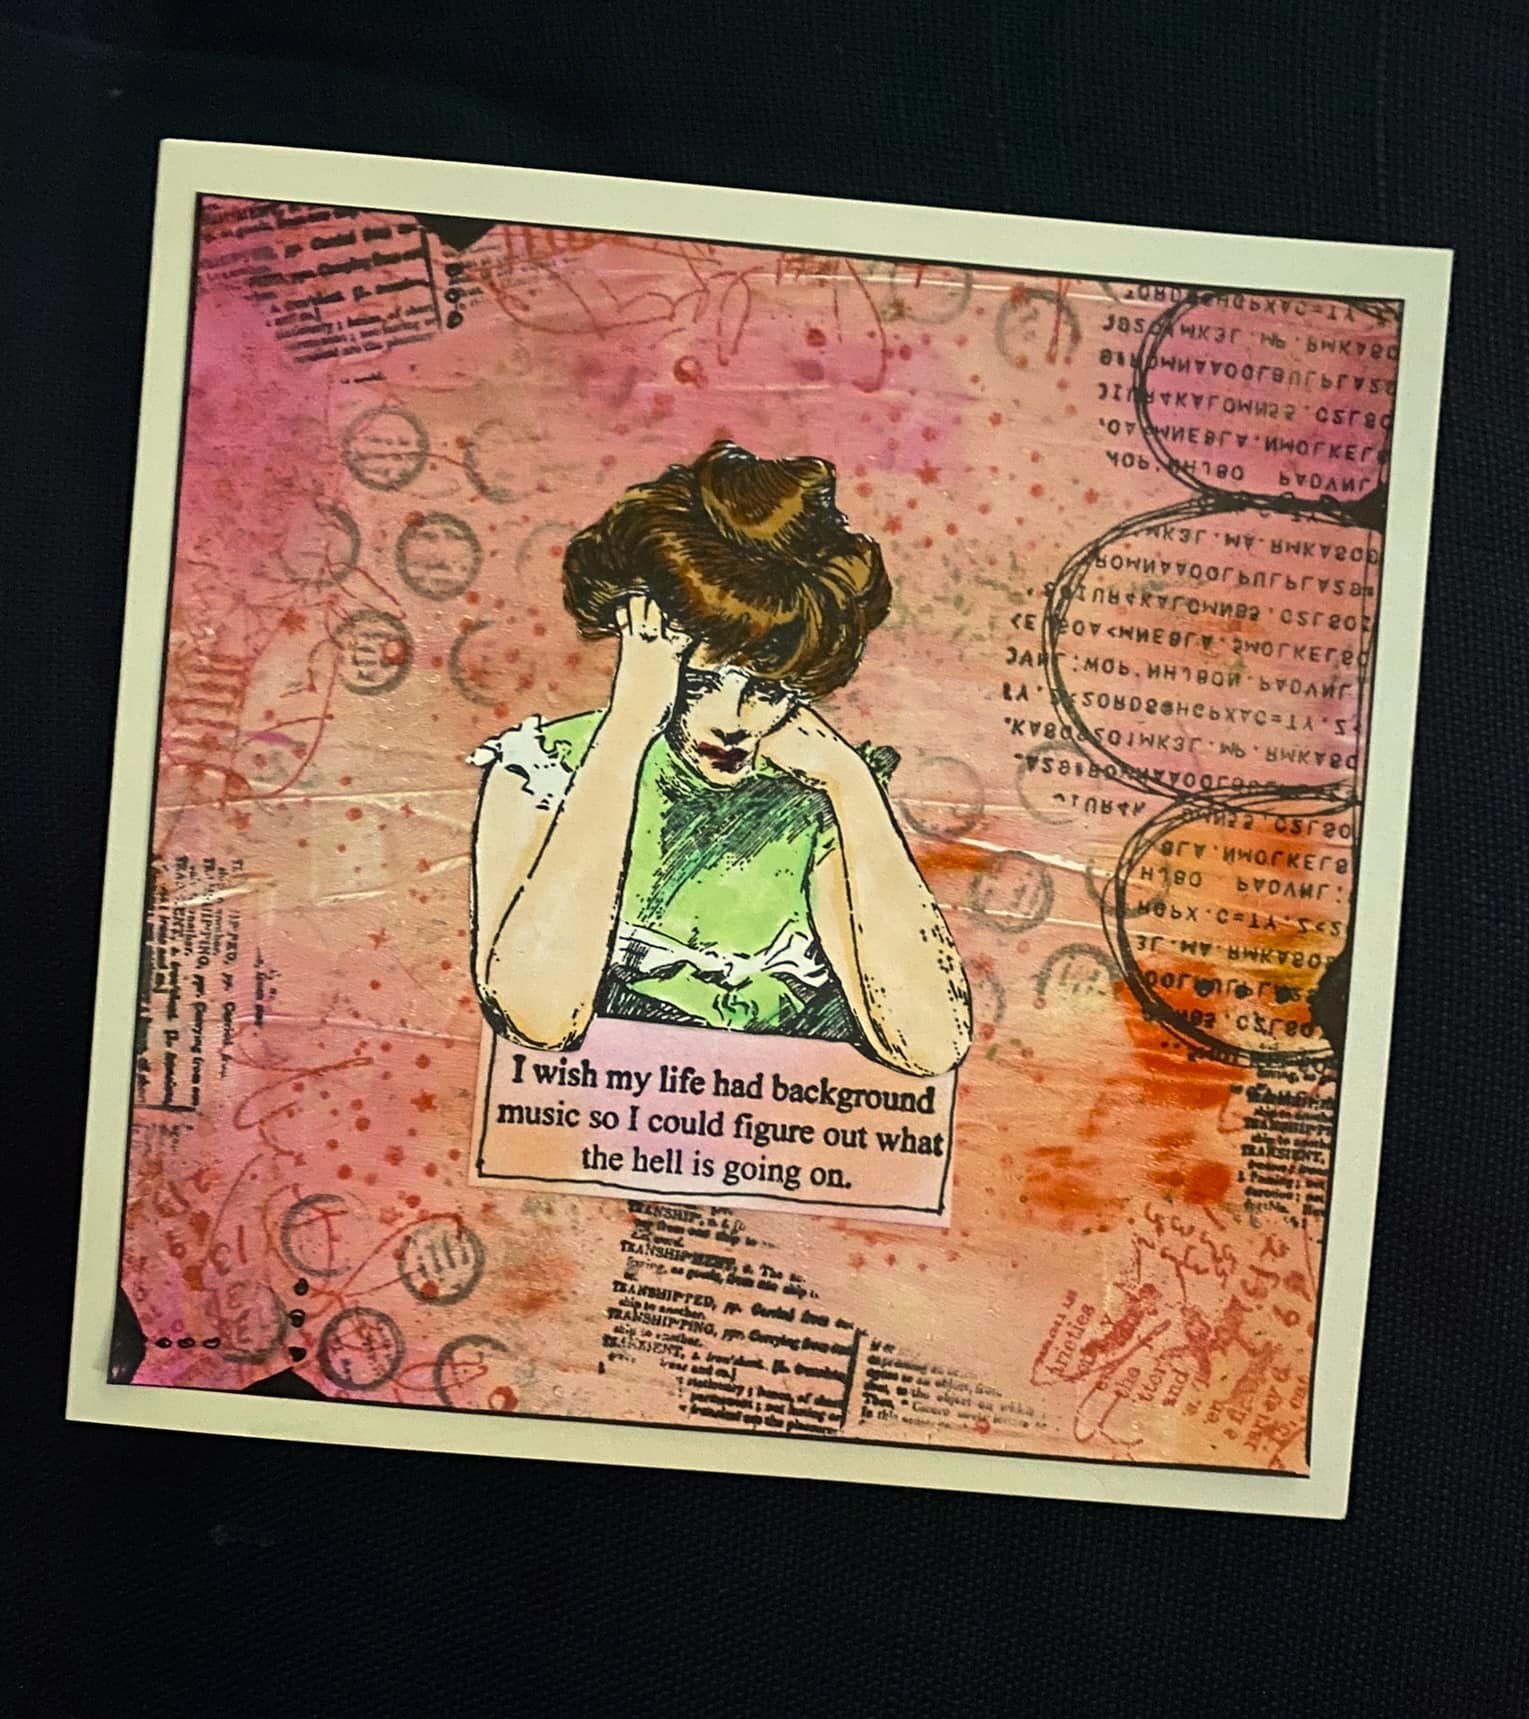
To create my page, I began with a sheet of Bazzill Marshmallow cardstock. This is my preferred cardstock to use when I create mixed media pages, as with its heavy weight (240gsm) it takes a variety of media well with minimal warping. 

I started by applying some Micador watercolour paints randomly to my background, drawing on the colours from Fiona's piece for inspiration. Once the watercolours had dried, I then added some contrast colours using Dina Wakley acrylic paints which I applied with my fingertips.

To add texture to my page, I also added some torn strips of old book and music paper, and some pieces of tissue paper before adding yet more acrylic paint to help blend the papers in a bit.


Once the colour and texture was down on the page, it was time to add some stamping to help give the page some structure. (Unfortunately, as I had flown to retreat and was weight restricted for my luggage, I only had a small selection of my favourite stamps with me.)


The first stamp I reached for was the Typeset Scallop, which I stamped twice horizontally over the paint on my background using black StazOn ink. This gave my page a horizontal line that I could then anchor my photos to.


Next, I wanted to add some vertical structure to my page, so I used the Rows of Numbers stamp and stamped it near the top and bottom of my painted section. I also added a few scribbles with my Stabilo All pencil to further enhance the horizontal and vertical lines I had created.


Once I had the structural stamping in place it was time to add some layers of texture. I used a variety of materials for my layers - striped tissue paper; punchinella; paper doily and frayed gauze before adding my photos on top.


Once the photos were in place I also added some pieces of twisted coloured wire and some staples; as well as some small snarky phrase stickers.


At this point I thought the background needed some extra black detail, so I used the Waybill/Invoice Background stamp to add a little random text and lines around the edges of the focal area.


To finish off my page, I used the Cross Marks Background stamp to add three small patches of crosses to form a "visual triangle" around my photos. I further enhanced the crosses by using some yellow embroidery thread to hand stitch over a few of them. 
Then it was a few tiny watercolour splatters and I was done!


That's all from me today, I hope I have inspired you to pull out some of your favourite stamps and get inky too!


Stamps used:

Other materials:
- Bazzill Marshmallow cardstock
- Micador watercolour paints
- Dina Wakley acrylic paints
- Tsukineko StazOn ink
- Book, music and tissue paper
- Paper doily, punchinella, gauze
- Small phrase stickers
- Coloured wire, staples
- Embroidery thread
- Stabilo All pencil