Showing posts with label film strip. Show all posts

Tuesday, May 08, 2018

Ray of Sunshine | Sue Plumb


Hi everyone!
Sue Plumb here with my latest design team project with you. Today I have a 12x12" mixed media scrapbook page I created to share, featuring a stamp-filled background and a photo of my daughter at her sunshiney best! haha


To create my page, I started with some white cardstock (I use Bazzill Card Shoppe cardstock in 'Marshmallow' - I find this best for applying wet media.) I added a wash of grey colour using Colour Blast 'Stormy Weather' Colour Shimmer Spray, which I poured into a cup and applied with a wide brush.


I needed to give my page some structure (and given the theme of this page was about capturing photos) I used the Film Strip stamp to apply some horizontal and vertical lines to draw the eye to the focal area of my page using Staz On ink.


I wanted to add a supporting focal image to compliment my photo, so I chose the Whimsical Horned Boy. I already had this image stamped out on some tissue paper, so I used some matte medium to apply it to my page.


I kept building my background by stamping the Evidence Label stamp near the top of my page (I can see this stamp is going to get a workout from me); and then I added two Deathhead Moths (they matched the death stare my daughter was giving me). I also had these on tissue paper, so I used matte medium again to apply them.


My background was really starting to take shape now, so it was time to add some finer details. I reached for my Sky of Stars Background stamp to add some visual interest around the page. My page also needed a title and I knew EXACTLY which stamp I wanted to use for it - I Am A Ray. I stamped it out multiple times around my page (just to make sure I got the message across!)


Now it was time to add a splash of colour to my page. I used a Faber-Castell watercolour pencil to add some red around the edges of my moths, as well as to the cheek and lips of my horned boy before blending it out with a water brush.
I also added a couple of scribbles that I didn't blend.


Now it was time to work on the focal area of my page and add some texture. I used a mini paper doily; torn tissue paper; some tiny gold star punchinella and frayed gauze to create a mat for my photo. 


I cut around my daughter in the photo to get rid of the background and added some cardboard to the back to pop it up before adding it on top of my layers using Miracle Tape. I also added some extra gold touches to my page using torn pieces of washi tape and gold sequins. 

I added some small splatters of Colour Blast 'Sunburnt' Colour Artist Ink and then my handwritten journalling. I complimented my journalling with the What We Have Here stamp. (A perfect finishing touch!)


The final addition to my page was a handmade chevron embellishment from Charms Creations, to help draw the eye to my photo.


Here's a closer look at the completed page...


Thanks for stopping by so I could share this with you. I hope I have inspired you to get inky too!


Stamps used:

Other materials:
- Bazzill 'Marshmallow' Card Shoppe cardstock
- Staz On ink
- Colour Blast 'Stormy Weather' Colour Shimmer Spray
- tissue paper
- matte medium
- Faber-Castell watercolour pencil
- collage materials (paper doily; tissue paper; punchinella; frayed gauze)
 - washi tape
- gold sequins
- Colour Blast 'Sunburnt' Colour Artist Inks
- Charms Creations chevron
- felt pen

Tuesday, May 09, 2017

Universe Inside - Art Journal Page by Susanne

Hi there!

I'm sharing an art journal page with you today. I used the Whimsical Leaf Lady stamp as my focal point. The colouring is made with Brushos and Aztec Metallic paints.


I recorded a video for you! Enjoy:


Thank you for stopping by today!
xx Susanne.


Supplies:
Viva Las VegaStamps!:
Whimsical Leaf Lady
Film Strip 1
There is a Universe 
Typewriter
Small Bee
Small Wasp
Large Wasp
Others:
ColourCraft Brushos
Molding Paste
ColourCraft Wax Resist Sticks
ColourCraft Aztec Metallics
Tissue Paper
Archival Ink


Tuesday, June 07, 2016

"Trust Your Cape" a Little Card By Fiona

"Spread your arms, hold your breath and always trust your cape. Life is just a leap of faith"

"The Cape"
by
Guy Clarke


Viva Las Vegastamps used:

Thank you for popping by. i hope you enjoyed my little card and the song that inspired it xx


Tuesday, August 18, 2015

Life is not a movie: August challenge inspiration


Hello my dear crafty friends and welcome to my August challenge inspiration for our VLVS challenge.
First let  me show you our gorgeous August inspiration:


This inspiration is SO MUCH ME!! 
Even as a new DT member I already own most of the stamps on this inspirational photo and I love them.
So here is my art page made with this inspiration.
I made it in my usual Mixed Media style using lots of mediums, paints, stencils and ... stamps, sure.
Also this inspiration is in black and white, I thought that adding a bit of color on the corner can be interesting. So I used stencil to make the texture over stamped Dictionary page  (keeping the main image of Businessman  Silhouette on the corner). The Film strip that was on the inspirational piece gave me the words of my art piece: Life is not an old movie, but a new rainbow dream.
Totally my own quote, believe me... 
The quote was made with my very old letter stickers and as those became totally non adhesive, I added a thin line of glaze to keep them in the place.


And now for some close- ups too:
I used Sepia black ink and not the  real black one, so you see a bit of dark brown on the background stamping. The man image was outlined with white paint around to make it " standing out".

The word life is a die cut  that I glued on my piece.

And here is a full sentiment  (you sure can use it, but remember me if you do so)


And here is a list of stamps I used for this inspirational piece:
 Businessman Silhouette Item 19418 Plate 1440
Film strip Item 18921 Plate 1428
Dictionary page Item 19015 Plate 890

Other products:
Stencil- Tando Creative
Die- Cherry Lynn Designs
Letter stickers
Paints, mists, gesso : Ranger

So now it's your time to play with our inspirational challenge!

Who knows- you can even win!!!

My new design adventure

Tuesday, August 04, 2015

Time has expired...

Hi everyone! It's Susanne today and I'd like to give you some more inspiration for this month's challenge. Here is the our monthly challenge inspiration:


I created a mixed media Artist Trading Card.
I used some watercolor paper and stamped parts of the "Dictionary Page"  stamp with VersaMark Ink. Now I colored the whole background with black PanPastels. The pigments of the pastels stick to the VersaMark Ink. Together with the watercolor texture the result is a nice background to work on.
Next step was stamping the "Film Strip" with jet black Archival Ink. I added also two butterflies from the "Butterfly Specimens" stamp. I always inked up only one buttefly by masking the adjacent with washi tape. I added some red to the film strip, just to bring out the black and white theme.
Now it was time to add some gesso to highlight the area where I wanted to place the words. I used the "Your Time As A Caterpillar" sentiment. I missed a border arround the ATC so I added some lace with the "Lace Background" stamp and blacked the edges with a black Neocolor crayon.
To finish it up I used a white uniPOSCA marker as well as a black Pitt Artist Pen and did some doodling.

Thanks for stopping by today, Susanne.
 
Stamps from Viva Las Vegastamps:
Dictionary Page
Film Strip
Butterfly Specimens
Your Time As A Caterpillar
Lace Background

Other Products:
PanPastels black
Neocolor II watercolor crayons (red, black)
Gesso
uniPOSCA marker (white)
Pitt Artist Pen (black)
watercolor cardstock

Monday, August 11, 2014

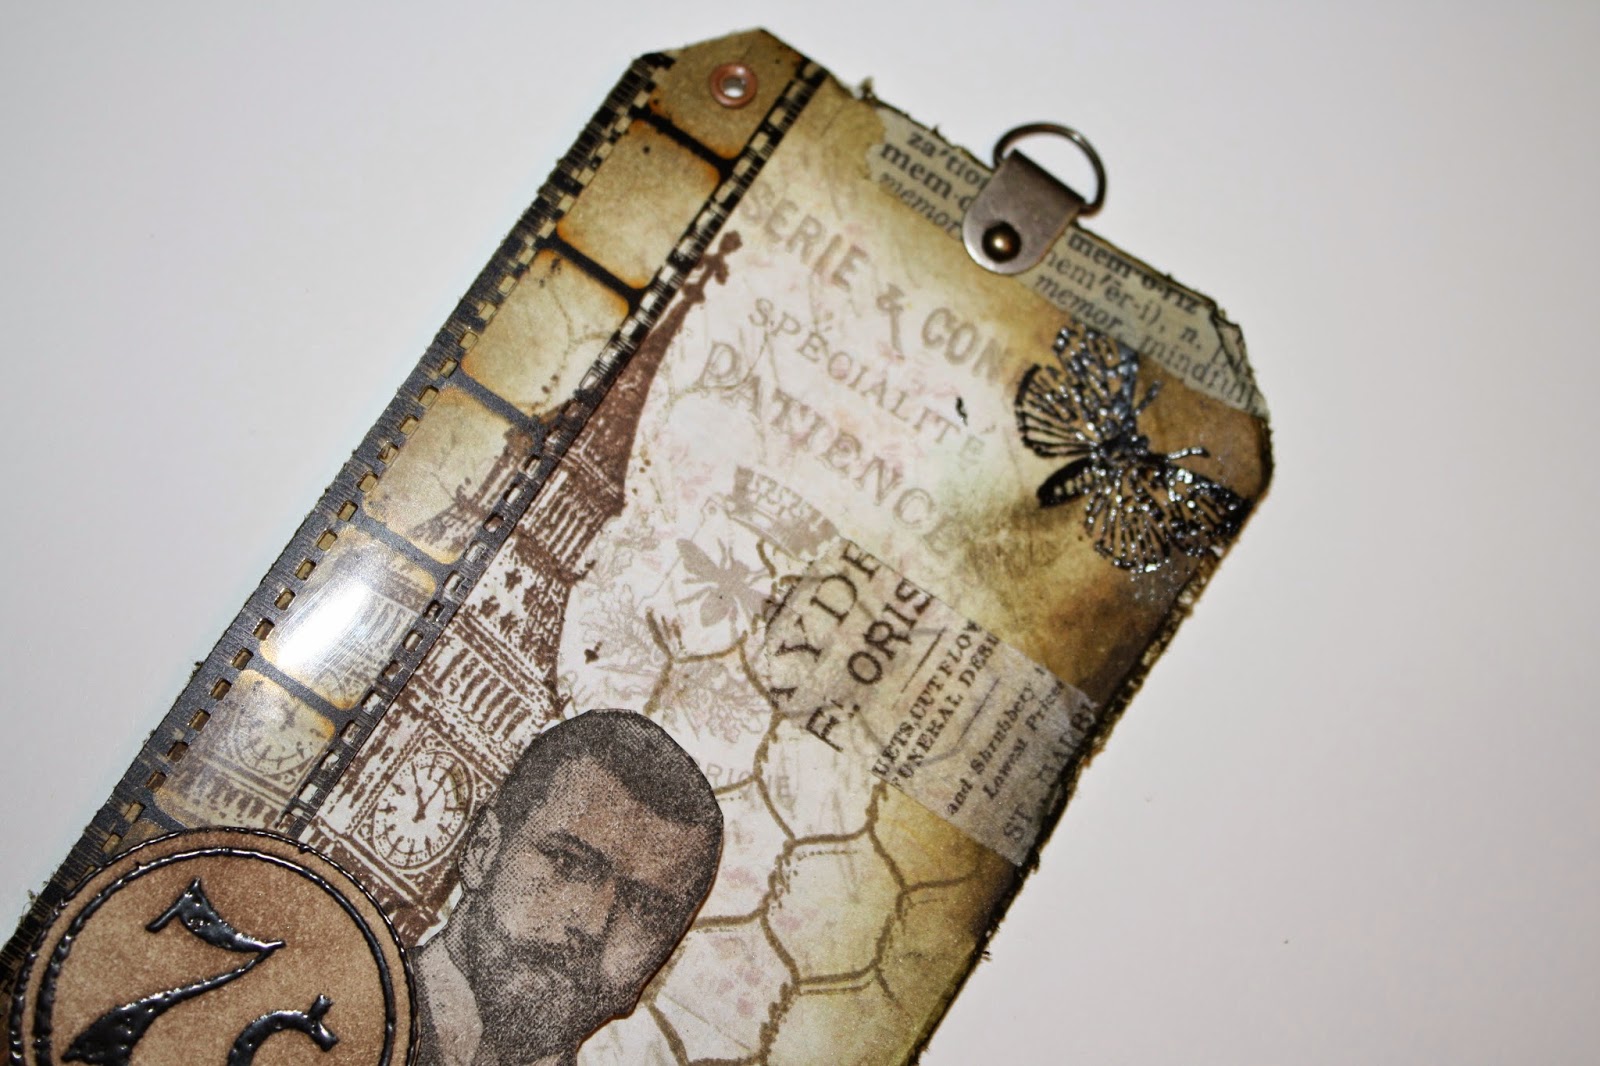
A Vintage Game of Tag

Hello, Its Me Tera here again with another fun project to share! 
Today I am sharing a fun Vintage themed Tag that I created. 

I started  with a base of patterned paper by Prima, and a main focal image that I wanted to build around. 
(From here I really got into the swing of everything and forgot to take progress shots as I went so bare with me while I try to explain my madness :-D) 

 I started by stamping Chicken Wire 3 3/4 x 4 1/2 randomly on the background in frayed burlap. 

Next I stamped the Big Ben 1 3/4 x 4 1/4 on the left side in VersaFine Sepia.
 I also inked and distressed around the edges in various shades of browns.  On a separate sheet of paper I stamped the Bearded Man 2 1/4 x 2 1/4  in verafine black and distressed it with versafine sepia. I also stamped the #7 from Plate 1430  then embossed it with black embossing powder before i cut it out and distressed it.  At the top right I stamped Butterfly Specimens 1 1/2 x 4 1/2 then also embossed it in black. To finish things off I added some film strip by Tim Holtz to the side, as well as some random spots of Tim Holtz washi tape. I popped up the 2 pieces on pop-dots, then embellished with UmWow Studio Gears. 

Below are a few more detail pictures :-D


Tuesday, May 13, 2014

Viva Las VegaStamps & Pan Pastels!

And 2nd today for our Pan Pastels Feature is the superbly talented Glenda Tkalac!


Ok, how exciting was this?? We were given some yummy pan pastels to play with and it was my first time playing with them, I was a Pan Pastels virgin!! haha I decided that I wanted to do two projects using the uber fabulous Running lady stamp
She looks exactly how I've been feeling lately so I decided to do an art journal page using her as well as these other fab stamps, the film strip stamp
and the one way stamp
and the one way small stamp
and the pylon stamp
and last but not least the arrow stamp
First of all I took a brick wall stencil and then sprayed it and then laid it onto my journal page and pressed evenly so I only got some of it (and yes I had to enjoy a nice cold beer while doing this)... also forgive the dim pics as I was playing at night!
 Then I took some of the orange pan pastel and used the sponge tool and colored when I wanted orange.
 Now it was time for placement! I had stamped the running lady stamp onto plain white cardstock and then cut her out and placed her where I wanted her, and then used black shimmerz to create a black cloud above her ('cause that's how I'm feeling lately!)
 then I got all kinds of other fun stuff as well as the cut out stamps and glued them onto my journal page.
 and here is my finished journal page!
I also made an ATC using the running lady stamps and pan pastels.  Here are the materials I used
 Once I glued the papers I wanted together onto a 2 1/2 by 3 1/2 piece of white cardstock I then took a stencil and placed it on top of the papers, and then using the sponge rubbed the orange pan pastels where I wanted it and sprayed a clear coat fixative onto it so the pastels wouldn't rub off
 I also had a rub on that was really old and crappy and wouldn't rub on so I taped it onto the card using clear tape and then glued the running lady onto the card, smudged the edges using staz on ink and voila! Here is my ATC.
I hope you enjoyed seeing how I used these stamps as well as the Pan Pastels and until next time!