Showing posts with label brick background. Show all posts

Saturday, September 07, 2019

Art Journal Page by Elisa Ablett


Hi VLV Stamps fans,

Elisa here from the design team with my latest inspiration for you, 
a bright and cheeky art journal page 😂

As soon as I saw the Large Sandwich board ( boy) stamp, I just knew I had to create a little something with him. For those of us with kids in our lives, sometimes our lovely children can be 'little rays of @#$ sunshine lol' so I wanted to commemorate in my art journal the few times perhaps when my boys caused me to suffer from - mum anxiety and stress -  with their moods. 

Let's take a closer look at how it came together....


I starting with stamping my Brick Background and then added my water colour background sky and brick colouring. I then stamped Large Sandwich Board boy on a seperate piece of cardstock using my trusty versafine black ink pad and coloured with watercolours and markers. I put him aside to dry and concentrated on completing my background adding the rays of sunshine using a Prima stencil and coloured texture paste from Colour Blast and Little Birdy.


Lastly, I used a clear acrylic block to position my next stamp I am a ray... so that it stamped in the right position in the middle of the Sandwich Board. I then fussy cut the boy out and used 3D mounting tape to add dimension. I wanted him to be outlined by the rays of sunshine so I positioned him over the middle. 

I also added a scribbled border and scribbled handwriting to add a bit of focus to the page. 

Thanks for stopping by the blog today, while I am chasing my kids around and refereeing their fights you may like to leave me a comment or two below ... just to let me know I am not the only one suffering from a few 'mum needs some time alone' moments 😏😏


Stamps used:


Other materials used:

Art by Marlene Art Journal
Prima Ray Stencil
Colour Blast Colour Paste
Little Birdy Texture Paste
Versafine Ink
Prima Watercolours
Decoart paint
Dictionary Paper
Black Marker
White Posca Paint Pen


Wednesday, December 07, 2016

Find Your Tribe | Fiona Paltridge

Hello VLVS! peeps Fiona here with you again to share a little card tutorial.


I want to show you how I got this Whimsical Fairy Lady to look like she's poking out from behind the tree.


First I made a mask of the stamp and placed it in my embossing folder where I wanted to stamp her later on. Then using some Distress ink I stamped the Brick Background stamp directly onto the inside of the embossing folder. You have to stamp on the non raised side (the side the writing in on in this case).


Next I stamped the Fairy lady. This time I used archival ink as I wanted it to be really black and permanent so I could do some Distress Ink blending later on and it wouldn't be disturbed.
I also got a wet wipe and removed any excess ink from inside the tree embossing part so it wouldn't transfer onto my card when I ran it through the machine. Seeing that it is Archival ink I did use a little bit of Stazon remover to help with this part.


After running it through my Big Shot I used a brayer and some more Distress Ink to add some ink onto the front of the tree. Later on I blended some ink over the top of it very carefully as well.


I have to be honest, I was worried ..... I was very worried when it first came out of the machine but after some additional Distress Ink blending and the addition of the Stitching stamps (everything looks better with a stitch stamp) plus a title, I was much happier with the results in the end.

Viva Las Vegastamps! used:


Thanks for popping by xo


Tuesday, June 07, 2016

"Trust Your Cape" a Little Card By Fiona

"Spread your arms, hold your breath and always trust your cape. Life is just a leap of faith"

"The Cape"
by
Guy Clarke


Viva Las Vegastamps used:

Thank you for popping by. i hope you enjoyed my little card and the song that inspired it xx


Wednesday, August 05, 2015

Paint your dream with Banksy girls


Hello my dear crafty friends and welcome to my new tutorial made for VLVS blog.
It becomes harder and harder to make tutorials as actually everything was already made and shown over the web.
 So if not the new techniques, maybe a new arrangement of pieces or just a way I think when I  make a big project that involves Mixed Media art and stamping.
 So this is a tutorial about all of those: my way of thinking when I make a new art piece/pieces; some of my favorite techniques and last, but not least- 4  canvases arrangement into one single art adventure.
I decided to make 4 canvases art piece with 3 Banksy stamps and to connect them all as a part of wall paint art. So  each stamp has it's own small (4*4'' ) canvas and the title canvas(7*7'') it the one that connect all small art pieces to one single " something".
Step by step tutorial:
1. Stamp background over each small canvas with some small background stamps. I picked small stamps and even with them I just stamped on the edges as the central part  intended to be for the main stamped image. I used pigmented black ink (Clearsnap) and clear embossing powder to heat emboss the backgrounds. 4 background were used here: Six Hexagons, Washi Grid, Think to thin round and Grunge circles.
I made the same stamping over the larger canvas using Brick background.


2. For the next step I used a few of my stencils (Memory box this time) and Gel medium. Yes, I didn't use texture paste but a very gentle gel medium that is almost translucent when it's dry. I covered the whole canvas with the stencil, but added gel medium randomly here and there. Let the wet medium dry. It takes time. You can do step 3 while your are waiting.


And the large canvas after stamping and adding gel medium texture:


3. Stamp all three main images with black permanent ink (Ranger) over tissue white paper. As our canvases are very textured, the only way to add good stamped image is to stamp over tissue, to tear the image and to adhere it with the very same gel medium.


4.Mist your 4 textured canvases with a mix of mists, according to the colors you want to see with each image. Wipe the mists a bit as we really want to see the gel medium stencilled texture and our primary background stamping.


5. Adhere the torn stamped over tissue images over  those three small canvases and let it dry.
6. Glue letters over the large canvas to make your title. I used simple stickers and Thickers to make my title. As always the sticky backs are not sticky, so I used my usual trick and it's to make a thin line or a few lines with some clear glaze to connect the letters and to adhere them to the background. The dry glaze looks divine (like water drops) and adds some interest to  your finished piece.


7. Add some drops of color to each canvas and arrange them to your favorite group arrangement.


VLVS STAMPS USED TO MAKE THIS PIECE:
6 Hexagon background Item 19076 Plate 917
Washi Grid Background Item 19074 Plate 917
Thick to thin Round Item 900 Plate 272 Page 279
Brick backround- Item 19077 Plate 917
Grunge cricles Item 19563 Plate 1451
Banksy Rain Under Umbrella girl  Item 19486 Plate 1447
Banksy Swing girl Item 19425 Plate 1443
Banksy Girl Floating with Balloons Item 19421 Plate 1443

Other products:
Canvases
Stencils- Memory Box
Mists: Tattered Angels
Inks: Ranger, Clearsnap
Gel medium
Letter stickers- AC,Pebbles

My new design adventure

Wednesday, July 22, 2015

Going in circles and never stop: art journal page

 Hello my dear crafty friends and welcome to my very first post on VLVS team.
This is an inspirational post and not a tutorial, so I am just going to share my thoughts, tips and the way I worked on this art journal page.
Lot of people ask me about the way I get my inspiration. Usually I begin with products I own. Like if I need to make a project for a stamp company, I try to figure what stamps I have and how I can combine them into a finished art piece.
As I already own quite a lot of VLVS stamps (about a hundred, I think) it was not so easy to group them into  some themes and to see what stamps are going to be used for the first project.
So I grouped the circles first as they were pretty large.
The huge Clock face,Coffee ring  stain, Solid color wheel and  another circles were the first. Then I  began to look for something that is connected to circles and to time and the result was this song line that says" Going in circles like a faceless clock with a timeless hope that never stop".
Perfecto! Now I looked for an image of someone who  was standing, walking scrolling etc. The only one I found in my stash was this Businessman Silhouette , but it was the best of the best. I stamped him on the corner as this was my whole page anchor and added Brick background around him. All stamping process over this page done with pigmented inks and clear embossing powder and all inks I used are Clearsnap Crafter's inks as those are very wet and perfect for heat embossing inks.
Now I started the process that was to stamp all images with different colored inks and to make the circled
background and to arrange the circles to the way that will make my stickers sentiment placement possible.
On the way I added more circled  VLVS  images around as  you can see on the full product list below.


The whole piece was misted, inked and painted with a wide mix of Gelatos, mists and acrylic paints and I even added some spots of gel medium around before (those are bare, non colored spots).


I arranged the sentiment around the circles and added this huge NEVER STOP central title with vinyl stickers.
Then I just added a couple of metal clock pieces and some glitter over the glue.


VLVS stamps used to make this project:
Solid color wheel-Item 19339 Plate 1435
Thick to thin round-Item 900 Plate 272
Coffee ring stain-Item 19230 Plate 926
Color wheel lines-Item 19338 Plate 1435
Hand holding circle- Item 15977 Plate 1271
Charred wood background- Item 16387 Plate 1301
Bussinessman silhouette-Item 19418 Plate 1440

Other products used:
Inks- Clearsnap, Ranger
Embossing powders, glitters: WOW! Embossing Powders
Metal trinkets:  Paper Studio
Letters- American Crafts, Glitz Designs


I hope I inspired  you a bit with my way of making art journal pieces and you are welcome to try this way of  creating art.

My new design adventure

Saturday, August 02, 2014

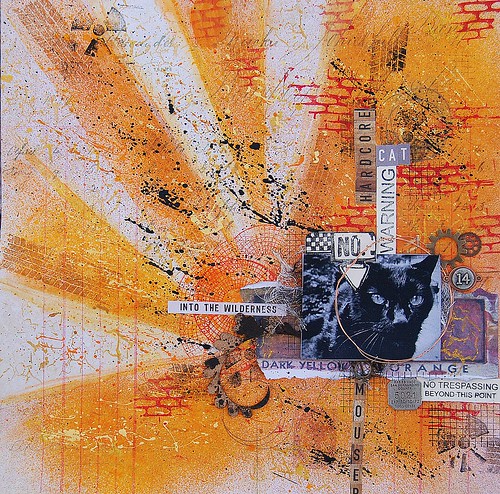
Warning: Hardcore Cat (August Challenge Inspiration)

hardcore cat, full, allassiter, VLVS
Welcome to Friday and a bit of inspiration, from me, Amy using the fabulous illustration for August here at Viva Las VegaStamps! This inspiration is so awesome, unique, and punk rock, I couldn't wait to dig in. I grabbed a piece of 12x12 paper from the Crowded Attic collection by Tim Holtz, and though the vintage theme is a strange mix with the graphic boldness of the inspiration board, I liked how it worked.

title, hardcore, ALLassiter
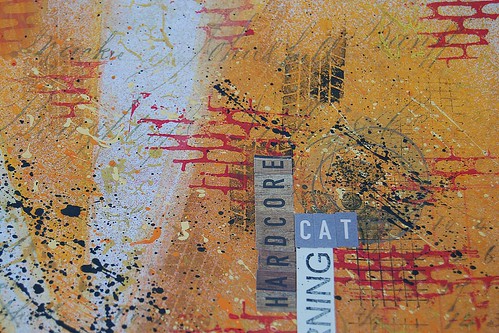
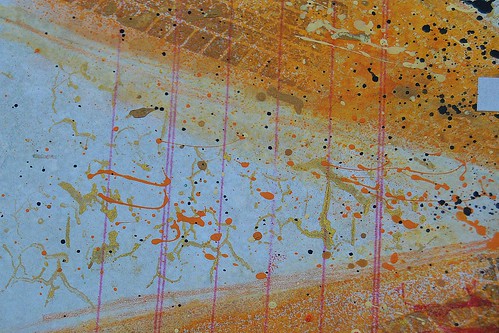
I began the mixed media journey here, by creating lines for the sun rays,using a ruler and a pencil. To get the brighter orange lines, I needed to cover the "white" area with a piece of paper, and on the other side of the ruler. I used Dylusions mist in Pure Sunshine, to create the orange sunbeams. When those were complete, I added Pan Pastel in orange along the edges, to soften them a bit. I stamped over the "beams" using the tire tread stamp and silver ink. For the "sun" I used the color wheel lines stamp, and overlapped it a bit in a circular area. bg, hardcore, ALLassiter
I added some "punch" to the plain lines, with the cracked background stamp, and gold ink. On top of all of this, I added lots of paint drippings and flickings. Hehe. The brick background was perfect for getting that "graffiti-ed wall"/Banksy's palette I was looking for. photo cluster, hardcore, ALLassiter
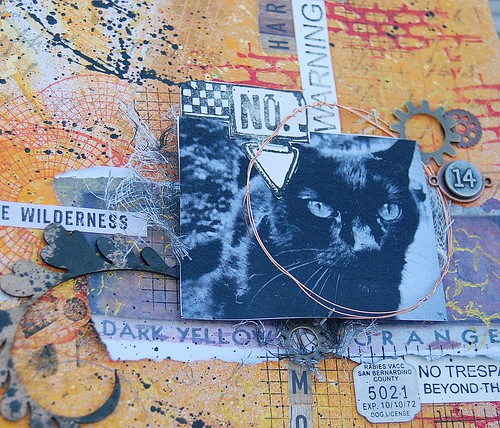
Finally, I created a layered cluster around the photo. First, I stamped around the area with the washi grid background, and then I added some black misted cheesecloth, and popped the photo up on 3D foam dots. I stamped the area 51 warning,and the top portion of the No.5 tag using memento ink in tuxedo black, onto library cards, and cut and layered them up. All that was left, was adding embellishments, like the UmWowStudio flourish, metal bits, and alphas to create the title. Voila! I created a way to honor my sweet but hardcore cat, who lived 8 years indoors, before sneaking outside one day....and disappearing for 4 months....then returning one day looking like he had been in a gang fight. He now hangs out on our deck, and catches mice and rats that he presents to me as a lovely gift. ;)
 Thanks for having a look today, and get busy making your own creation using this month's inspiration! (here's a reminder):

Supplies Used:
Viva Las VegaStamps!:Tire tread, color wheel lines, cracked background, brick background, washi grid background, area 51 warning, No. 5 tag
Miracle Tape, Memento Ink-tuxedo black
Paper: Tim Holtz
Inks: IMAGINE Crafts
Paint: Plaid, 13 Arts
Pan Pastel-orange
Metal-Bead Landing
Chipboard-UmWowStudio

Friday, October 25, 2013

October 31 - by GDT Kathy Clayton

Hi, Kathy here . . . I'm back again!!! Last time I showed you a mixed media layout I did, so I thought I would show you a mixed media "tag". As many of you know, I am still pretty new at doing mixed media . . . but I am in LOVE with it. I try to add something extra to everything I do now, even to most of my CAS projects. :)

Since I absolutely LOVE Halloween, I decided to combine the best of both worlds . . .mixed media and Halloween. After a couple false starts, I finally got it together. Here's how it turned out:


VLVS products used:
Kids with Giant Jack 'o Lantern stamp #19209 http://www.vlvstamps.com/latest-releases-summer-2013/kids-with-giant-jack-o-lantern-3-1-4-x-3-1-4.html
Brick background #19077 http://www.vlvstamps.com/brick-background-2-1-4-x-5.html
High Gloss Embossing Powder
Miracle Tape


Other products: Mischievous by MME, wood paper from MME, UmWowStudio October 2012 kit, chipboard, cardboard, plastic lid, block letters from Tim Holtz, Vintage Photo and Black Soot distress ink, gesso, orange glitter, Timeless, Taupe & Tattered Leather mists, geltos (banana & blood orange), black Pitt pen, sandal & latte alcohol inks, cheesecloth, misc. flowers & grass, Tim Holze bottles, misc. dictionary pages, and misc. bottle labels,


The first thing I did was take and 2 of the orange pieces of paper from the Mischievous by MME and cut them to 9 1/2" x 12. Then cut the top two (2) corners to make them into a big "tag". Then using miracle tape adhered the paper to each side of the chipboard and then distressed it. Then using the brick background, I embossed it here 'n there on the front of the tag. Taking my dictionary pages, I distressed them with distress inks and then glued them on each side of the tag. Then using three (3) sprays (Timeless, Taupe & Tattered Leather),sprayed around the tag. I also sprayed some misc. pieces of cardboard and using glossy accents, put glitter on my lid . . . then adhered to my tag along with the cardboard pieces..I also colored my stamped
image and adhered it above the lid.


I used some wood paper and made my fence. But since I didn't like the color, I used Sandal and Latte alcohol inks and changed the color. Once it was dry, I adhered it on each side of the tag so it would bow out.


I fussy cut "O-C-T-O-B-E-R" from the block letters and used my geltos on them to help them match my tag a bit better. Using a glue gun, I adhered the letters to the outside edge of my lid. I also glued bats in three (3) places.


Using a burlap-wrapped toilet paper roll, I placed it behind my fence to use it like a table. I adhered several small bottles and added some fake grass and flowers.


I also sprayed some cheesecloth . . . then added that and a small book & tag from UmWowStudio Oct. 2012 kit. Added a few more drops of spray and I was done.


Thanks so much for stopping by today. If you want to know how you can win a $20 gift certificate from VLVS from ME, visit my blog "UpintheNightwithKat.blogspot.com" for details. Thanks again!!!