Showing posts with label skull. Show all posts

Sunday, October 13, 2024

Balancing Bones.... by Tracy Blackwolf

 Hello Everyone!! Happy Fall!

I made a card for my project today~Enjoy!

For the background I used Three mica stain sprays. I started with the yellow, Then covered it while I sprayed the Orange one  And then sprayed the iron one. I used a paint brush to move them around the card to get the coverage I wanted.

I dried it with the heat tool and then I sprayed some water drops all around the card. to get the mottled look.
While I waited for that to do its thing, I fussy cut all the skulls and bones. Good thing I have many years of practice with that because that little skeleton was a challenge.
I used three colors of distress spray stain as watercolor paints for all of the bones.
The bottom skull is taped flat, then all others have foam tape with the skeleton have two layers. I wish the dimension showed better in photos.
I debated having a spider hanging from his hand, would be cute yet I like the simplicity of it as is.
I hope you enjoyed!

Stamps used:
Skull   2403
Realistic skull    19724
Creepy skeleton specimen     20684
Humerus bone   19728

Other supplies:
Distress mica stain: Harvest moon, iron gate, burning ember
Distress spray stains: Scorched timber, vintage photo, antique linen


Thursday, October 29, 2020

Halloween tags with witch and death moth

Hey everyone,

just two days until Halloween, so of course I have another inspiration project for this. Today I want to share these two tags. I know, it might be a bit hard to see on the photo, but guess which material I used as a base?


... it's foil! Windmill foil to be exact.

I cut my two tags from the foil and colored them with alcohol inks and some blending solution. I worked on them as long as I was happy with the look.


 While they were drying, I stamped and cut two focal points - the witch with her broom and the death moth - on watercolor paper. I left a white boarder around both images. I usually don't do that, but I thought they needed a little more contrast to stand out against my colorful tags. Bonus: it made the cutting much easier. ;-)

To add more interest I chose a chipboard element for each tag and heatembossed it - my favorite thing to do with chipboard.

As my backgrounds have dried in the meantime, I could work a little more on them. I decided to turn the tag around and stamp on the smoother side without the alcohol ink. For stamping I used a white Stazeon ink which works really well on foil. I stamped the row of chakras as well as part of the tree stamp on the red tag and two different skulls and the branch antlers on the blue one. The tree and the antlers both create a similar look when you just stamp parts of it, but I wanted to give you double the inspiration. 


I finished the tags by glueing the chipboard pieces, the cutout images and a lot of thread on them and added one of the Tim Holtz stickers on each.

I haven't had my alcohol inks for a while now, but it was fun playing with them on the foil. And of course there are some cool possibilities of using foil tags for decoration such as placing them in front of an electric candle.


Stamps used:
Witch Holding Broom (19705)

Death Moth (20056)
Weathered Tree (19467)
Realistic Skull (19724)
Branch Antlers Set of 2 by Cat Kerr (20147)
The Head Figure by Cat Kerr (20138)
Chakras (20246)

Other material:
- windmill foil
- watercolor paper
- Versaclaire Ink (nocturne)
- Stazon ink (opaque cotton white)
- Ranger alcohol inks + blending solution
    red tag: sunset orange, purple twilight, wild plum
    blue tag: denim, turquoise, raspberry
    on both: pitch black

- Scrapiniec chipboard elements (spiderweb 4967, boarder 4614)
- Embossing powder (Lindy's Gang - chalk it up)
- black and white thread


See you soon & happy Halloween!


Tuesday, September 10, 2019

She Was a Wildflower - Art Journal Page | Sue Plumb


Hi everyone!
It's Sue Plumb here with my latest design team project for you. Today I have a simple, but fun, art journal page to share that I created using a variety of stamps; Distress Oxides; a Sharpie; watercolour pencils and inks.


I began my page with an A4 sized sheet of white cardstock and Distress Oxides in the colours of Twisted Citron and Cracked Pistachio. I began using a foam blender to apply the Twisted Citron to an area in the centre of my page. I then blended some of the Cracked Pistachio into it to give it some extra depth.


Once I had the colour down, I grabbed the Doodle flower/garden stamp to form the base of my focal image. I then stamped Skull stamp on top of one of the flower stems so it appeared as though it were growing in the garden.


I then used the Row of scribble circle/eyes to add "flowers" to the tops of the remaining stems.


I then added some extra detail by using a Sharpie to doodle some "petals" and also to add some grass amongst the bottom of the stems.


Next, I took the Striped pattern circle and stamped it out onto some extra white cardstock. I then fussy cut around the image before using watercolour pencils to colour it, and then blended it out with a water brush.


I then stuck the flower I had made onto the skull (like a flower in her hair). 


With the flower in place it was time to add my sentiment. I chose the She was a wildflower stamp and placed it alongside the skull.


I then added a little extra detail to my background by splattering some inks around the page using a small brush. I used 13Arts Ayeeda Ink in white and Colour Blast Colour Artist Ink in Slipper.


To finish off, I used the Sky of stars background to add some fine stamped detail.


That's all from me today, thanks for stopping by so I could share this with you. I hope I have inspired you to get inky too!


Stamps used:
Skull

Other materials:
- White cardstock
- Ranger Distress Oxides
- Tsukineko StazOn ink
- Sharpie pen
- Faber-Castell watercolour pencils
- 13Arts Ayeeda acrylic ink
- Colour Blast Colour Artist Ink

Sunday, October 29, 2017

Halloween Mixed Media Tag Video by Susanne

Hi my dear crafty friends!

There are only a few days left until Halloween and of course I have creepy mixed media tag to share today! What could be better than a skull as my main image?


I recorded a video about the making of! Enjoy!


Thank you for watching! Have a wonderful Sunday and a great Halloween party :-)


xx Susanne.


Supplies:
Viva Las VegaStamps!
Row Of Jack-O-Lanterns 
Skull
Danger Skeleton
Vampires And Witches And
Others:
Glossy Accents
Archival Ink
Brushos
WOW! Embossing Powder
Bluemoon Charm
Distress Ink

Friday, October 13, 2017

TGIF the 13th! - by Cheetarah


Hey all, it's Cheetarah here and I have a fun mixed media postcard to share with you for today. Since it's Friday the 13th I thought I would make a Halloween version of TGIF! 
Little Nosferatu likes to unwind on friday the 13th and have brains for happy hour!
As usual a full list of stamps and materials used is at the end of this post.


I made this card on packaging, added other left over bits and pieces to it (I hate to waste stuff), applied gesso over it and worked with layers of distress paints. I also lightly added some texture paste over the Marbles stencil from the Crafter's Workshop to give it some "brain like mass" texture. Then stamped over it with some great mixed media and skulls stamps.

You can see the texture a lot better here. I have used distress crayons and pearl rubs in black and gold to give it shading. Nosferatu was stamped on a piece of sticker paper and "Brains fuck head" is made with two different stamps. I used letter stickers to form TGIF the 13th and lastly added some spatters in white and gold.


Hope this card made you chuckle and wishing you an awesome friday the 13th! (TGIF!)


Stamps used:

Materials used:
Distress paints: Hickory Smoke, Carved Pumpkin, Barn Door, faded jeans
Liquitex inks in Gold and White
Distress Crayons
Staz-On inks in Cherry red, Jetblack, Midnight blue, Stone Grey
Perfect Pearl rub ons 
Marbles stencil from the Crafter's Workshop
Modeling paste

Tuesday, October 03, 2017

Creepy Mixed Media Tag - Challenge Inspiration by Susanne

Hi there!

Susanne here today and I'd like give you a little bit of inspiration to join our October challenge! And what else could our theme be related to in October!? YES! It's all about spooky stuff!

https://vivalas.blogspot.de/2017/10/october-challenge.html

I made a tag with the "Skull" as my focal image. I love creating tags, because I think they are super versatile! You can use them on cards, in your planner, in your art journals, junk journals or mini albums and they have the perfect size to experiment with new products or techniques!
Sometimes I transfer the process I used on a tag to a spread in my journal or even onto a canvas.


This tag looks like a lot of work, but in the end it is really easy to achieve that look.

1. Stamp the Skull with black Archival Ink and mask it with masking fluid.
2. Make a Distress Oxide background. I used also different stamps to add texture to it (Frightful Fun and Folly, Row Of Jack-O-Lanterns, Halloween Tree Silhouette)
3. Use gesso to prime defined areas. I picked a stripe on the left border and a smaller one on the right.
4. Apply acrylic paint when the gesso is dry. Pick some colours that are working with your background. Most of the time you will get a great effect when you use complementary colours.
5. Add texture with stamps onto the dried painted areas and some black splatters to the background.
6. Remove the masking fluid.
7. Cut the Tim Holtz "Thorne Edge" from black glitter cardstock and arranged it together with the sentiment. I used a Tim Holtz word block die together with a gelli print scrap. I used Miracle Tape to adhere my embellishments.

Thank you for stopping by today!
Join our challenge here!
xx Susanne.


Supplies:
Viva Las VegaStamps:
Measuring Tape Section
Skull
I Wish My Life
Dead Letter Office
Frightful Fun and Folly
Row Of Jack-O-Lanterns
Halloween Tree Silhouette
Miracle Tape
Others:
Sizzix: Tim Holtz dies (Word Blocks and )
Acrylic Paint
Gesso
Ranger Distress Oxide Inks by Tim Holtz
Ranger Archival Ink
Masking Fluid

Friday, September 16, 2016

Skulls and bones


Hi all!!
This months inspiration challenge is SPOOKTACULAR!!


Michele here today with some challenge inspiration...this month I did a canvas inspired by bones, skeletons, spooky, creepy halloween!

I have a little tutorial on the background to share but first, here is my canvas.


I started building my background with an Um Wow Studio stencil and some heavy gesso.


While that was drying I used some of the Tim Holtz tissue and stamped the Skull several times in grey ink.


In black archival ink I stamped the Humerus Bone around the edge of the canvas.


On the canvas I sprayed Antique Linen Distress Spray and water.


After some dry time...I used matt medium to put down the tissue.


I did a little random stamping with the Smear/Smudge and Ink Drips with brown archival inks.


The skulls on the tissue look like a watermark!!


I just love background stamping!!


And a look at the crackle in my resin skull cast using Amazing Casting Products.  Thanks to Tina Walker for the use of her mold!!!
I also used a chip cobweb from Um Wow Studios, a fuzzy spider from my stash, black thread, thickers and cheese cloth srayed with Distress Spray.


I hope you are inspired!!!  You can link up your creation here.

Until next time, get inky!!

Tuesday, September 01, 2015

September Challenge! get spOOOOOOOOOOOOOOky

Whoooooooooa it's a new month! And that means.. a new challenge awaits you stamping friends!


We'd like to inspire you with words like lime green, halloween, spooky, POISON, labels, fruit, bad, spoiled, witch's broom, skulls, droopy, blood, black, white, heritage, grungy, spots, distressed, leaves, stems, and more.
Don't forget the rules:
-Create a new project based on our inspiration board (it has to be posted this month, but you can certainly link up to other challenges as well!)
-Use at least one (but certainly more if you want) Viva Las VegaStamps! rubber stamps
(We are now allowing competitors stamps to be on your work, but please make VLVS! the focus of the project, thank you.)
-Post it to your blog with a link back to us
-Upload to our linky using your direct blog post link (You may also upload via facebook, flickr or other gallery)
You could win a Project Spotlight post on our blog + some new rubber of course.
And visit us back here for inspiration! 


Saturday, August 23, 2014

The Doctor is in....

WARNING: If you are easily offended or don't like strange or creepy themes this card may not be for you

Hello again everyone!!! It's me Tera again, today I am going to share the card I created for the VLVS Shaped Halloween Card swap on the Facebook VLVS Groupies page If you are not a member I recommend joining, So much fun and inspiration going on over there!!! 


Stamps Used: 

Coffee Ring Stain 2 3/4 x 2 1/4

Other Supplies-- 
A4 card cut into a file folder shape
Ink- Archival Black, Distress ink- Frayed Burlap, scattered straw, black soot, brick red
scrap paper (for making masks)
Marker Sprayer for distressing
make-up sponge or distress tool for additional shading
Tim Holtz Tiny Attacher/stapler 

Sizzix Movers & Shapers Die - Tag & Tie 

Scraps of orange paper (for the circles on the tag)cord/string
Black marker (fine point for writing and drawing lines) 
water spritzer optional
score tool/board optional
Scissors 
File folder to trace top of (or you can wing it! lol) 
Glossy Accents (or Glue of choice) 

To Begin cut your card Base - 8.5x 5.5 score or fold at 4.5 This gives you the long and short side of your file. On the long side trace the tab of your file , then on the short side trace the inward dip (make sure they are on the same side so it looks right). Cut out your base and admire ho cute this mini file is!

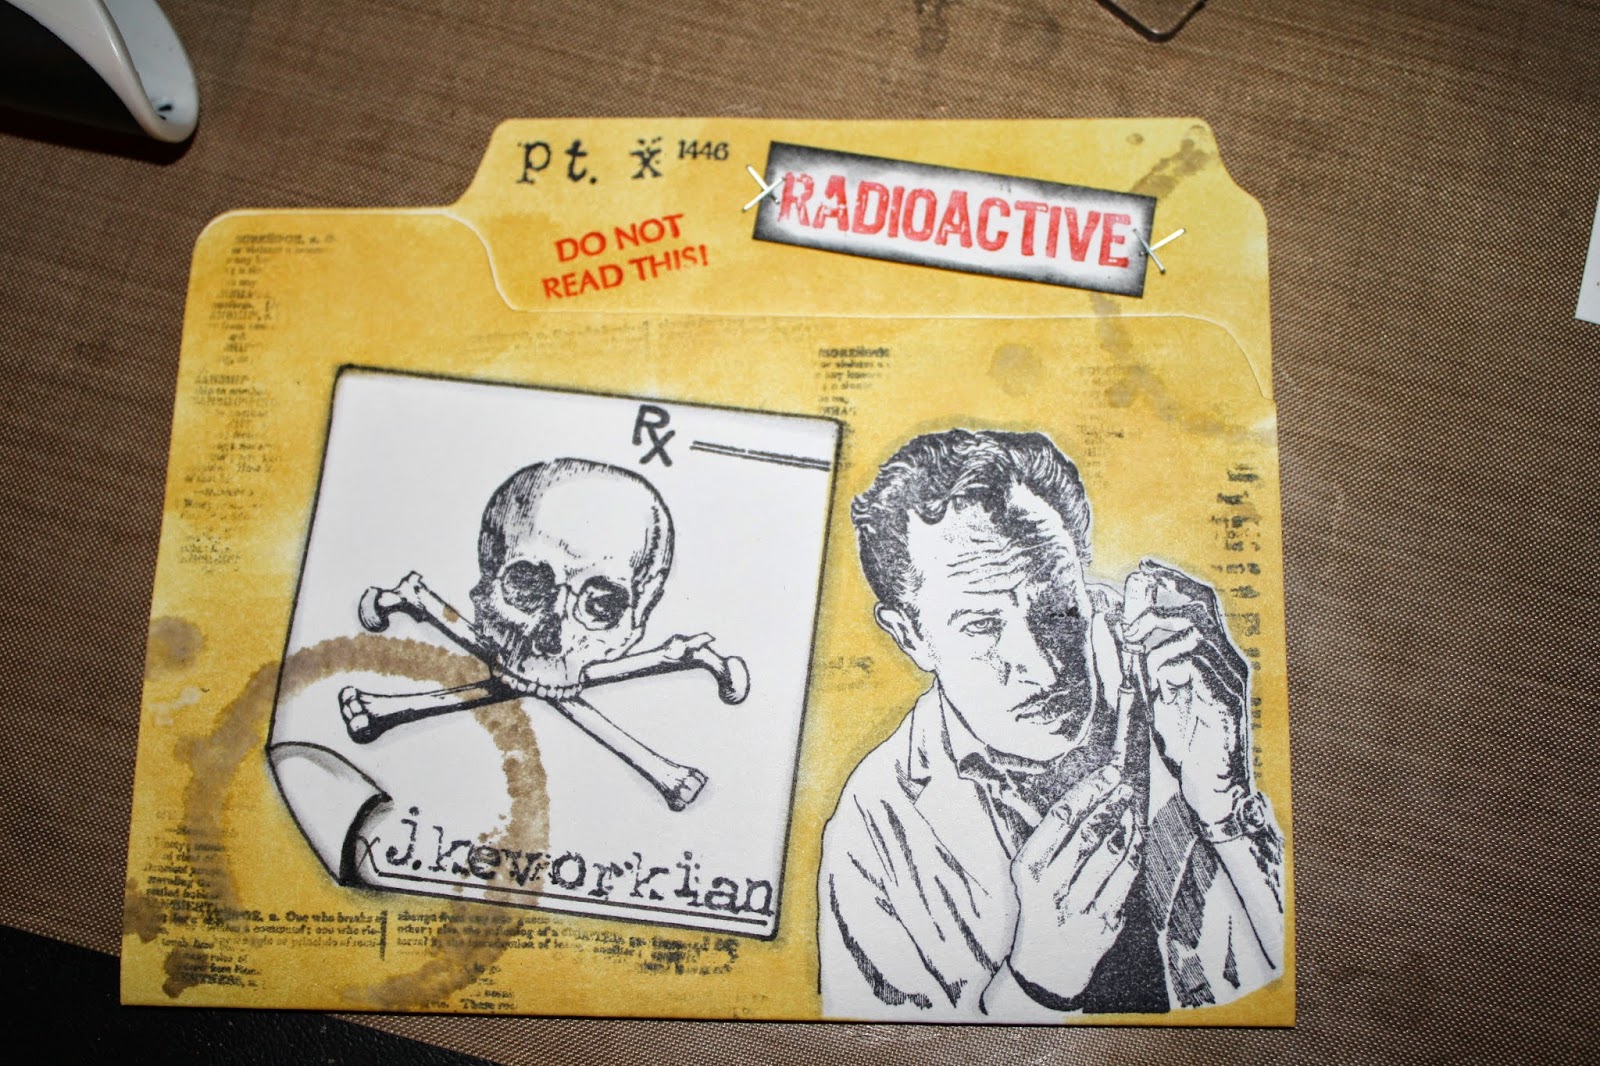
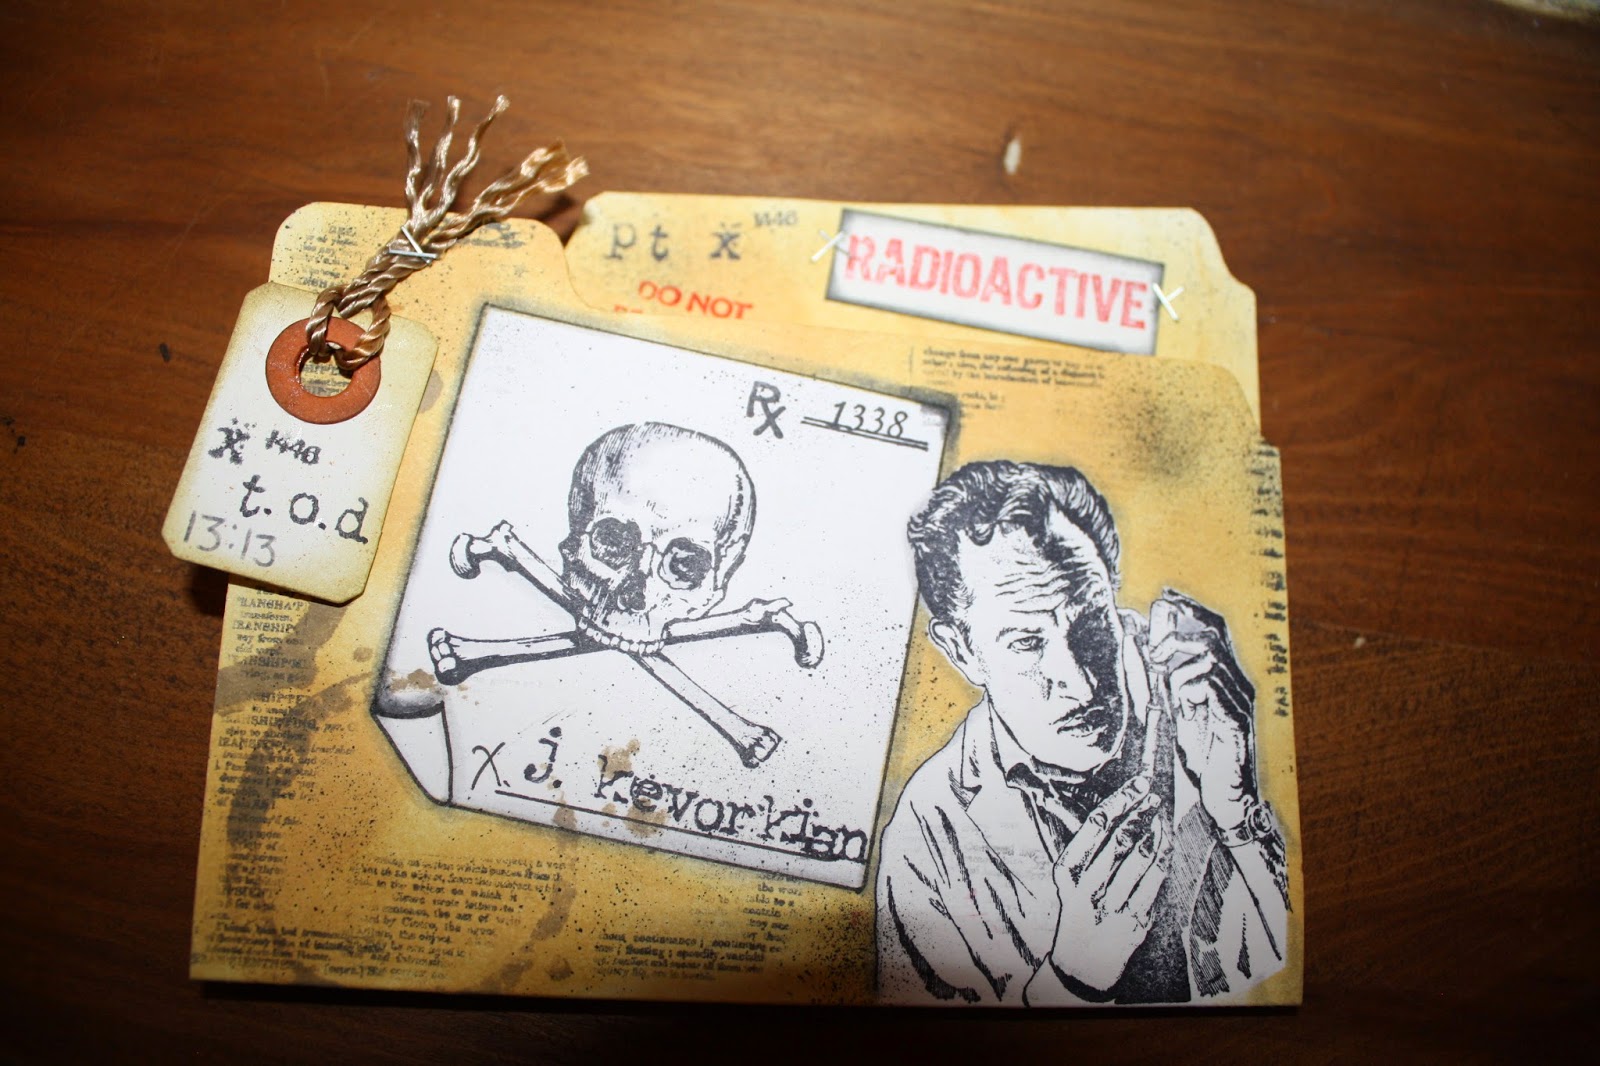
I start by stamping/drawing all of my masked off images in archival black ink: the Doctor was stamped then stamped on scrap paper to create a "mask" to protect it while i work, For the Rx pad, I traced my acrylic stamping block with a black marker leaving one corner open so i could draw it to look like folded paper. (You can also trace a post it not in your size of choice and you will save yourself from cutting out a "mask" for this.) I then traced it again on scrap paper to create a mask (and just folded the corner of the mask to match what i drew rather than guessing)


Next, stamp the skull, Rx pad with the Rx label from the Rx stamp (I cup mine out, so i can use it separate and still use the cute note box on other pieces : D ), and using the Type letters from plate 1430  I stamped out the J. Kevorkian (AKA "Dr. Death" get it a Rx for death, from Dr. Death himself... hehe) The Tiny #'s are numbers from the corners of the Plates of rubber : P Also stamp the patient (aka pt.) Name that you would like... Mine is patient X1446

Now, place both of your "mask" on to cover up your focal pieces. Get out your scattered straw ink and a makeup sponge and add color over the entire front of the card (careful not to move your masks). Set this aside to dry while you do this next step...


On a separate piece of paper stamp the "Radioactive" in red , then cut it out to look like a rectangle medical sticker "chart note"... Using the black soot distress the edge so that this will pop against the background! Also While you have the red out stamp the "Do Not Read This!" on the file tab
  (After All this is a confidential patient file!) 
Attach the radioactive "sticker" using your tiny attacher/stapler


Back  to the file, Sporadically stamp the dictionary page stamp to distress the file....Remove your masks (admire your clean work...now we are going to grunge it up more!) Using your frayed burlap distress ink, ink up the coffee ring stamp (I spritzed my stamp with water at this point to give it the wet/watery coffee look but you don't have too) then stamped as if coffee had sat on the file and Rx script

Take the marker spritzer with the black soot Distress marker and add some grunge all over where you feel it's to "clean" and bright!  


Cut out the tab in plain card stock (bread tie looking thing) then 2 of the reinforcing circles in orange .  Distress the pieces with the frayed burlap, then glue the circles on the front and back to reinforce the piece to look like the "Toe Tag". Tie yours cord around it and attach with the tiny attacher

Enjoy your spooktacular work!!!
Below I have a few more views : P