Showing posts with label canvas. Show all posts

Monday, May 30, 2022

Yes, I can ► Majo


Hello, Friends,

 I show you a little canvas that started out as an accident. I had covered it with different colors of ink, then disliked it and again partly covered it with gesso, now it fits.


I stamped the lady and the sentiment on tissue. After drying I added some more ink and distressed the edges.

 I added the loops and the twine and ready is another piece for the wall of my studio.


 I have used the following stamps:


Tina Walker Spiky Hair Scribble Girl 2

(Plate 1517)

 Yes, I Can by Cat Kerr

(Plate 1483)

 Have a good week, and stay safe.

 Luv ya


Friday, September 16, 2016

Skulls and bones


Hi all!!
This months inspiration challenge is SPOOKTACULAR!!


Michele here today with some challenge inspiration...this month I did a canvas inspired by bones, skeletons, spooky, creepy halloween!

I have a little tutorial on the background to share but first, here is my canvas.


I started building my background with an Um Wow Studio stencil and some heavy gesso.


While that was drying I used some of the Tim Holtz tissue and stamped the Skull several times in grey ink.


In black archival ink I stamped the Humerus Bone around the edge of the canvas.


On the canvas I sprayed Antique Linen Distress Spray and water.


After some dry time...I used matt medium to put down the tissue.


I did a little random stamping with the Smear/Smudge and Ink Drips with brown archival inks.


The skulls on the tissue look like a watermark!!


I just love background stamping!!


And a look at the crackle in my resin skull cast using Amazing Casting Products.  Thanks to Tina Walker for the use of her mold!!!
I also used a chip cobweb from Um Wow Studios, a fuzzy spider from my stash, black thread, thickers and cheese cloth srayed with Distress Spray.


I hope you are inspired!!!  You can link up your creation here.

Until next time, get inky!!

Tuesday, September 13, 2016

Mixed Media Canvas by Jenn Engle

Hey everyone! I have a 4x4 canvas to share with you today. I used this Banksy stamp and made it into a really cool 3 dimensional piece for my canvas. Be sure to check out the video to see exactly how I made this project.

Stamp Used:


Check out the process video to see exactly how I made this canvas!
(All supplies listed & linked at the bottom of this post)

This is a very photo heavy post because I wanted you to get the best idea of how this looks in real life. There are so many different elements to it that look different when the light hits in different ways!

In the photo above and below, you can see my girl's fishing line is actually a thin wire that's 3-D!


 The brown color is instant coffee. I love using instant coffee because it gives this perfect vintage brown color that I have not been able to replicate elsewhere. Plus it smells super good!
 

Thanks for looking!
~Jenn


PLACES TO FIND ME:
Instagram @mixedmediajenn
Email is the easiest way to get a quick response from me:

Thursday, September 03, 2015

Freaks are everywhere!

Hi my dear Viva Las Vegastamps Friends!

I'd like to share a 4" by 4" Canvas today. I used the "Whimsical Horned Boy" from the newest Viva Las Vegastamps release. The background of my canvas is colored with a mix of Viva Decor Inka Gold and Gesso. After this layer was dry I used my Neocolor II watercolor crayons to add more color. I just add the color randomly until I liked the result. To finialize the background I used uniPOSCA markers and a red acrylic marker to add some doodling.

I stamped the main image with jet black Archival Ink onto white paper and colored it with Faber-Castell Pitt Artist Pens. I add the image to the canvas using Gel Medium. I stamped the "Freaks" three times on white paper as well and adhered it to my canvas. I colored the words with watercolor pencils and drew a black frame.

Thank you for stopping by today! Susanne.


Viva Las Vegastamps:
Whimsical Horned Boy
Freaks

Tuesday, June 23, 2015

Altered Canvas by Shanna

Hey everyone. Shanna here today to share with you a fun creation. 
I have been wanting to play with this resins I got and had no clue what to do with them. Well I figured that out really quick! What do you think?


I did create a video so check it out. 


I loved using my stamps to create the background of this piece. 


I added some glass beads and glass glitter with a matte gel on some of the corners. 


Of course there is no glass on this but I thought the sentiment stamp Through The Looking Glass - 19353 was fitting. 


The stamp Pair of Butterfly Wings - 19647 went perfectly off the side of the frame too. 


Items Used:


Friday, May 15, 2015

Guest Designer : Sheri Levitt x2

Today we are being joined by the talented Sheri Levitt again.


HI everyone Sheri here again. I'm back for my second Guest DT project.


I had gotten a couple of these 5x7 canvases at the thrift store last year. One day I was looking through my boxes in my craft room (yes my craft room is still not totally unpacked yet.) I found these so I took one to use for my guest DT.

I glued down a black and white paisley napkin with matte medium. I then took some water down yellow and pink craft paint on the canvas. Didn't like how that looked so I used magenta craft paint and painted over the canvas. 
 
 
Next I stamped the Line of Chevrons and the 6 hexagon stamps using black craft paint. I had some white lace in my stash that I sprayed with Black Dylusion spray. after it dried I glued it on the canvas with Helmar 450 quick dry.I made some drips with the Black Dylisons spray and Tinsel Color Shine by Heidi Swapp. I then I glued down the silver beaded trim and the black pearl trim to hide the lack of color when I spayed water to make the drips. Finally for the background I felt it needed some white, So I used the heart confetti stencil by UmWowStudio with White Linen Dylusion spray. I also painted the edges of the canvas with black craft paint.
 

I stamped the Umbrella Girl on white cardstock and colored her with Artist Loft Watercolors and the pearlesent watercolors also by Artist Loft.  The girl I used foam tape and glued her onto the canvas. The I'm a fruit Loop sentiment I stamped on with Black Versafine ink pad on white cardstock, and glued onto the canvas.


Friday, February 27, 2015

Guest Designer >> Tiffany Goff Smith

We're welcoming back Tiffany Goff Smith for her second post as our February Guest Designer! 


Hello Tiffany back again with one more project I designed. My goal is to have an online workshop (my very first) soon and it will be on painting purses and wallets.


Do not limit your creativity to just paper or canvas. There is so much else out there you can paint and recycle. I love to go to the thrift store and find things to recycle and see how paint works on them.


This project I used a canvas wallet and layer upon layer built it up with using theses stamps with ink and paint. Yes its ok to use your stamps with acrylic paints just make sure that you clean them as soon as you are through using them.


The stamps that I used added fantastic elements to the piece. Thanks so much for checking out my project and check on my blog to see when the class will be posted.

Writing Circles BG
Double Coffee Rings
Staple X
Mesh Background
Invoice / Waybill

Friday, October 03, 2014

Zombie Gnomes Mini Canvas


Goood morning, and a very happy October to you! This month is always my favorite....with the spooky stories and things to see, the falling bright leaves, crisp apples, and chubby pumpkins, October is a delight!
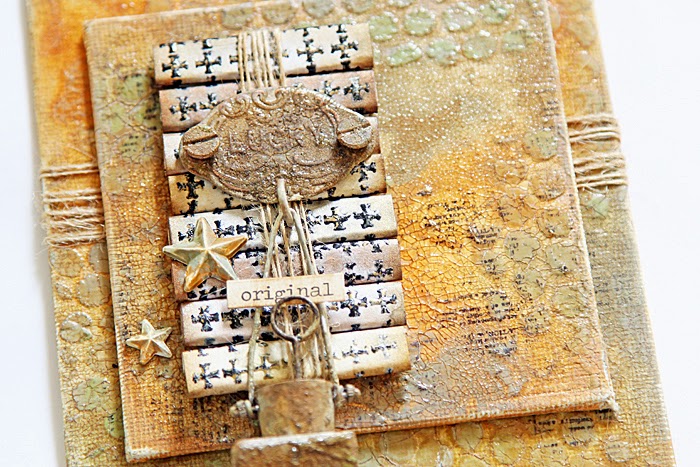
Today I have a mini canvas to share (it is 4x5) that I created to bring a little Halloween into Sparkling Gnome Studios.


To begin my canvas, I added some rust, silver, and orange paints to the canvas in small amounts, and then smoothed them out, also including the 4 outsides of the canvas. I had a faux "newspaper" from a local restaurant here in Des Moines, called "Zombie Burger," that had all kinds of funny headlines pertaining to the zombie apocalypse. I cut those on and collaged them onto the page, along with some dark papers from 7 Dots Studio's Cold Country collection. When the glue had dried, I added just a few dots of gesso, and smoothed it over the collaged areas, to mute it somewhat. I wanted my zombie/skeleton gnomes to be the focus.
My next layer was stamping using the Writing Background 4x4, to add a bit of a vintage vibe. The rest was layering on trims and washi tapes until I felt the layering was complete.


I used the awesome Gnome Lady Skeleton as well as the Gnome Skeleton and stamped them onto cardstock, using Memento Ink in Tuxedo Black. I colored them lightly with watercolor, and placed them on the canvas using 3D foam dots.
The gnomes look so calm and casual, I thought they needed something to be casual about, so I added an UmWowStudio chipboard piece, with zombie hands, at the bottom of the piece.
I'm so excited about how this little canvas came out, and I already have it on the wall in my studio. These gnomes may not sparkle, but they have edge, which definitely has a place in my creative space.
Thanks so much for having a look today, and a very happy fall day to you!
~Amy

Supply List:
Viva Las VegaStamps! Gnome Lady Skeleton, Gnome Skeleton, Writing Background
Ink: Tsukineko/Imagine Crafts, Ranger
Paint: 13 Arts, Folk Art (Plaid), Sakura
Trims: Webster's Pages
Washi Tape: Tim Holtz
Paper: 7 Dots Studio
Chipboard: UmWowStudio

Tuesday, September 23, 2014

Creating texture with stamps and stencils

Hello and Happy Tuesday!

Tina here today with a dimensional Mini Canvas project that is FULL of texture created by using Stamps and Stencils - two of my favorite tools!


If you only had a couple of favorite stamps and a stencil or two, you could create an unlimited number of unique canvases!  The possibilities are endless.

To create my background texture, I applied Shimmerz Dazzelerz through a Crafters Workshop stencil and let dry completely.  I then applied several shades of Distress Paint (over the stenciled pattern) and let the colors mix and blend.


For more texture, I covered both canvases with a layer of Crackle Paint.  Once dry, I applied Distress Ink (watered down) and allowed the ink to seep into the cracks.


I added a bit of stamping, using the Dictionary Page stamp.  This added more texture and interest.

To create my focal point, I heat embossed a sheet of heavy cardstock, using the Design Crosses 2x2 stamp.  I then painted each square with Shimmerz Inklingz, cut each stamped image out, then rolled each square into a flat piece.


I glued each rolled square to a scrap piece of cardboard, and wrapped twine around the entire piece.

To finish my canvas, I added several metal embellishments, painted and enhanced to match the colors of the canvas.


Done!

How do you create texture on canvases?  Please share your tips and ideas!  I am always looking for new ways to create!

Thanks for stopping by!  Have a wonderful day!


Thursday, September 18, 2014

Family Love Vintage Style Collage


Greetings stampers! It's Amy blogging today, to share a vintage style collaged canvas. I have 7 different Viva Las VegaStamps! on this canvas, and I think they all work so well together.

  I started by prepping a 12x12 canvas board with...of all things, a sample of Benjamin Moore blue paint I picked up at the hardware store for $1. I then layered on vintage style papers, layering them on with Mod Podge. When this had dried, I added layers of mists in light browns, and spread them on with a brayer. A layer of white acrylic paint was the final of the canvas layers. 
The fourth layer on this canvas is the background stamping, where I used the checkerboard and cursive writing stamps randomly all over. I kept the harlequin diamond stamping just over the area where my photo cluster would be. 
 After layering on vintage papers and elements, I stamped the Bee Cards, Paintbrushes in Jar, and Pen Tips onto untextured cardstock, and fussy cut them out. Adding them throughout the clustered area of the collage, gave the perfect unique vintage touch.


 The Directional Wheel stamp added a perfect bit of movement on the bottom and top corners of my layered cluster. I love the look and how it blends seamlessly with the style of the piece.

I'm really excited with how this canvas turned out, and I hope you enjoyed seeing it too! I hope you have a creative rest of the week! <3

Supply List:
Viva Las VegaStamps!:
Backgrounds: checkerboard, cursive writing, Harlequin Diamond.
Other: Bee Cards, Paint Brushes in Jar, Pen Tips, Directional Wheel.

Canvas board
Ink: IMAGINE Crafts, Ranger
Paint: Benjamin Moore,Plaid Crafts
Mist: 13 Arts, Tattered Angels
Paper: Tim Holtz, 7 Dots Studio, Vintage
Metals: Prima, Bead Landing, Vintage
Photograph: The Sparkling Gnome