Showing posts with label valentine. Show all posts

Tuesday, February 13, 2024

Forever Yours by Tracy Blackwolf

 Hello Everyone!

Todays project is a card for Valentines day- Enjoy!


I started with the background, I sprayed distress stain saltwater taffy first.  Then spread it around with a paint brush. next I sprayed some lost shadow and last, black soot. I let them run the card as it stood up to get a blend.

Then I added some lumberjack plaid -red
Then I dried it with my heat tool. Next I cut out Poe and the Raven. The wings I've had in my stash but they were browns so I sprayed them with Black soot distress stain

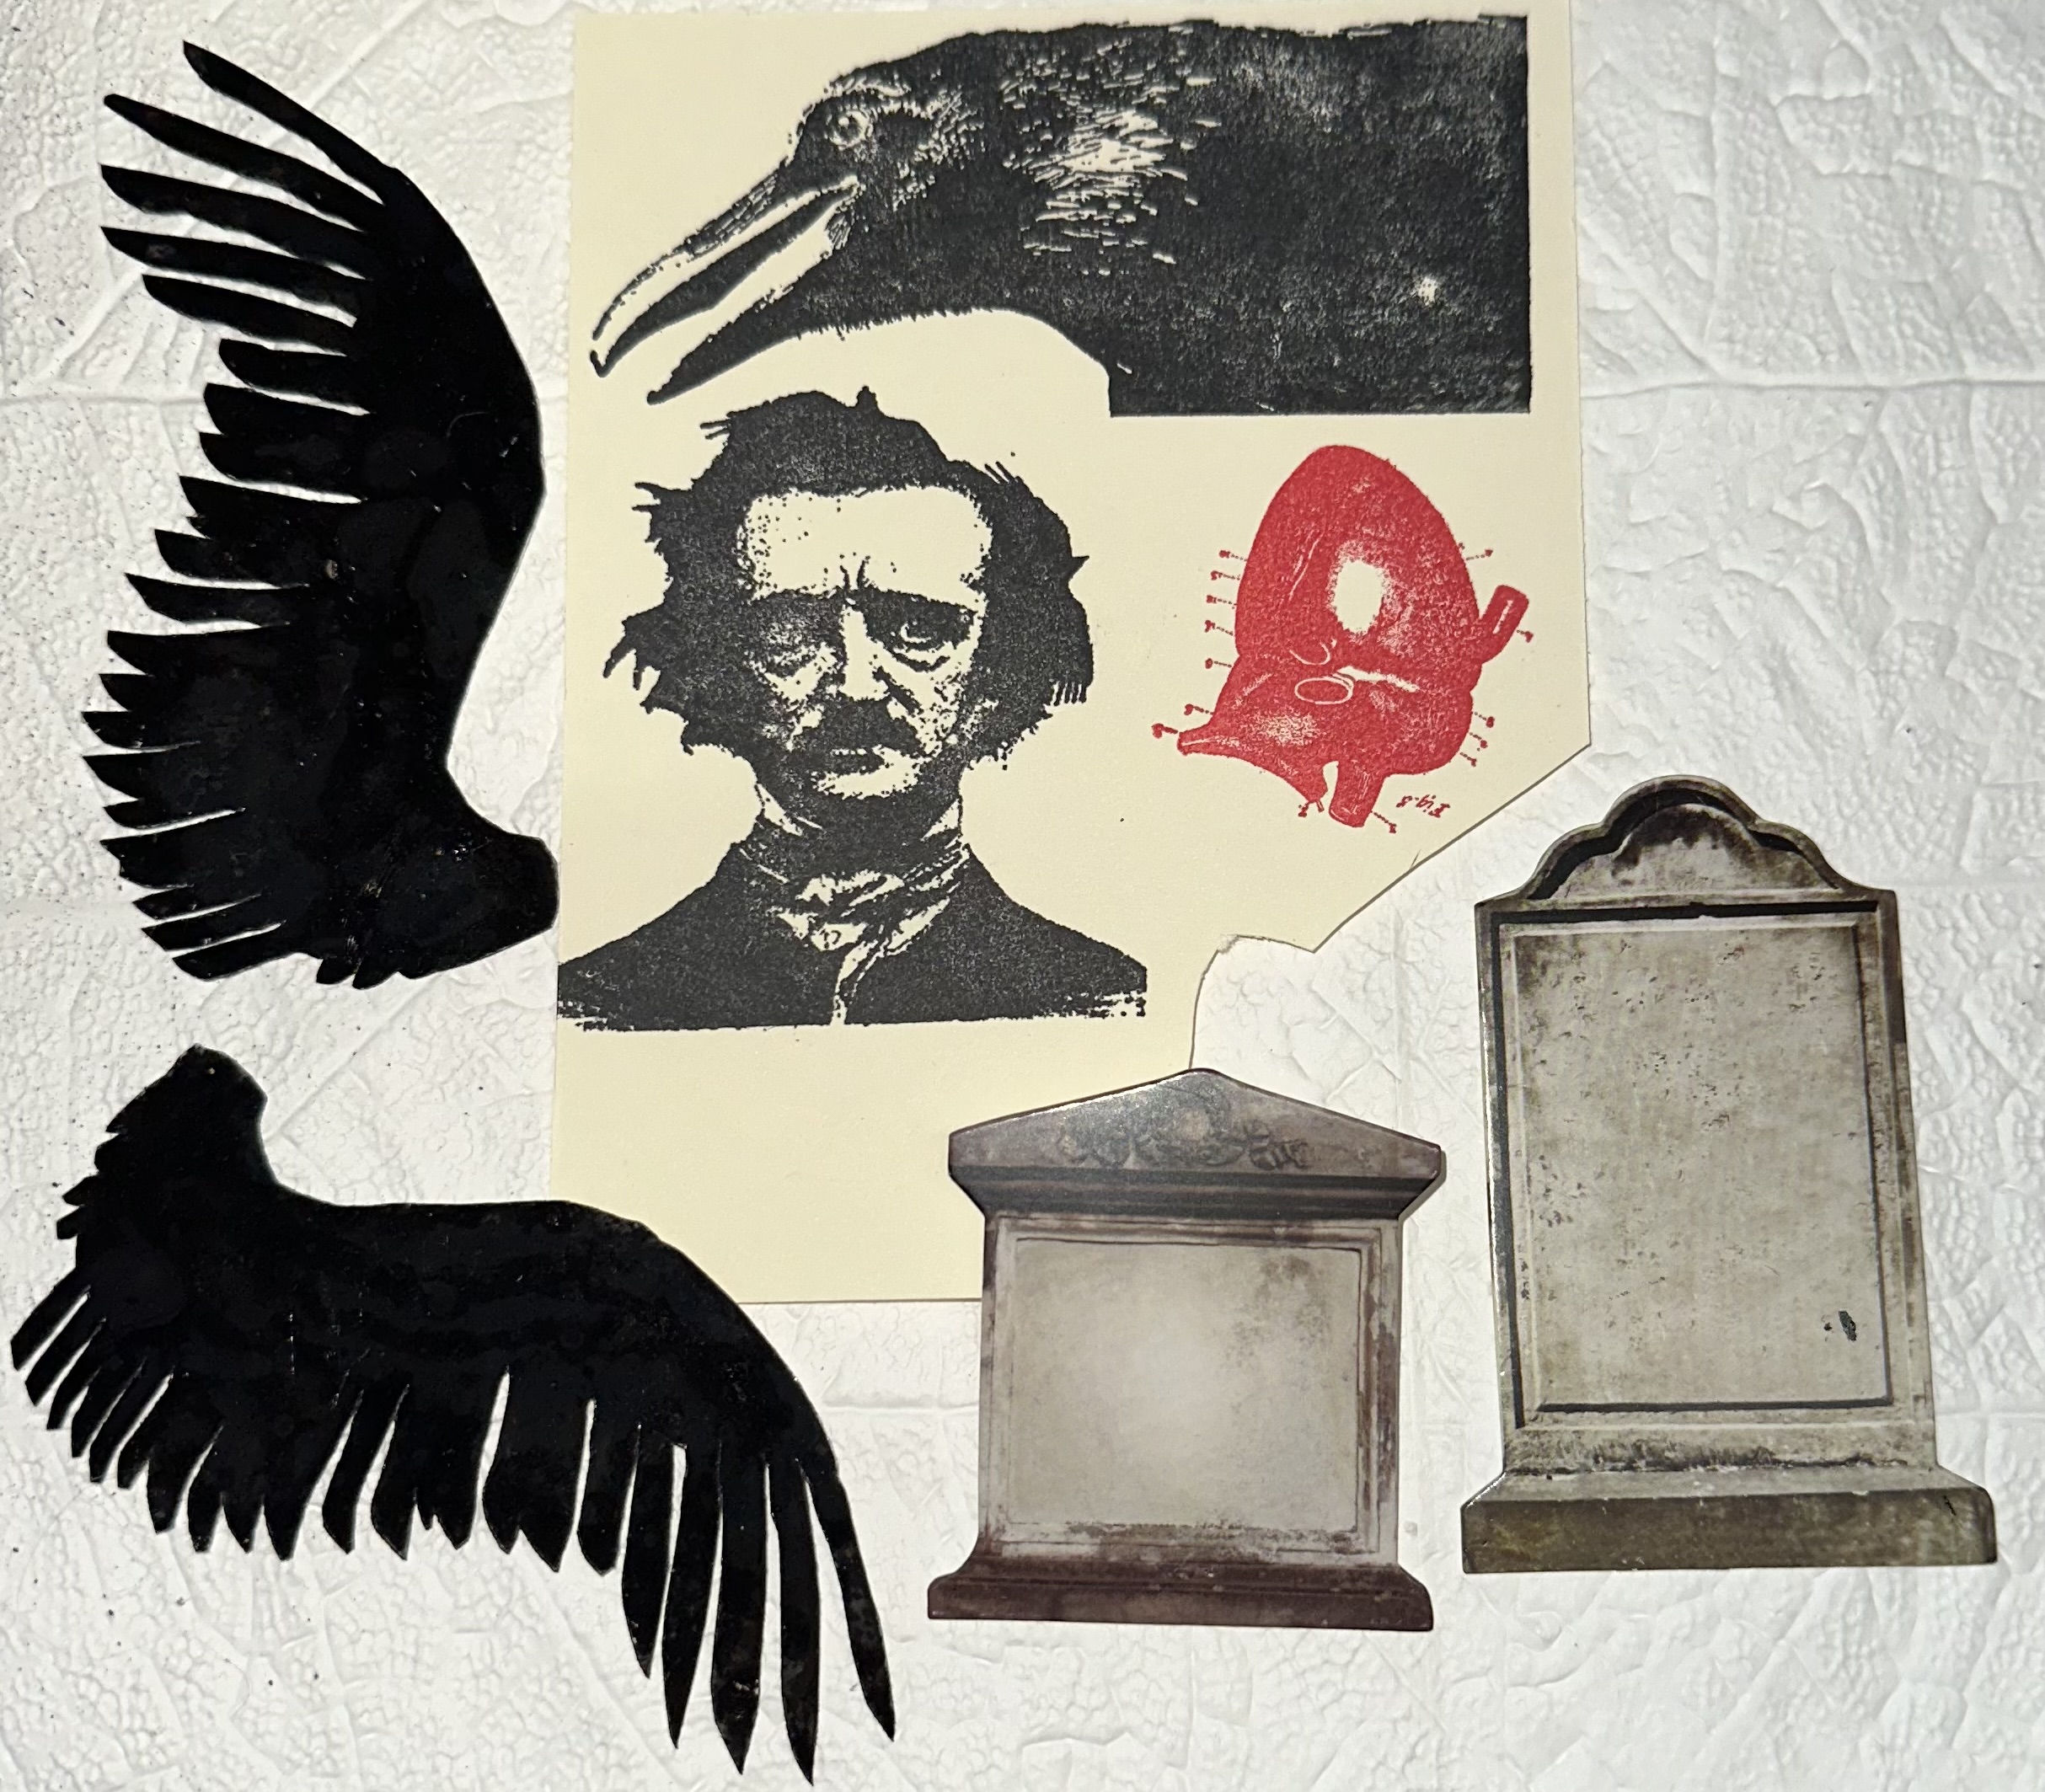
I fussy cut everything out. The heart I added Glossy accents for that shine. The sentiment I typed up on my computer and added to the head stone. Painted Poe and the raven and used foam tape on some and just double stick tape on the rest. 
Last I layered onto red and black cardstock.

I hope you enjoyed this weeks project.

Stamps used:
Heart diagram       19097
Poe                         19900
Crow/Raven            20269

Other Supplies:
Distress spray stains-Black soot, lost shadow, lumberjack plaid, Shaded lilac, saltwater taffy

Wings- computer generated
sentiment- Computer generated
Headstones- Retro cafe art


Monday, January 07, 2019

Queen of Hearts Mail Art Monday

Hello Crafty Friends!!

Hope you are having a fabulous
Mail Art Monday!


Stamps Used:
(all 3 main stamps are on this plate <3 )


Today I want to share a little Valentines themed happy mail!


I just love this sassy queen! I started by stamping my beautiful queen and quote in memento ink on my A2 card base and envelope.  I used blick alcohol inks to color my queen. I masked off the queen then used Distress inks in Picked raspberry, worn lipstick, and festive berries.  I used Tim Holtz layering stencils to add extra details in the background. 


On the envelope I stamped my hearts in distress ink, festive berries. Using the same color, I stamped the french writing on the card background. 


To finish everything off, I flicked some perfect pearls mist in heirloom gold. 


I hope you are all inspired to create some fun mail art and Valentines love. <3 


Friday, February 02, 2018

Mermaids and Monthly Inspiration...

Hello Crafty Friends!!!

I hope you are all as excited as I am about another monthly inspiration.  I love this month's inspiration board (of course what's not to love about mermaids?!)


I used the inspiration and I also added a little Valentine twist...


STAMPS USED:
XO
You are Beautiful
Bettie Mermaid
Miracle tape (not stamp but vlvs)

OTHER PRODUCTS:
White cardstock base
Black cardstock
Pink cardstock
Distress ink- worn lipstick, festive berries
Memento ink- tuxedo black
Markers/Pens-zig clean color, blick alcohol-based markers, gelly roller pens, and wink of Stella
Glitter (various pinks)
Foam tape (I created my own with fun foam)
Distress Collage medium (as a wet glue for my mermaid... cant have glitter getting stuck)


I love shaker cards, but rarely ever make them.  I am super excited with how this one came out.  This one is going to be a Valentine card for someone special (Don't want to spoil the surprise by saying whom for).

I started with a white A2 card base, a black matte, and a pink card stock base. The top layer of the card was created with more black card stock, and some clear acetate from some packaging I had lying around.


On my pink card stock i started by stamping the XO stamp in "worn lipstick" and "festive berries" distress ink.  I also stamped "you are beautiful" in black memento ink on the pink card base.

On a separate piece of card stock I stamped my Bettie mermaid in black memento ink.  I colored my image with various markers (zig clean color, blick alcohol-based markers, gelli roller pens, and wink of Stella).


(before top shaker layer added)


(Close up of glitter goodness inside the card!)


(different angle so you can see all that glitter in the shaker!!!)

I hope you enjoy this card as much as I do. :)
Don't forget to join in the challenge!!
(There are prizes to be won!)


Wednesday, January 30, 2013

Making Backgrounds!

It is always fun to try new techniques using what is around the house, shop/garage or in our creative supply stash.  Today's post is about making backgrounds. 

Faux Wood Background
This is an ATC from a SWAP... The theme of the swap was "FROM THE SHOP." My shop items are masking tape and locking washers! over lapping layers of Masking Tape on the base card stock (2 1/2 x 3 1/2), swipe with Chocolate Brown. Stamp VLVS! Harlequin Diamond Background with Barn Red after stamping off. Note: stamping off is inking the stamp then stamping on another sheet of paper before on the actual project.  Next stamp the VLVS! Easy Dog Rider and Route 66 Road Sign with Black. Cover the entire card with VLVS! Ultra High Gloss Embossing Powder, heat the embossing powder until clear, this gives the card a nice finish. Add locking washers (available at the hardware store) for embellishment and a touch of color with COPICS.

Supplies:
VLVS! Stamp Harlequin Diamond Background
VLVS! Easy Dog Rider
VLVS! Route 66 Road Sign
VLVS! Ultra High Gloss Embossing Powder
Masking Tape (shop)
Card stock
Inks: Chocolate Brown, Barn Red and Black
Heat Emboss Gun
Locking Washers(shop)
COPICS

RESIST With
Stamp the VLVS! Nike Statue and VLVS! Two Columns in the back ground with white ink (one statue with violet ink), using masks to keep from stamping over previously stamped images. Heat emboss with VLVS! Ultra High Gloss Embossing Powder.  Spritz with mists, wipe the mist from the embossed images. Randomly stamp VLVS! Swirls to create borders with violet ink. Ink May Arts Lace with chocolate ink and adhere with VLVS! Miracle Tape. What a great background!!!
Supplies:
Journal Clairfontaine
Ink White - Violet - Chocolate
Mist - Winter Grass Stewart Superior
Mist - Sandalwood 
Add VLVS! Lady with Arms stamped on Kromecote Cardstock, fuzzy cut and add her in the foreground.  


Washi Tape Background
To see step by step instuctions on making your own Washi Tape check out Dee Dee's Washi Tape Tutorial posted earlier this week. It is well worth watching!!!
For this card place VLVS! Miracle Tape 1 inch on white tissue. Use an dauber or sponge to apply brown ink directly to the white tissue. 
Randomly stamp images of VLVS! stamps Draw,Pen TipsPointed Pen TipA Drawing Is and This is where I draw the line on the tissue. Note: the images are partially stamped on the tape. Now you have beautiful one of a kind Washi Tape.   
For this card the Washi Tape was cut to fit the card stock panel and used as a background. A few pen nibs were added in the lower left.  Stamp the VLVS! Feather Pen Collage on coordinating card stock and mount with foam tape.
Supplies:

White Tissue (dollar store)
Pen Nibs (thrift store)
Card stock
Ink Brown & Black

Curtains
Another background can be done using VLVS! Stage Curtains stamps to create a mini stage. This is a background I used last weekend when the VLVS! Design Team had their fantastic blog hop BLAST FROM THE PAST using VLVS! Oldie But Goodies Stamps! My stamp was the VLVS! MAN WITH HOOP! Here I created an altered tin with a stage.


Supplies:
VLVS! MAN WITH HOOP
VLVS! Chevron Banner
VLVS! Stage Curtains
VLVS! Ultra High Gloss Embossing Powder
May Arts Ribbon & Fibers
Altoid Tin
Transparency
Cream card stock
Pink Card stock
Black ink
Red ink
Stickles
Sakura Crystal Lacquer
Hearts Made from Creative Paperclay®
Be Mine - Sticker
Foam Tape
Small blocks


Now is the time to stock up on your Viva Las VegaStamps! 
They are now  47% OFF!!! 

Tuesday, January 22, 2013

"Love Bites..." a Valentine for the Twilight Fans!

Its Tuesday at Viva Las Vegastamps!...WELCOME to the PARTY!! Susan here today bringing you some Valentine inspiration ... complete with a Vampiress!


I have just returned from a whirlwind EXCITING week at CHA and YES!!! I got the pleasure of finally meeting DeeDee in person, as we were demoing together at the Amazing Mold Putty Booth. She is genuinely friendly, fun and bubbly and I have to say our shared love of stamps and everything creative made us immediate crafty pals for life! I'm already planning for my trip to Vegas in April to see my favorite "hair band" Def Leppard whose ballad "Love Bites" is the inspiration for this Valentine ATC {and to sneek off for a few hours to VLVS! to see DeeDee, too}.

I have inspiration overload from CHA - everything and anything has went into this, too many techniques to share them all in one post. What I will share is that - break out those off-season holiday stamps and make them work for other holidays! I've used stamps from Halloween, Christmas and others to make this ATC. Just play around and have FUN getting inky!!!


For the detail on the heart, I melted several layers of gold embossing powder onto a chipboard heart. I inked the gear heart with black pigment ink, reheated the gold embossing powder and pressed stamp into the hot melted embossing powder. For balance, I stamped the words "love bites" and embossed with gold embossing powder to finish this "Vampy Vixen" ATC off right. The golden heart is finished off with a ruffle fashioned out of crepe paper stamped with "23, 24, 25 measuring tape" from PLATE 1430.


Thanks so much for dropping by. If you have a little time... check out what the rest of the Viva Las Vegastamps! Design Team has been up to or head on over to the Viva Las Vegastamps! store - for all your stamping needs and for every occasion...and MIRACLE TAPE, too!

If you would like to see more of my creations please visit my blog, sbartist : painting in the dark HERE. I'll be back with another stamping adventure real soon! Hope you have an inky day! Sb

Wednesday, January 16, 2013

Singin' in the Rain

The husband and I grew up on opposite sides of the country. He’s from California and I am from New Jersey. I enjoy cool weather, whereas he wants the heat on when it’s 73 in the house. I would sleep with the windows open every day and night while he wears sweats 365 days a year. There is however one type of weather that we both love – rain. We agree there is nothing nicer than staying in when the weather is damp and gloomy. A log in the fireplace, hot soup and grilled cheese sandwiches – the husband makes the best grilled cheese ever – and we are exactly where we want to be.

One of the things I love about being on the design team of VLVS is looking through their incredible variety of stamps. I went in search for stamps to make a card for the husband. I didn’t want it too cute, and it had to be meaningful for the two of us. When I saw these stamps -Vintage Man With Umbrella and You make even the rainy days special. I knew I had found what I was looking for.


This has to be one of the easiest cards I have ever made.
Got it completed in less than 10 minutes.
Who said the longer something takes the better it is? Not this gal.
Supplies
White Cardstock
Kraft Paper
Patterned Paper
MS Heart Punch and a scrap of red paper
Miracle Tape
Vintage Man With Umbrella VLVS
You make even the rainy days special. VLVS

Directions
I took a 5 1/2" x 8" piece of cardstock, folded it in half and set aside. For the cover I cut a 2 1/2" x 3 1/4" piece of Kraft paper and stamped the Vintage Man With Umbrella. I layered this with a 2 3/4" x 3 1/2" piece of red paper on top of a and 3" x 3 1/2" piece of patterned paper. I adhered to the cardstock using Miracle Tape. I then stamped the You make even the rainy days special.sentiment on the bottom of the card. For the inside I layered with Kraft paper and white cardstock. I topped the cover off by gluing on a handful of mini red hearts.

The husband has my heart. Who has yours?