Wednesday, February 12, 2014

To The Circus.

Hello, Mary here, with a sweet and simple card today.
 
I absolutely fell in LOVE with this adorable Whimsical Elephant image when I saw it!  I knew instantly that I just had to color her up :-)
 
So, that's just what I did!
 
I started by stamping her onto a sheet of Neenah Solar White cardstock with Memento ink in Tuxedo Black, and proceeded to add some Copic color in a teal and red color combo.
 
 
I love how the brightness of the image just pops against the white of the paper!


To add a bit more interest to my background, I stamped the same Whimsical Elephant stamp through a circle mask!  You'd never know those polka dots came from the same stamp, eh?!!?
 
I decided to add only minimal color around the dots to keep them looking very much like I doodled them on.
 
A bit of stitched on vellum and a few sequins for sparkle, and she is complete and ready to brighten the day of someone special.


Ok guys, that's it for me!!  I hope you have a fabulously crafty day!!
 
xx Mary

Tuesday, February 11, 2014

Journal cover


Hi Hermine here, Made this art journal cover for Journal 52, this event started in january already but  I couldn't decide how to make the cover untill last week.


This cover is made with the gelli plate. Put different colours acryllic paint on your gelli plate, then put some contrasting colours on a lid and stamp the circles onto the gelli plate. Put your cardstock on the gelli plate to lift the paint. Stamp the alphabet from the December Daily plate on this bakcground with Stazon black ink. Put aside  for a while to make the border. Stamp with different colours the line of Chevrons 18965 - Plaid 19336 - Washi reverse grid 19075 - Washi grid background 19074 - Washi Chevron background 19072  and Washi Lines background 19073 on white cardstock and cut to size. Glue the gelli print onto a piece of cardstock that is larger then the print and glue pieces of the border in place. Make some shadow with Lyra crayons and a waterbrush. Stamp the Whimsical Collage 19360 on a piece of Kromecote with Stazon black and colour with alchol ink markers and cut out. Glue this on the gelliprint. Use the December Daily plate 1430 to make the word journal and the five and 2, cut out. And glue on the gelliprint. Make some accents with a black marker. Finally glue the die-cut keys in place. Then glue the finished piece on the cover with miracle tape.


Here a sneek peek in my journal, these are the pages for week 1 and 2, for which I used VLVS images.


And because I was left with a piece of gelli print I decided to make a card out of it. I stamped Make a Wish 19040 on the background with Colorbox Chalkink. Then I took a piece of transparant sheet stamped the flying eye insect 19356 on it with Versamark and embossed with black embossing powder. Stapled them together with a stapler without staples and because that leaves holes you can thread ribbon through it to tie around the card. On the card itself I used distress ink and stamped the triangle banner 19043 at one side.


hope this will inspire you. I for one had lots of fun making these.


Warmly Hermine


Used materials:


Monday, February 10, 2014

January Challenge WINNER

Hiii! Here to announce January's challenge winner

....

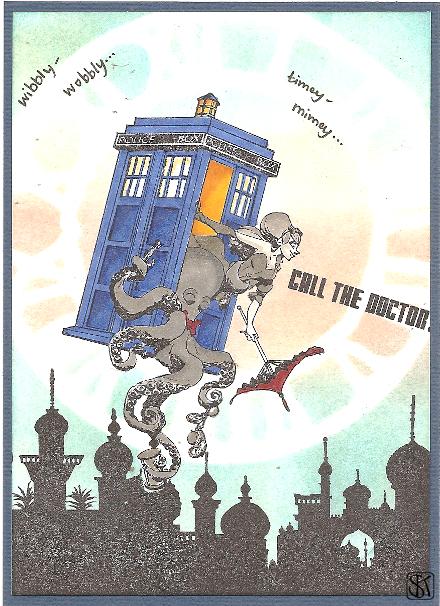
SVENJA!!! with this beauty:


Love this whole compilation! She's used Docto Who, Call The Doctor, and Eastern Skyline. Very well done, Svenja! Thanks so much for joining us :) Email me @ deedee430@gmail.com with your address and we'll get you some rubber. 

Don't forget to enter our CURRENT CHALLENGE.

Friday, February 07, 2014

Love Is A Work Of Heart

Hello its me Tera Again!
Happy Early Valentines Day to all of you! 
For my piece today I want to share a special layout that I made for my brother and his girlfriend. 
(Shhh... This is a surprise so don't tell them yet hehe...)


For this Layout I wanted to use depth and color to highlight the focal images. I chose to use corrugated board and my favorite kiwi colored tattered angels spray (over a layer of Gesso to keep it's truest color). Since this will be placed in a shadow box frame, I wasn't worried about the thickness of the embellishments. 

Stamps Used here: 

Love Is A Work 2 x 2

Large Arrow Heart 2 x 1 3/4

Eyes Looking Left 1 x 3 (which I didn't end up using in the final piece)


I started by inking the stamped images that I thought I would use, and cutting them out. 
I then arranged them around the photo and adhered them with miracle tape. 


I also decided to really spruce things up but adding some fun UmWow Studio Chipboard Star Confetti
 and the inside of the UmWow Chipboard Contoured Feather! 


Now that you've seen this super simple layout, Who's ready to get stamping!?!
Don't forget about the ongoing February challenge and that you can also share your creations on the Viva Las VegaStamps! Groupies Facebook page too!!  


Thursday, February 06, 2014

Be mine

Hello all, Nataliya is here :)
Valentine's Day is coming and it's time to make a card for a loved one!
I made ​​this mini, of course with a butterfly :)


I love volume, multilayer work and always use 3D adhesive tape.


To create the background I used this VLVS!:

Lace Background 2 1/2 x 6 1/2

Harlequin Diamond Background 4 1/2 x 5 3/4


Wings is a stamp with clear embossing powder.

Have a love's day!

Wednesday, February 05, 2014

Into the Abyss~ Altered Altoid Tin

Greetings, stampers! It's Amy here today, to share an altered Altoid tin I made into a fun little "shrine" of sorts on the inside.
I used a regular Altoids tin, and covered it with vintage book pages in layers (on both the inside and outside), using gel medium. When those were dry, I added a layer of copper paint, that had been thinned in half with water........to cover the entire tin and papers. This half paint mixture allowed the papers to show through, and gave a cool realistic metallic shimmer.
abyss bottom tin
For the outside of the tin, I added flicks of turquoise, olive green shimmer, and Mediterranean blue, and when that was dry, I added stamping with the Area 51 Warning  stamp.
abyss detail stamping
I added the whimsical diver stamp in two layers. One is stamped on cardboard, and fussy cut, and a second is stamped onto a library card, fussy cut, and added on top with foam adhesive. I then stamped the into the abyss stamp onto a small scrap, and adhered it, along with the metal wing (with a little bit of cheesecloth behind it),and chipboard star. I sprayed the outside with a protective gloss spray, and wrapped it with copper wire, attaching a clasp. tin inside, abyss, ALLassiter
 The inside was simple to complete, since it has already been covered with the vintage pages. To the top, I simply added some washi tape,a chipboard piece,button and a fussy cut vintage image of octopus tentacles. The wire from the front wraps to the inside, so it adds a nice line of color, as well. For the bottom, I adhered a playing card to the bottom, and a strip of washi; added cheesecloth/twine to the sides/edges....and then added a stamped and fussy cut Octopus/Cephalopod...to happily slink along the bottom edge. A die, and a star pin stamped image, and little sewing machine charm (because every octopus thinks about sewing) complete the project!
I am going to give this little tin to my husband, for his desk at work. Because...everyone needs a little whimsy during a work day. :)

Thanks for having a look today, and for more inspiration from me, visit my blog at www.sparklinggnome.com! Have a great rest of the week!

Supply List: 
Viva Las VegaStamps!: Whimsical Diver, Octopus/Cephalopod, Star Pin, Area 51 Warning.
Ink: Clearsnap Mix'd Media Inx (black, denim).
Paper: Vintage, digtal download-Stampington and Co.
Chipboard: UmWowStudio
Metal Wing: Tim Holtz

Celebrate

Hi! 
Here is Maria Potapovich (mellpellmell) at the post today))) Heheh)))

Sometimes in life the days when you want to think.
Just think and think. 
That's get some interesting thought in his head, and you go all day, two, three ... and think. 

Often you want to forget and get busy, but the idea does not let you go!

This work is about such a thought.

I wanted to depict my thoughts about human relationships on this mixed-media art page. 


Often every relations become incomprehensible and there is too much welter in it, but no one understands the reasons. 
And often it is NOT necessary to find out any reasons, because they do not exist! 

Sometimes you just need to accept the fact that your close people love you!  That's it!
 Sometimes happiness depends on this!


 For this art page I've used 3 stamps from the Plate 927 and 5 stamps from Plate 917 ))


So, what can I say?
Add some bright colors to your life and enjoy each other!
Celebrate EVERY day!

And... I'm going to hang this art page on the wall and a few days it will delight me)))

Luck to all!

Tuesday, February 04, 2014

With Love


Hello! Diana Fisher here with you today to share two cards I made using Viva Las VegaStamps. I have to admit that I made more than two as I was going along. More like four or five. I was trying to get the right color combinations and these two ended up being my favorite. 


To make this card, you would need the feather stamp and the with love stamp. I used a few different colors and kinds of ink to achieve this look, but everything is on one layer, which makes it an easy card to duplicate and customize. 

I used just the top edge of the feather stamp, giving the impression that the ink could have been brushed on (like paint). It is only after looking closely that you can tell it was a feather. 

For the first card, I used VersaMagic Chalk Ink (Thatched Straw), Heidi Swapp Dye Ink (Coral), VersaMagic Chalk Ink (Sea Breeze) and Heidi Swapp Dye Ink (Teal) for the feathers.

For the words, I used Heidi Swapp Dye Ink (Coral), Hero Arts (Pale Tomato), Heidi Swapp Dye Ink (Teal) and Heidi Swapp Dye Ink (Navy).

The reasons for the shifts in color was the keep the feathering to the side a shade off from the stamping of the words.


For this second card, I used VersaMagic Chalk Ink (Thatched Straw), Heidi Swapp Dye Ink (Coral), Hero Arts (Pale Tomato) and VersaMagic Chalk Ink (Red Magic) for the feathers.

For the words, I used a mix of VersaMagic Chalk Ink (Thatched Straw) and Heidi Swapp Dye Ink (Coral) for the first line, then Hero Arts (Pale Tomato) and VersaMagic Chalk Ink (Pixie Dust).


To add a bit of pop to the card, I replaced the 'o' in each of the words 'love' with an enamel dot. It was an easy enough addition and gives the eye something to focus on. 


Thanks for taking a peek at my cards today. I hope I've given you some ideas for fun ways to use color on your cards. 

Sunday, February 02, 2014

She Who Wears The Bigger Crown {Inspiration by DeeDee}

Hi hi hi folks!!

DeeDee here today to INSPIRE you for the February Challenge.


I have a lot of fun putting together these boards to inspire you each month, and now I'm excited to create a project based on one, too. I've put together the following Tag: 


The pink circles in the background are from the brand new Solid Color Wheel stamped in Design Memory Craft's melon gelato. I've layered on top of them the Large Doily and the Medium Doily. Our Man and Woman Symbol make the perfect non specific couple, and she got HER crown, and he got HIS. ;)


All black ink is Archival Ink by Ranger. The checker pattern is from the UmWowStudio Checker Board Mask, and has been drawn in with Sakura of America Micron. I finished off the tag with a little dymo label maker, May Arts ribbon and vintage measuring tape.

Now that I've INSPIRED YOU >>> Head over and join in on the challenge yourself! Some rubber and a spotlight on our blog is up for grabs♥

Saturday, February 01, 2014

February Challenge

Welcome to February 1st of 2014!

It's the month of love, and we're inspiring AND challenging you to create some looooove goodness.

Our mood board for this month :


Don't worry about stamping about ONLY love though --- you can take inspiration from anything! Crowns, Top Hats, bokeh, spots, doilies, tickets, paper clips, thread, coral, tan, pink, white, black, couples, potty people -- it's all on you!! Can't wait to see what you create for this month :)

Don't forget the rules:
-Create a new project based on our inspiration board
-Use at least one (but certainly more if you want) Viva Las VegaStamps! rubber stamps (please no competitor stamps on your entries)
-Post it to your blog with a link back to us
-Upload to our linky using your direct blog post link (You may also upload via facebook, flickr or other gallery)
You could win a Project Spotlight post on our blog + some new rubber of course!
And visit me back here tomorrow for my own inspirational piece!