Showing posts with label embossing folders. Show all posts

Tuesday, May 07, 2024

Tag Tuesday by Cathy N

 Good morning, Cathy here with a tag Tuesday for you.

I started out with some white tags, and I made 2 backgrounds. I used distress ink to make them. I really don't like these tags because they have a smoothness to them that doesn't like to take ink.


This is not what I had in mind when I started making this tag. I happen to get my grab bag when they had a sale on them today, so of course I had to play with my new stamps. 

I started stamping the Apocalypse and the Bullet Hole randomly around the tag. Next, I stamped the Gas Mask on some white cardstock and colored it with copic markers and cut out. 


I then saw this embossed brick paper that I had left over from another card I had made and thought that would be perfect for an apocalypse tag Tuesday. So, I cut it down, so it looked broken and then added the Gas Mask to the front of it. 
Lastly, I edged it all with some black ink.


                                                              Stamps Used:

                                                      19136 Apocalypse

                                                      19128 Gas Mask

                                                      19139 Bullet Hole

Monday, November 06, 2023

First winter card by Cathy N

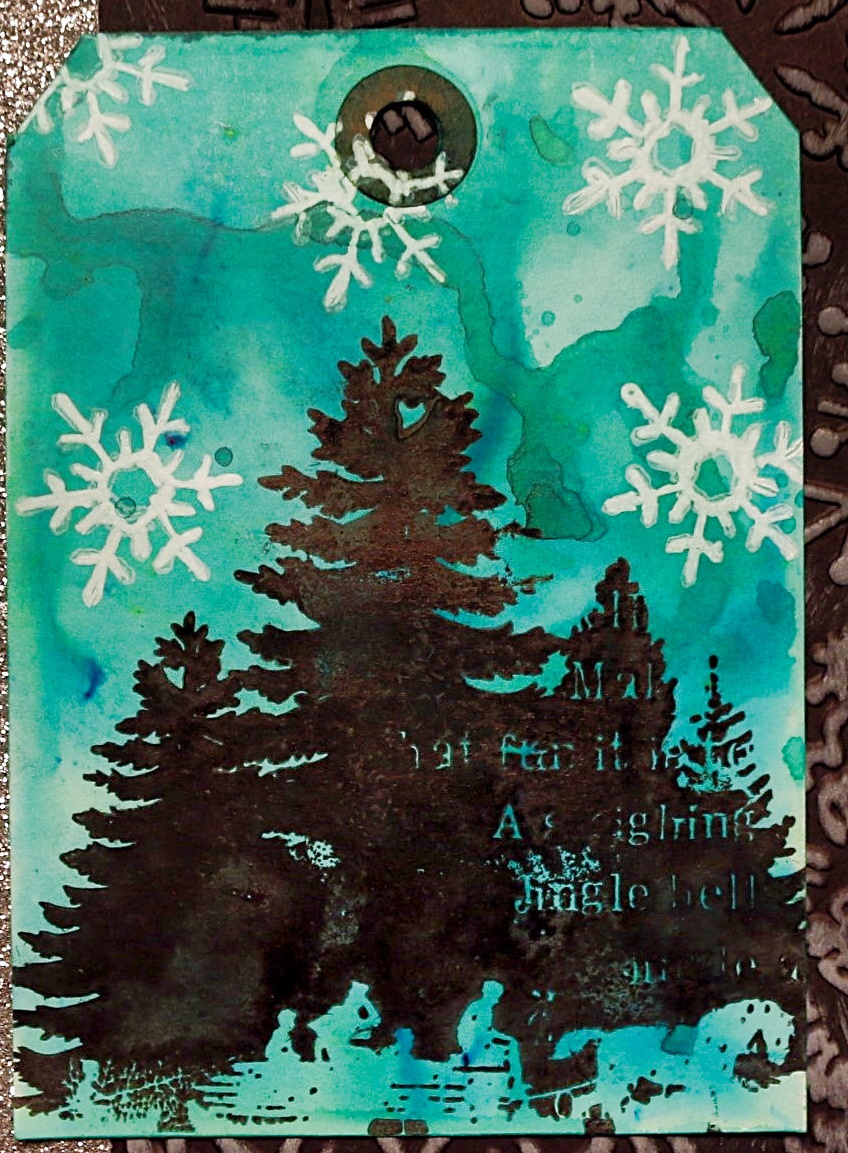
 Goodmorning, Cathy here with my first winter card of the season. 

I started out with a half of a tag and some Lavinia dinkles. I used pine green that gave me some greens and blues. 
I stamped Xmas silhouette collage on the bottom of the tag in black ink and then I used white ink and stamped medium snowflake on the top. 
I then embossed blacked cardstock with a snowflake embossing folder. I rubbed the white ink pad over top to highlight the snowflakes. Next, I added that to a white card base.


Lastly, I took a strip of sliver glitter paper and added to the side and then added the tag I made and that is my card. 

Stamps Used:


Thursday, May 28, 2020

Wrong is the Fun One

Hey VLVS fans!  As a history buff and one with a dark sense of humor, I thought I would create card using the Plague Doctor with a more positive spin of sorts. For this project, I used the Tim Holtz 3-D Alterations Mechanics Texture Fade, Tim Holtz Texture Fades Skull Damask, Distress Oxide Ice Spruce, confetti, clear plastic sheet, white heavy card stock, metallic card stock, Black permanent ink, Prima Metallic Wax Rich Copper, Small Oval die with another oval die one size up, Embossing Ink, Black Embossing powder, Time Holtz Big Talk stickers, double sided tape and foam tape.

This project is a double-layer shaker card, so the bottom level is the metallic card stock that is embossed with the Mechanics Texture Fade.  The top layer is embossed using the Skull Damask.  I rubbed the folder itself with Distress Oxide, inking only the raised areas, then I placed the white card stock inside to run it through my machine to emboss it.  Once the white top layer is embossed, I used one of my oval die cuts to cut out the center of the card (if you do not have a oval die, you can totally hand cut it out yourself).

Stamp in black permanent ink the Plague Doctor on white card stock.  Allow to dry before coloring the stamped image in with whatever pens, pencils or coloring implements you have.  Once colored, fussy cut the stamped image out.


Position the Plague Doctor within the open window, right sides facing out. Once the Plague Doctor is positioned in the center, glue him down, and then, cut a small square of the clear plastic that covers the hole end to end.  Once properly positioned, glue that down as well.


Cut out strips of foam tape and form a tight, enclosed square on the inside of the card.  Make sure the tape doesn't show from the outside, facing page.


To add a little more depth, use Metallique Rich Copper Wax on the background Mechanics embossed texture.  Wipe on and rub off to create some highlights and more interesting background.


Pour for of your confetti on the inside of the foam tape box.  Depending on your confetti, it might be less that a teaspoon to use.  In my example, I used a bit too much.  Remove the backing on the foam tape and carefully attach the background facing down onto the card, keeping everything aligned edge to edge.


Taking the two different sized oval dies, I cut a boarder with them, and embossed the surface using black embossing powder. Used embossing ink all around the edges, embossing the edges with black embossing powder. Finding the right sayings sticker, I adhered that to the bottom to complete the shaker card.

Monday, June 09, 2014

Birthday Cards made Easy

Hello again everyone!! It's me Tera here with another fun tutorial.
Today I am going to share this cute but simple card that I created for my cousin for her 13th Birthday! I know you wouldn't normally think Dragons for a girl, but Kenzi is extra awesome and sort of a tom-boy so I think she's like it, and this stamp is so adorable it can be used for boys or girls!!


Supplies Used:
VLVS:

Dragon on Egg 2 1/2 x 3

PanPastel in dark Blue
StazOn ink in Black
Adhesive
scissors
cardstock (black, green, White)
K &Co Adhesive Chipboard
Embossing folder (not sure of name)

To start, I took my roll of masking tape and traces two connecting circles to make the base of the card. then i trace 1 more circle that was separate.

after you cut your circles out (making sure you don't cut apart your connecting ones...see photo) fold your connecting circles in half. then fold the top part/circle of your card in half so that the circle touches the center fold line (this is the popped up part of your card)


next glue the extra circle to the bottom 1/2 of your folded circle on the front. Next take your PanPASTELS and color the edges


I then cut out a contrasting black circle which was slightly smaller and embossed it using an embossing folder that looked like dragon scales to me. After doing this I adhered it you the new front of the card


I stamped my dragon on white card stock, then colored using markers before cutting it out and gluing it to the front of the card


to finish everything off I added the chipboard stickers to help prop the card open and add a little extra visual interest

 Below you can see it from a few different angles : )


Thank you all for visiting!!
Don't forget about the June challenge board!!!


Wednesday, September 05, 2012

crazy friends cards

Happy Thursday! Today project are these 4 fun note cards featuring the images by Mary Vogel Lozinak. 


I ran 4 pieces of cardstock using the Tim Holtz Alterations Retro Cirque Retro texture fades by Sizzix, through the big shot. I then painted them in 4 different colors of craft paints. After that dried I did try to sand them a bit, but it didn't do much of a difference. I then took the Black Soot Distress ink pad and ran it over the cardstock. I poured clear UTEE over them and embossed. I then stamped different Mary Vogel Lozinak images on white cardstock with black Versafine ink pad. Embossed with Ultra high gloss embossing powder. I colored the images with Artist Loft water color. I stamped and embossed the sentiments on white cardstock with black versafine ink pad and Ultra high gloss embossing powder. I attached sentiments to the embossed cardstock with Miracle tape. Also the embossed cardstock to Kraft card base with Miracle tape. The Mary Vogel Lozinak images are attacked with foam tape.


Items used
cardstock
Retro Cirque texture fades
craft paint
Versafine ink pad
Black Soot Distress ink pad
UTEE
Kraft card base
Artist Loft water colors
water brush

stamps used


Friday, August 17, 2012

You're a doll

Today's post I thought I do some art dolls. The bodies are tags that I die cut using the Tags Sizzix die, with using paper that embossed with the Cuttle bug embossing folders in the retro 50's that  I was RAK'ed . I looked through my Viva Las Vegastamps! for the right stamps to use for them.


This one I  painted the tag with a little bit of french vanilla craft paint and a little white craft paint. let it dried and then sanded so the design would pop. The legs are from Grunge Board Elements. One is an arrow and one is a hinge that I chopped the decorative bits off. I glued the arrows with Aleen's tacky glue. I find that is the only glue that the grunge board will work. The wings are from the negative from the same Grunge board set, using it in a stencil as you will see in the rest of the art dolls.  I set the now stencil over a piece a paper. I then traced the designs I wanted to use, just to make it easier to cut out so I can see. I took some of my Lindy's starburst sprays and sprayed some color on the paper. I cut them out and glued them on the back of the tag.  I stamped Victorian lady with flowered hat on white card stock with a brown Vivid ink pad. Colored her with my Prisma color pencils. 


The wings for her I used a red and yellow sprays, making some bits orange. Again I stamped Victorian lady with hat on Brown Vivid ink pad. colored her with prisma color pencils. The legs are arrows that I painted black. Glued the wings and head with glossy accents and the legs with Aleen's tacky glue.


This one is probably my Favorite of the 4. I stamped the Smiling baby on kromecote using a Versafine Black ink pad. Embossed using Ultra High Gloss Embossing powder. Colored the face using Prisma colored pencils. The crown is another part of the elements grunge board that I was now using as a stencil. I sprayed some black and other colors. The arms and legs are Grunge board arrows, that I painted black. They are actually 2 different sets. one is dots and the other is swirls.


This one is another favorite. Used the same smiling baby. I put a different crown on her. Glued the last of my grunge board arrows on her too. I stamped the Striped butterfly using black Versafine ink pad on the kromecote. I pained the wings using the Artist loft watercolors. I then added some shimmer using the pearlesent water colors.


Items used
Brown vivid ink pad
craft paints
cardstock
embossing folders
various sprays
Grunge board elements
Versafine Black ink pad 
Prisma color pencils
Glossy accents
Aleen's tacky glue

Stamps used: